Tutorials
A Comprehensive Guide to Laser Engraving Slate
Aug
Estimated reading time: 8 minutes
Key Takeaways
- Preparation is Crucial: The quality of your engraving depends heavily on starting with a flat, clean piece of slate. Always check for warps and clean the surface with isopropyl alcohol or mild detergent before engraving.
- Optimize for Contrast: For the brightest, most vibrant engraving, apply a thin, even coat of clear spray lacquer before lasering. This technique creates a whiter mark and helps seal the engraved dust.
- Test, Don’t Guess: There are no universal settings for slate. Always run a power and speed test grid on a scrap piece from the same batch to find the perfect settings for your specific material and laser.
- Finishing Makes the Difference: After engraving, clean the dust away first with a soft brush, then a damp cloth. Finish by applying food-safe mineral oil to the entire surface to dramatically deepen the slate’s color and make the engraved design pop.
Table of Contents
- Preparing Slate for Flawless Engraving
- Optimal Laser Settings for Slate
- Post-Engraving Cleaning and Finishing
- Conclusions
- Frequently Asked Questions
Discover the art of laser engraving slate, a unique material that yields beautiful, high-contrast results. This guide will walk you through everything from selecting the right slate to dialing in your settings and applying finishing touches. Whether you’re a hobbyist or a professional, these tips will help you master the process and create impressive, high-quality engraved slate products.
Preparing Slate for Flawless Engraving
The success of your slate engraving project is often decided before the laser even fires up. Proper preparation is not just a preliminary step; it is the foundation upon which a crisp, high-contrast, and professional-looking design is built. Skipping these crucial preparations can lead to inconsistent results, blurry details, and wasted material. Taking the time to properly select, clean, and prepare your slate will pay dividends in the final quality of your work.
The first and most critical step is the selection of your raw material. Slate is a natural, metamorphic rock, which means it is formed in layers. This inherent characteristic results in pieces that can vary significantly in thickness, texture, and, most importantly, flatness. The focal point of a laser beam is incredibly precise, often measured in fractions of a millimeter. If your piece of slate is warped or uneven, the distance between the laser lens and the slate surface will change as the laser head moves across the design. Areas that are slightly higher will be too close, and areas that are lower will be too far from the perfect focal point. This deviation results in a loss of power density, causing blurry lines, incomplete engraving, and a noticeable lack of consistency across the piece. Before you begin, place your slate on a known flat surface, like the bed of your laser or a workbench. Check for any rocking or wobbling. For larger pieces like platters or signs, you can use a straightedge to identify any significant high or low spots. While minor surface texture is part of slate’s natural charm, a piece that isn’t fundamentally flat is a poor candidate for detailed engraving.
Once you have selected a suitably flat piece, the next ritual is a thorough cleaning. Slate is notoriously dusty, and pieces often arrive from suppliers covered in fine slate dust, oils from handling, and other residues. These contaminants can interfere with the laser’s ability to interact cleanly with the surface, potentially causing spots of poor engraving or discoloration. To clean the slate, use a lint-free cloth, such as a microfiber towel, to avoid leaving behind fibers that could be ignited by the laser. For the cleaning solution, you have two excellent options:
- Isopropyl Alcohol (IPA): A high-concentration IPA (90% or higher) is ideal. It is a fantastic degreaser, effectively removes fingerprints and oils, and evaporates very quickly without leaving any residue.
- Mild Detergent: A simple solution of warm water with a small drop of dish soap also works well. If you use this method, it is absolutely critical to rinse the slate thoroughly and allow it to dry completely before taking it to the laser. Any residual moisture can cause inconsistent engraving and steam, which can deposit onto your laser’s lens and mirrors.
Wipe the surface gently but firmly, ensuring you cover the entire area you intend to engrave.
For those seeking to achieve maximum contrast and a bright, almost white engraving, there is an optional but highly recommended pre-treatment step: applying a thin coat of clear spray lacquer. This technique works by creating a masking layer. When the laser hits the surface, it cleanly ablates the thin layer of lacquer and fractures the top layer of the slate beneath it. The intense, localized heat of the laser reacts with the slate dust and the lacquer particles, creating a chemical reaction that results in a significantly brighter mark compared to untreated slate. It also helps to “lock in” the light-colored dust created during the engraving process, preventing it from being blown away or wiped off. To use this method, choose a clear spray lacquer, sealer, or varnish—a matte or satin finish often looks more natural than a high gloss. In a well-ventilated area, hold the can 10-12 inches from the slate and apply one single, thin, and even coat. A thick coat will result in a gummy engrave and excessive fumes. Allow the lacquer to cure completely as per the manufacturer’s instructions before engraving.
Finally, and most importantly, always test your settings. Every piece of slate is unique, with variations in density and composition that affect how it reacts to the laser. This is especially true if you have used the lacquer pre-treatment method, which will require different settings than raw slate. Before running your final design, use a scrap piece from the same batch or the unseen back of your workpiece to run a power and speed test. This test should include a small grid of squares with varying settings, as well as fine text and a small filled shape. This allows you to dial in the perfect settings for crisp lines and evenly filled areas, ensuring your final product is flawless. This simple, five-minute test is the ultimate insurance policy against ruining a beautiful piece of slate.
Optimal Laser Settings for Slate
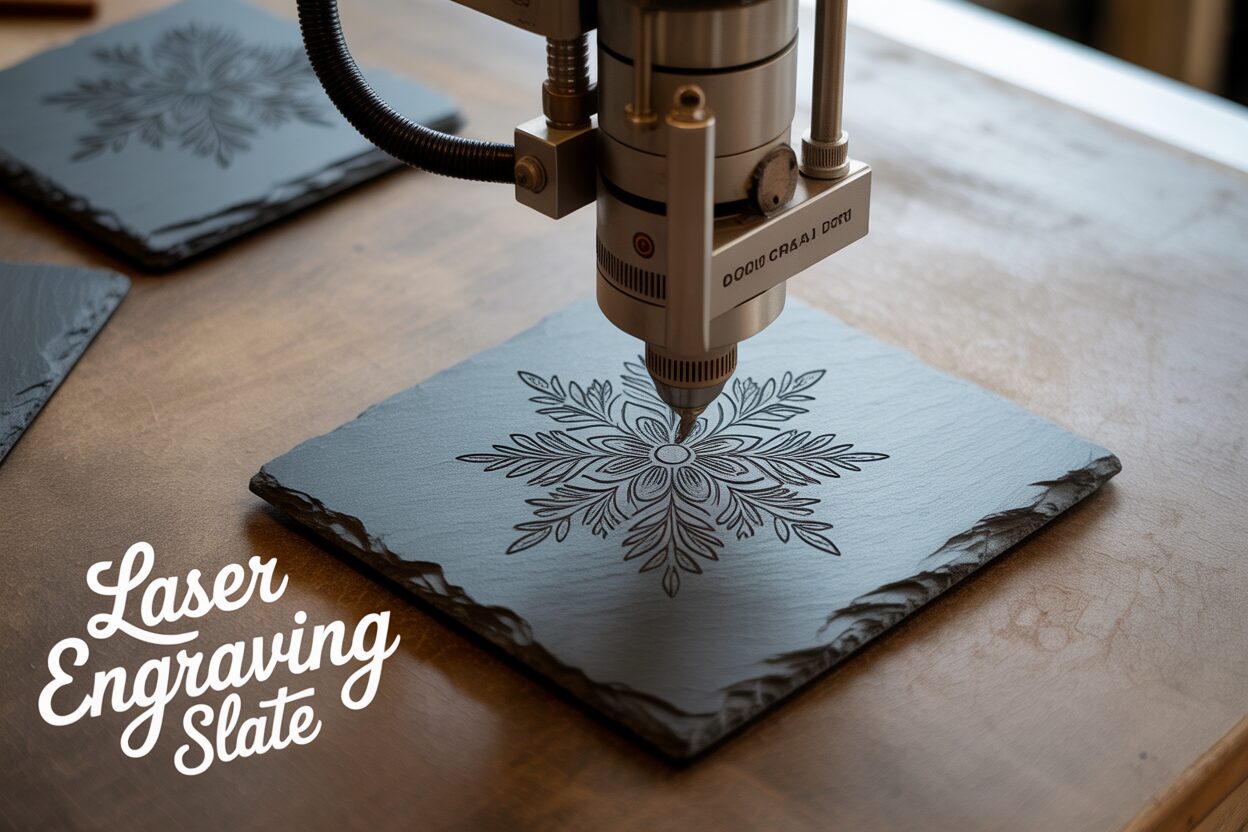
With your slate selected and prepared, the next step is to translate your digital design into a physical reality by dialing in the optimal laser settings. This is where art meets science. Unlike wood, which is burned by the laser, slate is fractured. The intense, focused heat from the laser beam causes micro-fractures on the surface, which reveals the lighter-colored material underneath. Achieving the perfect bright, crisp mark is a balancing act between three key parameters: power, speed, and interval. While CO2 lasers are excellent for this task, the accessibility and capability of modern diode lasers make them a popular and highly effective choice for hobbyists and small businesses looking to master laser engraving slate.
The Three Pillars of Slate Engraving Settings
Understanding how power, speed, and interval interact is fundamental to success. Think of them as a triangle where adjusting one side requires you to consider the other two. For a typical diode laser for slate, you will find that a relatively high power and low speed combination yields the best results.
- Power: This setting controls the energy output of the laser beam. For slate, you generally need sufficient power to create the desired micro-fractures. Too little power will result in a faint or non-existent mark. You will almost always be operating in the upper range of your laser’s power capacity, typically between 60% and 100%. The goal is to use just enough power to get a bright white mark; excessive power doesn’t necessarily make it “whiter” and can sometimes reduce clarity on very fine details.
- Speed: This determines how fast the laser head moves across the slate. Speed has an inverse relationship with energy delivery; the slower the speed, the more time the laser has to transfer heat to a specific spot, resulting in a more pronounced and brighter engraving. The trick is to find the “sweet spot” that gives you a brilliant mark without being unnecessarily slow.
- Interval (or Lines Per Inch – LPI): This setting applies to fill engraving and defines the spacing between each horizontal pass of the laser. A smaller interval (which means a higher LPI) packs the lines closer together, creating a more solid and uniform filled area. For slate, a higher LPI of around 254 (which corresponds to an interval of 0.1 mm) or more is usually recommended to achieve a solid, bright white appearance and avoid visible scan lines.
Finding Your Starting Point and the Power of Testing
Every laser and every batch of slate is slightly different. Therefore, a universal “perfect setting” does not exist. However, we can provide a reliable starting point. For many common 10W diode lasers, a good baseline for slate coaster engraving settings would be a speed between 1000 mm/min and 3000 mm/min, with the power set between 80% and 100%. For more powerful 20W or 30W lasers, you can start with significantly higher speeds, perhaps in the 4000-8000 mm/min range.
To move from this baseline to your perfect setting, you must perform a material test, often called a test grid. This is the single most important step in this phase. Using software like LightBurn, create a grid of small squares on a scrap piece of slate. Assign a different speed to each column (e.g., 1000, 1500, 2000, 2500 mm/min) and a different power level to each row (e.g., 80%, 90%, 100%). After running the test, examine the results. You are looking for the square that produced the brightest, sharpest result at the highest possible speed to maximize your efficiency. Also, be aware that different slate compositions, such as a darker black slate versus a lighter charcoal grey one, may absorb energy differently and require slight adjustments. Running a quick test grid on each new batch of material removes all guesswork and is your guarantee for consistent, professional-quality results every time.
Post-Engraving Cleaning and Finishing
Once the laser has completed its path and the hum of the machine subsides, your slate piece might look a bit underwhelming. It will be covered in a fine layer of light-colored dust, a direct byproduct of the laser fracturing the surface. This dust obscures the true contrast and sharpness of your work. The post-engraving process is where the design is truly revealed and the slate is transformed from a raw engraved object into a beautifully finished product. These final steps are not to be rushed; they are essential for achieving that stunning, high-contrast look that makes engraved slate so appealing.
The Crucial First Cleanse
The primary goal of the initial cleaning is to thoroughly remove all residual dust from the nooks and crannies of the engraved areas without scratching or marring the smooth, un-engraved surface. A two-step approach is most effective for this task.
- Dry Brushing: Start with a soft-bristled brush. A cheap, clean paintbrush, a soft-bristled toothbrush, or even a dedicated detailing brush works perfectly. Gently brush the entire engraved area. The goal here is to dislodge and sweep away the majority of the loose dust particles that are sitting on the surface and inside the engraving. This prevents the dust from turning into a slurry and smearing in the next step.
- Wet Cleaning: After the initial dry brushing, it’s time to remove the finest, most stubborn particles. Take a clean, lint-free microfiber cloth, dampen it with cool water, and wring it out well. Gently wipe down the entire slate surface. Alternatively, for items like coasters that can be fully submerged, you can simply rinse the entire piece under a gentle stream of cool running water, using your fingertips or a soft cloth to lightly scrub the engraved area. Knowing how to clean engraved slate at this stage is critical; be gentle but thorough. Afterward, pat the slate dry with another clean cloth or let it air dry completely. You will notice the engraving is now clean, but the overall look might still seem a bit muted or chalky.
Enhancing Contrast for a Professional Finish
This is the final, transformative step that makes engraved slate designs truly pop. Applying oil to the slate deepens its natural dark grey or black color, which dramatically increases the visual contrast with the light-colored, laser-etched design. The result is a rich, vibrant, and professional finish.
For this step, the go-to choice is mineral oil. It is inexpensive, readily available, and brings out the best in the stone. Crucially, if you are working on an item that will come into contact with food, such as a cheese board, serving platter, or even coasters, you must use a food-safe mineral oil. This is non-negotiable for safety and product quality.
The application is simple:
- Apply a small amount of mineral oil to a clean, lint-free cloth.
- Work the oil into the entire surface of the slate—both the engraved and un-engraved areas—using small, circular motions. You will immediately see the slate darken and the design become brilliantly pronounced.
- Let the oil sit and soak into the stone for 10-15 minutes.
- Using a new, clean, dry cloth, thoroughly buff the entire surface to remove any excess oil. This is important, as you want to leave behind a rich, satin sheen, not a greasy, oily surface.
This final finishing touch not only elevates the aesthetic but also helps to condition and protect the slate. For intricate designs with fine text, the oil makes the details crisp and legible. For bold logos or graphics, it creates a powerful and striking statement piece. Your slate is now complete, with its design beautifully and permanently showcased.
Conclusions
Laser engraving slate is a rewarding process that combines natural stone with precise technology. By properly preparing your material, using the correct settings, and carefully cleaning the final piece, you can produce professional-grade items. Experiment with different engraved slate designs to unlock new creative possibilities and enhance your product offerings. Start your slate engraving project today and see the stunning results for yourself.
Frequently Asked Questions
Q: Why is my engraved slate blurry or inconsistent?
A: The most common cause is the slate not being perfectly flat. A warped or uneven surface causes the distance between the laser and the slate to change, moving it in and out of the optimal focal point. This leads to blurry lines and inconsistent power delivery. Always check your slate on a flat surface before you begin.
Q: What is the best way to clean slate before engraving?
A: Use a lint-free cloth with either high-concentration isopropyl alcohol (90%+) or a mild solution of dish soap and warm water. Alcohol is preferred as it evaporates quickly and leaves no residue. If using soap and water, you must rinse the slate thoroughly and ensure it is 100% dry before engraving.
Q: How can I achieve a brighter, whiter engraving on slate?
A: For maximum contrast, apply a single, thin coat of clear spray lacquer or sealer to the slate and let it cure completely before engraving. This pre-treatment helps create a brighter reaction with the laser. Combine this with laser settings that use high power and a relatively slow speed.
Q: What should I do after the engraving is finished to make the design stand out?
A: First, clean off all the engraving dust using a soft brush followed by a wipe with a damp, lint-free cloth. Once completely dry, apply a coat of food-safe mineral oil to the entire surface. This darkens the slate and dramatically increases the contrast, making the light-colored engraved areas pop.
Q: Are there universal laser settings that work for all slate?
A: No. Due to natural variations in slate density and composition, along with differences between lasers, you must always run a material test grid. A good starting point for a 10W diode laser is 1000-3000 mm/min at 80-100% power, but a test grid is the only way to find the perfect settings for your specific material.
Block "subscribe-popup" not found