Tutorials
Mastering Laser Cutting Wood: Techniques and Projects
Jun
Estimated reading time: 12 minutes
Key Takeaways
- Material Selection is Crucial: Different wood types (Plywood, MDF, Balsa, Hardwoods) have unique properties affecting cut quality, charring, and fumes. Density, resin content, and grain pattern are key factors.
- Calibration is Key for Optimal Results: Master laser parameters like power, speed, frequency, and air assist. Systematic test cuts are essential to fine-tune settings for specific wood types and thicknesses.
- Design for Laser Capabilities and Material Strength: Utilize vector design software and consider kerf compensation, material strength (especially grain), and detail level for successful projects. Post-processing steps enhance the final product.
- Explore Advanced Techniques: Expand your projects with inlays, living hinges, and 3D stacked layers, understanding the specialized design and setting requirements for each.
- Prioritize Safety Above All: Always ensure robust ventilation, constant supervision, readily available fire safety equipment, and awareness of material-specific hazards to operate the laser safely.
Table of Contents
- Choosing the Right Wood for Laser Cutting
- Calibrating Your Laser Cutter for Wood
- Designing and Executing Laser Cut Wood Projects
- Advanced Techniques and Safety Protocols
- Conclusions
- FAQ
Dive into the world of laser cutting wood. This article explores essential techniques, material selection, and optimal machine configurations. We’ll guide you through understanding different wood types and how to adjust your ‘wood laser cutter settings’ for perfect cuts, helping you master your craft and create beautiful ‘laser cut wood projects’.
Choosing the Right Wood for Laser Cutting
Selecting the right wood is a cornerstone of successful laser cutting, directly influencing the ease of processing, the final appearance, and the structural integrity of your projects. Not all woods are created equal when faced with a concentrated beam of light, so understanding their properties is key.
Popular Wood Choices for Laser Cutting
Different projects call for different wood types, each with its unique advantages and disadvantages:
- Plywood: A versatile and popular choice, especially Baltic Birch plywood.
- Pros: Generally affordable, available in various thicknesses, relatively stable, and offers a good strength-to-weight ratio. Laser-friendly plywoods (like Baltic Birch made with exterior grade glue) cut more cleanly.
- Cons: The glue layers can be problematic. Some glues cause excessive charring, release harmful fumes (avoid formaldehyde-based interior glues if possible), or are simply too tough for lower-power lasers. Internal voids or inconsistencies in core layers can lead to uneven cuts.
- MDF (Medium Density Fiberboard): An engineered wood product made from wood fibers, wax, and resin.
- Pros: Extremely consistent in density and thickness, no grain direction (cuts uniformly), smooth surface ideal for painting, and cost-effective.
- Cons: Produces fine, pervasive dust when cut, which can clog filters and requires good ventilation. Edges char significantly and are not as aesthetically pleasing as natural wood. Contains resins that can release formaldehyde, so excellent ventilation and extraction are paramount.
- Balsa Wood: A very lightweight hardwood.
- Pros: Incredibly easy to cut, requiring minimal laser power. Ideal for architectural models, RC planes, and delicate crafts.
- Cons: Extremely soft and fragile, dents and breaks easily. Its porous nature can sometimes lead to more charring than expected if settings aren’t optimized.
- Solid Hardwoods (e.g., Cherry, Walnut, Maple, Alder):
- Pros: Offer beautiful natural grain, rich colors, and a premium feel. Cherry produces a lovely warm tone and engraves well. Walnut offers a striking dark appearance with excellent engraving contrast. Maple is light-colored and dense, engraving with subtle contrast. Alder is known for cutting and engraving very cleanly with a dark, rich mark.
- Cons: More expensive than engineered woods. Density varies between species and even within a single board, which can affect cutting consistency. Higher density generally requires more laser power and slower speeds. Some oily or resinous hardwoods can produce more smoke or flare-ups.
Key Wood Characteristics and Their Impact
Beyond the type of wood, specific characteristics play a crucial role in how it responds to the laser.
Density and Resin Content
The density of the wood is perhaps the most critical factor. Denser woods, like oak or walnut, absorb more laser energy and require higher power settings or significantly slower cutting speeds compared to less dense woods like balsa or poplar. Uneven density, such as knots or varying growth ring thickness, can result in inconsistent cut depth. Woods with high resin content, like pine, tend to produce more smoke, flare-ups, and leave a sticky residue on the cut edges and potentially on the laser optics. These resins can also cause darker, more pronounced charring. When cutting resinous woods, optimized air assist and frequent lens cleaning become even more important. Some woods are naturally oily, which can similarly affect the cutting process, potentially requiring adjustments to power and speed to achieve clean results.
Grain Pattern
While MDF has no grain, the grain pattern in natural woods significantly affects the aesthetic outcome, especially for engraving. Engraving along the grain versus across it can yield different shades and textures. While generally less impactful on the cut-through process than density, very pronounced or irregular grain patterns with distinct hard and soft sections might exhibit slight variations in cut edge quality. For intricate cut-out designs, a wood with a finer, straighter grain may be preferable for visual consistency and to minimize the risk of small, delicate parts breaking along a prominent grain line.
Navigating Wood Thickness and Laser Settings
The thickness of your chosen wood directly dictates the feasibility and approach to laser cutting. Most hobbyist lasers (40-60W) can comfortably cut woods up to 6mm (1/4 inch), while more powerful industrial lasers can handle significantly thicker materials. When selecting wood, consider your laser’s maximum cutting capacity. For thicker materials:
- Power and Speed: Higher power and slower speeds are fundamental. There’s a delicate balance; too much power can cause excessive charring and flaming, while too little speed won’t cut through.
- Multiple Passes: For wood nearing your laser’s thickness limit, or to achieve cleaner edges on very thick pieces, using multiple passes at a moderate power and faster speed per pass is often better than a single slow, high-power pass. This reduces heat buildup and charring.
- Focal Point: For thicker materials, adjusting the focal point to be slightly lower than the surface (e.g., one-third into the material thickness) can help maintain a consistent kerf through the entire depth.
- Air Assist: Indispensable for any wood cutting, but absolutely critical for thicker pieces. A strong, directed airflow clears debris, reduces charring, extinguishes flames, and improves cut quality.
Remember that achieving a clean cut through thicker wood often requires more testing and refinement of settings than with thinner stock.
Tips for Sourcing Quality Wood
The quality of your raw material significantly impacts your final product.
- Specialty Suppliers: Look for suppliers specializing in “laser-grade” or “laser-friendly” materials. These woods, especially plywoods like Baltic Birch, are often manufactured with glues that cut cleaner and are flatter and more consistent in thickness.
- Local Lumberyards and Hardwood Dealers: Excellent sources for solid hardwoods. Inspect pieces carefully for flatness, excessive knots, cracks, and signs of internal stress (bowing, cupping, twisting).
- Online Retailers: Offer a vast selection but prevent pre-purchase inspection. Stick to reputable vendors with good reviews, especially those catering to crafters and laser users.
- Key Checks:
- Flatness: Warped wood leads to inconsistent focus and incomplete cuts.
- Uniformity: Consistent thickness is crucial for predictable cutting. For visible projects, consistent color and grain might be important.
- Moisture Content: Wood that is too damp will absorb more laser energy inefficiently, while overly dry wood can be brittle. Store wood in a stable environment.
- Plywood Glue: If unsure, ask about the glue type in plywood. Exterior grade glues are generally better for laser cutting than interior glues, which may contain formaldehyde and not cut as cleanly.
Investing time in selecting and sourcing high-quality wood will save you considerable frustration during the cutting process and result in more professional-looking projects. Always conduct small test cuts on any new batch or type of wood to dial in your laser settings before committing to a large project.
Calibrating Your Laser Cutter for Wood
Proper calibration of your laser cutter is non-negotiable for achieving clean, precise, and repeatable results when working with wood. Without it, you’ll waste material, time, and potentially damage your project or even your machine. Optimizing settings involves understanding how each parameter interacts with different wood types and thicknesses.
Key Laser Cutter Parameters for Wood
Achieving the perfect cut or engraving on wood relies on a delicate balance of several key settings. While your laser cutter’s manual will provide general starting points, fine-tuning is essential for each specific wood and application.
- Laser Power (%): This determines the intensity of the laser beam. Higher power delivers more energy, enabling deeper cuts or darker engravings. For cutting wood, you generally need enough power to vaporize the material efficiently. Too little power results in incomplete cuts, while too much can lead to excessive charring, flames, or a wider kerf (the width of the material removed by the laser). The power setting is highly dependent on the wood’s density, thickness, and resin content discussed in the previous chapter.
- Cutting Speed (mm/s or inch/s): This is how fast the laser head moves across the material. Slower speeds allow the laser beam to dwell longer on a specific spot, transferring more energy and resulting in deeper penetration. Conversely, faster speeds are used for lighter engraving or cutting thinner materials. The interplay between speed and power is crucial; a high power setting with a very slow speed can cause significant burning, whereas high power with high speed might only score the surface.
- Frequency (PPI/Hz – Pulses Per Inch or Hertz): For CO2 lasers, the beam is often pulsed rather than continuous. Frequency determines how many laser pulses occur per inch of travel (PPI) or per second (Hz). Higher frequencies generally produce a smoother cut edge, as the individual pulses overlap more. This can be beneficial for achieving a clean, almost flame-polished edge on some woods. However, very high frequencies can also generate more heat, potentially increasing charring on sensitive woods. Lower frequencies might be used for specific engraving effects or when cutting certain materials that respond better to more distinct pulses. For wood, a mid to high range is often preferred for cutting, while engraving settings can vary more widely.
- Air Assist Pressure (PSI or Bar): Air assist directs a stream of compressed air coaxial with the laser beam, playing multiple critical roles. Firstly, it clears smoke and debris from the cut path, allowing the laser to work efficiently. Secondly, it helps to extinguish any flames that may ignite on the wood’s surface, significantly reducing charring. Thirdly, it can cool the material slightly, preventing excessive heat buildup. The optimal pressure varies; too little won’t be effective, while too much (especially with very fine, lightweight materials) could potentially shift the material or cause excessive cooling, hindering the cut on thicker woods. For most wood cutting, a moderate to high pressure is beneficial.
Conducting Test Cuts: The Path to Optimization
The most reliable way to determine the “best laser for cutting wood” settings for your specific machine, wood type, and thickness is through systematic test cuts. This process involves creating a series of small, identical shapes (squares or circles are common) and varying one parameter at a time while keeping others constant.
The Test Matrix Approach
Start with a small piece of the exact wood you intend to use for your project. It’s crucial that this test piece is the same type and thickness.
- Isolate Speed and Power for Cutting: Create a grid or a line of small squares (e.g., 10mm x 10mm). For the first row, set a starting power (e.g., 50%) and vary the speed across the squares (e.g., 10mm/s, 15mm/s, 20mm/s). For the next row, increase the power (e.g., 60%) and repeat the speed variations. Continue this until you find a combination that cuts cleanly through the material with minimal charring on the top and bottom surfaces and the edges. Label each test cut with its settings.
- Evaluate Cut Quality: Examine the edges. Are they smooth or ragged? Is there excessive charring (a wide, sooty black edge) or just a slight discoloration? Does the piece fall out easily, or is it still attached by a few fibers? The “best” setting is often the fastest speed and lowest power that achieves a clean, consistent cut-through. This minimizes heat input and wear on your laser tube.
- Refine with Frequency and Air Assist: Once you have a good power/speed starting point, you can conduct further tests to optimize frequency and air assist. Try a few variations around your chosen power/speed, adjusting PPI/Hz to see its effect on edge quality. Similarly, if your system allows, vary air assist pressure to observe changes in charring and flame suppression.
- Engraving Tests: For engraving, you’ll typically use lower power and higher speeds than for cutting. Create a test array of small filled squares or text with varying power and speed combinations to find the desired depth and darkness without excessive burning. Frequency can also play a bigger role in engraving appearance.
Keep meticulous records of your settings for each wood type and thickness. A labeled sample board or a digital logbook with photos can be invaluable for future projects.
Troubleshooting Common Issues
Even with careful calibration, issues can arise.
- Excessive Charring/Burning:
- Cause: Power too high, speed too slow, insufficient air assist, high resin content in wood.
- Solution: Decrease power, increase speed, increase air assist pressure/ensure nozzle is clear and properly aligned, or try multiple faster passes. For resinous woods, test on a scrap to see if it’s manageable.
- Incomplete Cuts:
- Cause: Power too low, speed too high, laser optics dirty or misaligned, material warped or not flat, incorrect focal distance, material thicker than expected or denser in spots.
- Solution: Increase power, decrease speed, clean lenses and mirrors, check mirror alignment, ensure material is flat and focus is correct (re-focus if necessary). Consider multiple passes. If density varies, you may need a setting that can cut through the densest part.
- Flames During Cutting:
- Cause: Insufficient air assist, cutting very resinous wood, power/speed settings creating too much heat buildup.
- Solution: Increase air assist significantly, ensure nozzle is close to the cut. Adjust power/speed (often increasing speed can help if power is appropriate). Never leave the laser unattended, especially if flames are a recurring issue.
- Wide Kerf or Ragged Edges:
- Cause: Poor focus, power too high for the material, incorrect frequency setting, or dull/dirty cutting lens.
- Solution: Re-check and adjust focal distance, reduce power, experiment with different frequency settings, clean the lens. A slightly lower focal point (into the material) can sometimes help with thicker woods.
Systematic testing and careful observation are your best tools for mastering laser cutter calibration for wood. Each machine and every piece of wood can have slight variations, so be prepared to fine-tune.
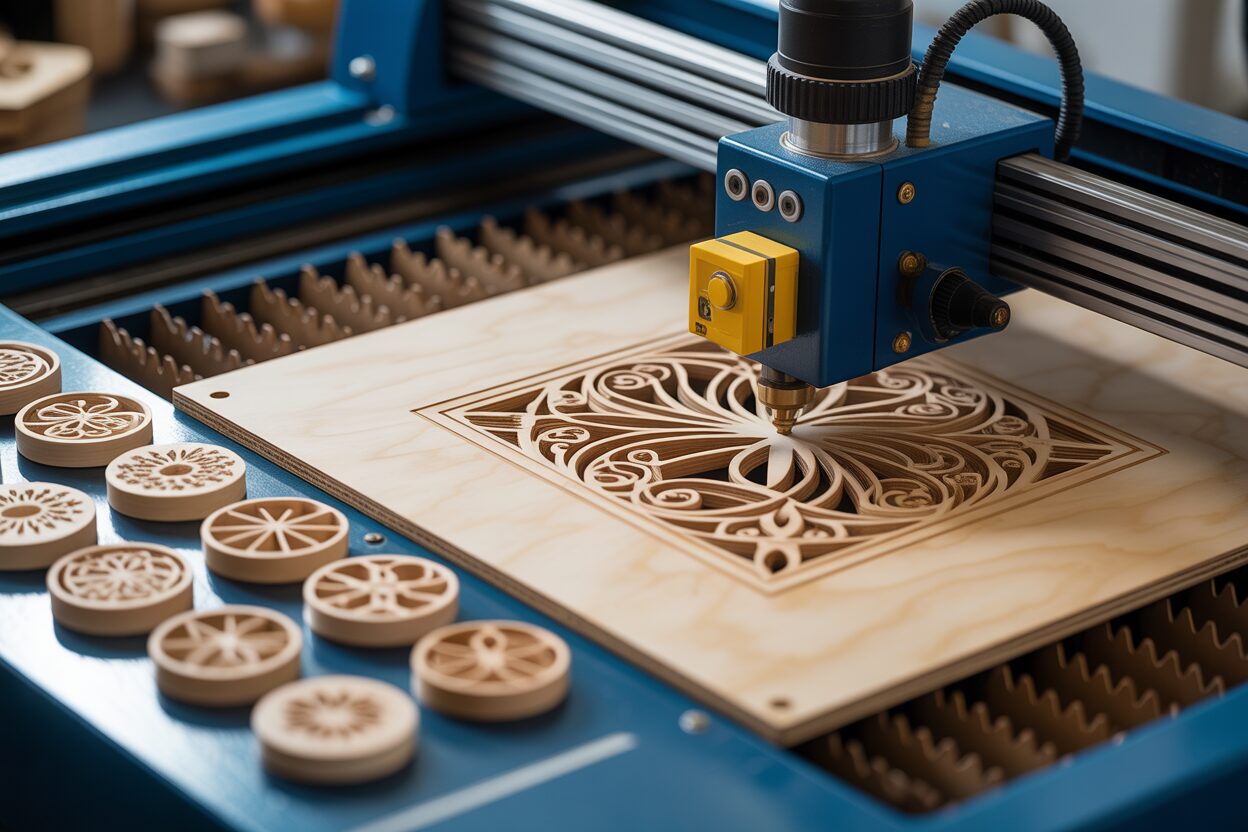
Designing and Executing Laser Cut Wood Projects
The journey from a digital concept to a tangible wooden creation is at the heart of laser cutting. This chapter bridges the gap between understanding materials and settings, and the practical application of designing and producing your own unique laser cut wood projects.
From Digital Blueprint to Physical Object: Design Software and Considerations
The foundation of any laser cut project is a digital design file, typically a vector graphic. Vector files (common formats include SVG, AI, DXF, PDF, CDR) define paths, lines, and curves mathematically, allowing them to be scaled without loss of quality and instructing the laser where to cut or engrave. Popular software choices for creating these designs include:
- Dedicated CAD/Vector Programs: Adobe Illustrator, CorelDRAW, Inkscape (free and open-source), Affinity Designer. These offer robust tools for creating intricate designs from scratch.
- CAD Software: AutoCAD, Fusion 360, SolidWorks. These are more engineering-focused but excellent for precise 3D modeling that can be converted into 2D cutting profiles, especially for projects requiring assembly.
- Laser Cutter Specific Software: Some laser cutters come with proprietary software (e.g., LightBurn, RDWorks) that can import various file types and also offer basic design capabilities alongside machine control.
When designing, always consider the capabilities of your laser and the chosen wood. Key design principles include:
- Kerf Compensation: The laser beam removes a small amount of material as it cuts, known as the kerf. This kerf width (typically 0.1mm to 0.5mm, but varies with material, thickness, and laser settings) must be accounted for, especially in projects with interlocking parts, inlays, or tight tolerances. For example, if you want a tab to fit snugly into a slot, the slot needs to be designed slightly wider, or the tab slightly narrower, by the kerf amount. Precise kerf measurement is done through test cuts – cut a square of known dimensions, measure it, and the difference divided by two (for each side) gives your kerf adjustment.
- Designing for Material Strength: Wood has grain, and its strength varies along and across the grain. Avoid overly thin or delicate elements, especially if they run perpendicular to the grain, as they can easily break during or after cutting. For structural pieces, orient the grain to maximize strength.
- Simplicity and Detail: Extremely intricate details can be lost or become fragile depending on the wood type (e.g., coarse-grained wood vs. MDF) and laser spot size. Test small sections of complex designs first.
- Raster vs. Vector Engraving: For engraving images or filled areas, you’ll use raster graphics (like JPEGs or PNGs). For cutting outlines or scoring lines, vector paths are essential. Most design software allows you to work with both.
Interaction of Materials, Settings, and Desired Outcomes
The choices made in the previous chapters regarding wood type, thickness, and laser settings directly influence how your design translates into a physical object. For instance, if you’re designing intricate jewelry from 3mm Cherry (a dense hardwood), your laser settings will require higher power and slower speed compared to cutting the same design from 3mm Balsa. The resulting edge charring will also differ, potentially requiring more post-processing for the Cherry. If your design incorporates living hinges (flexible sections made from a series of cuts), the chosen wood’s flexibility and the precision of your laser settings (power, speed, frequency) are paramount to prevent breakage. A design intended for 6mm plywood will likely need thicker connecting tabs and less fine detail than one for 1.5mm veneer, simply due to the material’s inherent strength and the laser’s ability to resolve detail at different thicknesses. The calibrated settings ensure that cut lines are clean, engraving is at the desired depth, and parts fit as intended, validating the effort spent in initial calibration.
Popular Laser Cut Wood Projects and Inspiration
The versatility of laser cutting wood lends itself to a vast array of projects:
- Intricate Jewelry: Earrings, pendants, and brooches with delicate patterns, often from thinner hardwoods or even specialized wood veneers.
- Custom Signage: Business logos, personalized nameplates, and decorative wall art, combining cut-out text and engraved graphics on various wood types.
- Decorative Boxes and Containers: Finger-jointed or tab-and-slot boxes are classic laser cutting projects, perfect for gifts or storage. Designing these heavily relies on accurate kerf compensation for a snug fit.
- Architectural Models and Miniatures: Balsa and thin plywood are ideal for creating detailed scale models.
- Home Décor: Coasters, ornaments, intricate trivets, layered art pieces, and custom photo frames.
- Educational Tools and Toys: Puzzles, construction kits, and learning aids.
Post-Processing: The Finishing Touches
Once your design is cut, some post-processing is often necessary to achieve a polished final product.
- Sanding: Laser-cut edges, especially on plywood or softer woods, can have some charring or a slightly raised “flash” from vaporized material. Light sanding with fine-grit sandpaper (220 grit or higher) can smooth edges and remove surface soot. Be gentle, especially with delicate pieces. Masking the wood surface with transfer tape before cutting can significantly reduce surface charring and smoke stains, minimizing the need for sanding.
- Cleaning: A damp cloth (for unsealed wood) or isopropyl alcohol (for sealed surfaces or removing resinous residue) can help clean away soot. For MDF, vigorous cleaning can damage the surface, so a light brushing or air blow-off is often better.
- Painting and Staining: Wood takes paint and stain well. You can paint/stain before or after cutting. Painting before can result in crisp, clean edges if the laser settings are optimized to minimize charring. Staining after cutting allows the color to penetrate the cut edges as well. Masking can be used to achieve multi-color effects.
- Sealing: Applying a clear sealant (lacquer, varnish, or wax) protects the wood, enhances its natural beauty, and makes it more durable.
- Assembly: For multi-part projects, wood glue is typically used. Clamps may be necessary to hold pieces together while the glue dries. Accurate design, including kerf compensation, is crucial for easy assembly.
Thoughtful post-processing elevates your laser-cut wood projects from simple cut-outs to refined, professional-quality items.
Advanced Techniques and Safety Protocols
Once you’ve mastered the fundamentals of material selection, calibration, and basic design, you can explore more sophisticated laser cutting capabilities to create truly impressive wood projects. Parallel to advancing your techniques, reinforcing safety protocols is paramount, as working with lasers and combustible materials like wood always carries inherent risks.
Elevating Your Craft: Advanced Wood Laser Cutting Techniques
Beyond simple cuts and engravings, your laser cutter can be employed for more complex constructions and effects:
- Creating Inlays: This technique involves cutting a pocket into a base piece of wood and then cutting a corresponding shape (the inlay) from a different type or color of wood to fit snugly into that pocket.
- Process: Carefully design both the pocket and the inlay piece, meticulously accounting for the laser kerf. The pocket needs to be cut slightly larger than the inlay, or the inlay slightly smaller than the pocket, by the kerf dimension of your specific laser and material combination to achieve a tight fit. Often, the inlay piece is cut with a slight outward offset and the pocket with a slight inward offset. The thickness of the inlay material should ideally match the depth of the pocket, or it can be slightly thicker and sanded flush after gluing.
- Considerations: Contrasting wood types (e.g., walnut inlaid into maple) produce striking visual effects. Precision in your ‘wood laser cutter settings’ and kerf measurement is absolutely critical for success.
- Engineering Living Hinges: A living hinge is a flexible section cut directly into a rigid material like wood, allowing it to bend. This is achieved by creating a specific pattern of cuts – typically long, thin parallel lines with small gaps, or more complex lattice patterns.
- Design: The effectiveness of a living hinge depends on the wood type (‘laser cutting wood thickness’ is crucial here – thinner is generally better), the density and length of the cuts, and the spacing between them. Plywood, especially aircraft or Baltic Birch, tends to work well due to its layered construction. Solid woods can be more prone to breaking.
- Application: Commonly used for creating curved book covers, flexible box lids, or unique decorative elements. Extensive testing of different cut patterns on scrap material is essential to find what works best for your chosen wood and desired flexibility.
- Building 3D Objects from Stacked Layers (Slicing): Complex three-dimensional forms can be constructed by laser cutting multiple 2D cross-sections (slices) of an object and then stacking and gluing them together.
- Workflow: This often starts with a 3D model, which is then “sliced” into layers using specialized software (e.g., Slicer for Fusion 360, or built-in functions in some 3D modeling programs). Each slice becomes a 2D cutting file.
- Tips: Thinner ‘laser cutting wood thickness’ allows for smoother curves and more detailed final shapes, but requires more layers and cutting time. Including alignment holes or markers in your design for each layer greatly aids in accurate assembly. Sanding the assembled object can further refine the 3D contours.
Non-Negotiable Safety Protocols for Laser Cutting Wood
While laser cutting wood is a rewarding process, safety must always be your top priority. Wood is combustible, and the laser process generates smoke and particulates.
Ventilation and Fume Extraction
Adequate ventilation is non-negotiable. The smoke produced from laser cutting wood contains fine particulates and volatile organic compounds (VOCs) which can be harmful if inhaled. Some woods, and especially the glues in engineered woods like MDF and plywood, can release more noxious fumes (including formaldehyde in some cases).
- Requirement: Your laser cutter must be connected to an efficient fume extraction system that vents directly to the outside. Never operate a laser cutter in an unventilated room or vent it back into the same space, even with an internal filter, unless that filter is specifically designed for wood fumes and regularly maintained/replaced.
- Maintenance: Regularly check and clean your exhaust ducting and fan to ensure optimal airflow. Clogged systems are ineffective and increase fire risk.
Fire Safety
Wood is flammable, and a laser beam is a concentrated heat source.
- Constant Supervision: Never leave a laser cutter unattended while it is operating, especially when cutting wood. Flare-ups can occur quickly.
- Air Assist: Ensure your air assist is always functioning correctly. It helps to suppress flames, clear debris, and improve cut quality. A faulty or weak air assist significantly increases fire risk.
- Fire Extinguisher: Keep an appropriate fire extinguisher readily accessible near the laser cutter. A CO2 extinguisher is often recommended as it doesn’t leave a residue that can damage the laser’s electronics, but an ABC dry chemical extinguisher is also effective on Class A (wood) fires. Know how to use it.
- Cleanliness: Keep the cutting bed and the area around the laser free of accumulated wood scraps and dust, which can act as fuel.
Material-Specific Hazards
Beyond general wood combustion, be aware of:
- Resinous Woods: Pines and other resinous woods can produce more smoke, flare-ups, and leave sticky residues.
- Engineered Woods: MDF and some plywoods contain glues and binders. Ensure good ventilation to deal with the fumes released from vaporizing these adhesives. Avoid materials containing PVC or chlorine, as burning them releases highly corrosive and toxic hydrochloric acid.
- Mirrors and Lens: Smoke and resin can deposit on laser optics, reducing efficiency and potentially causing damage. Regular cleaning as per your manufacturer’s guidelines is crucial.
Choosing a Laser for Advanced Projects and Enhanced Safety
When considering the ‘best laser for cutting wood’ for more complex ‘laser cut wood projects’ and with an eye towards safety, certain features become more important:
- Robust Fume Extraction System: Look for machines with well-designed, powerful built-in extraction capabilities or easy integration with external systems.
- Effective Air Assist: A system with adjustable pressure and a well-directed nozzle is superior.
- Safety Interlocks: All access panels should have interlocks that shut off the laser if opened during operation.
- Enclosed System: A fully enclosed system helps contain fumes and stray reflections.
- Emergency Stop: A clearly visible and accessible E-stop button is essential.
- Z-axis Travel and Autofocus: Useful for working with varying ‘laser cutting wood thickness’ and for techniques like stacked layers.
Investing in a machine with good safety features and capabilities not only protects you but also enhances your ability to execute advanced techniques reliably.
Conclusions
You’re now equipped with key knowledge for laser cutting wood. By understanding ‘types of wood for laser cutting’, appropriate ‘wood laser cutter settings’, and considering ‘laser cutting wood thickness’, you can tackle diverse ‘laser cut wood projects’. Continue exploring and refining your techniques to unlock the full potential of your ‘best laser for cutting wood’.
FAQ
Q: What types of wood are best for laser cutting?
A: Popular choices include plywood (especially Baltic Birch), MDF, Balsa wood, and solid hardwoods like Cherry, Walnut, Maple, and Alder. Each has unique properties regarding ease of cutting, charring, and aesthetics.
Q: How do I choose the right laser cutter settings for wood?
A: Optimize laser power, cutting speed, frequency (PPI/Hz), and air assist pressure. The best method is to conduct systematic test cuts on a scrap piece of the exact wood and thickness you plan to use, varying one parameter at a time to find the optimal combination for clean cuts and engravings.
Q: What are common issues when laser cutting wood and how do I troubleshoot them?
A: Common issues include excessive charring (reduce power/increase speed/air assist), incomplete cuts (increase power/decrease speed/check focus/clean optics), flames (increase air assist/adjust settings), and wide kerf/ragged edges (check focus/reduce power/adjust frequency/clean lens). Systematic testing and observation are key to troubleshooting.
Q: Is safety important when laser cutting wood?
A: Absolutely paramount. Wood is combustible and produces harmful fumes. Non-negotiable safety protocols include robust fume extraction directly to the outside, constant supervision, keeping a fire extinguisher nearby, and ensuring good air assist. Always be aware of material-specific hazards, especially with resinous or engineered woods.
Q: How can I improve the finish of my laser-cut wood projects?
A: Post-processing steps like light sanding to remove charring and smooth edges, cleaning with a damp cloth or isopropyl alcohol, and applying paint, stain, or a clear sealant can significantly enhance the final appearance and durability. Accurate design and kerf compensation are crucial for multi-part assembly.
Block "subscribe-popup" not found