Tutorials
Mastering 3D Illusion Laser Engraving on Wood
Jan
Estimated reading time: 8 minutes
Key Takeaways
- Grayscale is a Depth Map: 3D illusion engraving works by translating a grayscale image into varying laser power. Pure black creates the deepest burns, pure white leaves the surface untouched, and shades of gray create proportional depths.
- Material and Design are Critical: The best results come from using light-colored, tight-grained hardwoods like Basswood, Cherry, or Maple, paired with high-resolution (300+ DPI) grayscale files that feature smooth, gradual transitions.
- Calibrate Settings with Tests: Always use the “Grayscale” mode in your software. Before engraving the final piece, perform tests on scrap material to dial in the perfect combination of speed, power (min/max), and DPI for your specific laser and wood.
- Finish for Maximum Impact: After engraving, gently clean the surface with a soft brush and isopropyl alcohol. Never sand the engraved area. Apply a clear coat finish (like spray lacquer) to protect the piece and dramatically enhance the contrast, making the 3D effect pop.
Table of Contents
- The Art and Science Behind 3D Laser Engraving
- Choosing Your Canvas and Design
- The Engraving Process From Start to Finish
- Finishing Touches to Maximize the 3D Effect
- Conclusions
- Frequently Asked Questions
Dive into the fascinating world of 3D illusion laser engraving. This guide offers a complete walkthrough, from selecting the right materials and design files to mastering the engraving techniques. We’ll explore how to manipulate laser settings to create stunning optical illusions on wood, turning a flat surface into a piece of captivating laser art that seems to pop with depth.
The Art and Science Behind 3D Laser Engraving
The magic of 3D illusion laser engraving lies in its ability to deceive the human eye. Unlike traditional engraving that simply scratches or burns a design onto a surface, this advanced technique sculpts the material, creating a topographic map of light and shadow on a flat piece of wood. It is a masterful blend of digital art and precision engineering. The fundamental principle is surprisingly simple: the laser doesn’t just turn on and off; its power is meticulously modulated. By varying the intensity of the laser beam as it moves across the wood, we can create different shades and, more importantly, different physical depths. A higher power setting burns away more material, creating a deeper, darker mark. A lower power setting results in a lighter touch, barely altering the surface. When orchestrated correctly, this range of depths and shades tricks our brain into perceiving a three-dimensional object, complete with highlights, shadows, and contours, all on a completely two-dimensional plane.
Interested in more 3D Illusion? Check out our 3D Illusion laser file designs: Click here!
The Language of Grayscale
At the heart of every stunning piece of 3D laser art is a grayscale image. Think of grayscale not just as black and white, but as a language that communicates depth to the laser engraver. In 3d illusion laser files, this language is absolute. Pure black (hex code #000000) represents the maximum laser power, instructing the machine to burn the deepest and darkest. Conversely, pure white (hex code #FFFFFF) represents zero or minimal power, telling the laser to leave the wood’s surface untouched. Every shade of gray in between corresponds to a specific, proportional power level. A 50% gray pixel will command the laser to fire at half its maximum setting for that job, creating a depression half as deep as a black pixel. This pixel-by-pixel translation of shade to power is what allows for the smooth gradients and subtle transitions that make the 3D illusion so convincing. A well-prepared grayscale file is essentially a topographical depth map, where lighter areas are “mountains” and darker areas are “valleys.”
To truly appreciate this method, it’s helpful to contrast it with other common laser techniques.
- Traditional Line Engraving: This is a vector-based process, much like a pen plotter. The laser follows a defined path to draw lines. It’s excellent for outlining shapes, cutting out intricate patterns, or engraving text, but it doesn’t create shaded, volumetric effects. It defines the edges of an object.
- Laser Cutting: This technique uses the laser at a continuous, high-power setting to slice completely through the material. There is no variation in power; the goal is separation, not surface sculpting. It creates the silhouette.
- 3D Illusion Engraving: This is a raster-based process, where the laser moves back and forth, like an inkjet printer, firing at different power levels for each individual pixel. It doesn’t just define the edges or the silhouette; it fills the object with texture and perceived volume.
By harnessing the power of grayscale, we move beyond simple wood engraving designs. We transform a flat digital image into a tangible piece of laser art that invites touch and inspection. The subtle dips and rises carved into the wood catch the light in unique ways, creating a dynamic visual experience that changes depending on the viewing angle. This is how a standard 2D portrait can be transformed into a lifelike bas-relief, or a simple pattern can become an intricate, textured surface with stunning perceived depth.
Choosing Your Canvas and Design
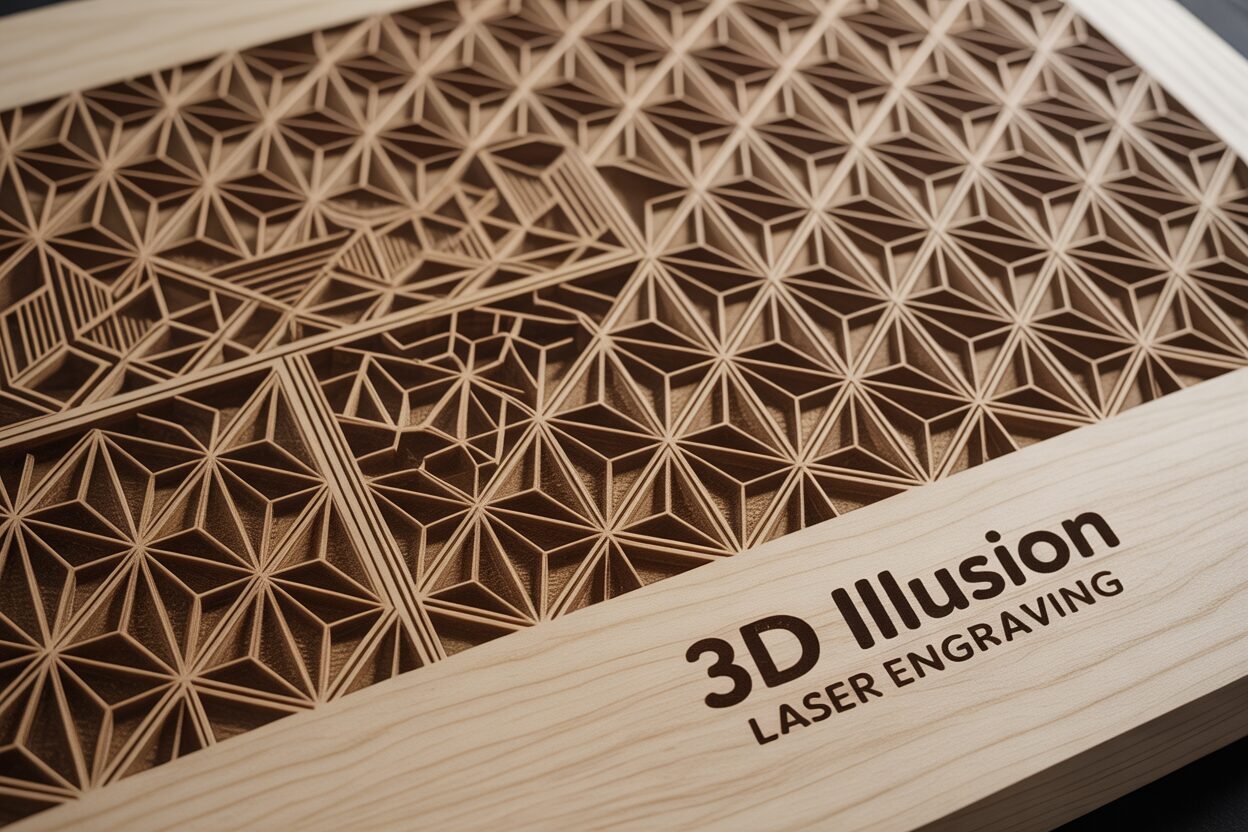
The success of a 3D illusion laser engraving project hinges on two critical choices made before the laser even warms up: the canvas you work on and the design you choose to bring to life. Just as a painter selects a specific type of canvas and pigment to achieve a desired effect, a laser artist must carefully consider their materials. The wood is not merely a substrate; it is an active participant in the creation of the illusion. The ideal choice is a light-colored hardwood with a tight, uniform grain. Woods like Basswood, Cherry, and Maple are perennial favorites for a reason. Their pale surfaces provide the highest possible contrast, allowing the deep, dark burns of the laser to stand out sharply against the untouched, light-colored wood. This wide dynamic range is essential for a dramatic and convincing 3D effect. Furthermore, a consistent and fine grain ensures that the wood’s natural texture doesn’t compete with the engraved details. Woods with a prominent, uneven grain, such as oak or pine, can create visual “noise” as the laser interacts differently with the hard and soft parts of the grain, disrupting the subtle shading that the illusion relies upon.
Finding and Vetting the Perfect Design
Once you have your canvas, you need the right blueprint. Not all wood engraving designs are created equal when it comes to the 3D illusion technique. The ideal source file is a high-resolution grayscale image that functions as a precise depth map. The key is to look for designs with a full, rich spectrum of grays, from near-white highlights to deep, near-black shadows.
Here’s what to look for when selecting or evaluating 3d illusion laser files:
- Smooth Gradients: The most convincing illusions are built on gradual transitions between shades. A design with smooth gradients, like the gentle curve of a cheek in a portrait or the rolling hills of a landscape, will translate into a physically smooth and visually realistic surface on the wood. Avoid images with sharp, jarring transitions between black and white, as these will simply look like deep cuts next to untouched wood.
- High Resolution: The laser is capable of incredible detail, but it can only replicate the information it’s given. A low-resolution image will result in a pixelated or “blocky” engraving, destroying the illusion of a continuous surface. Always aim for a source file of at least 300 DPI (dots per inch) to ensure crisp, clean results.
- Strong Depth Cues: Look at the design as a grayscale image. Does it already look three-dimensional? Good candidates for 3d laser engraving are images that have strong inherent depth, such as detailed portraits, intricate textures like dragon scales or carved stone, and images with clear foreground and background elements. Simple logos or line art are not suitable for this technique.
Before committing to a long engraving job, take a moment to critically assess your chosen design. Use the “squint test”: look at the image on your screen and squint your eyes. This blurs the fine details and allows you to see the overall composition of light and shadow. If a strong sense of depth remains, you have a promising candidate. You can also use image editing software to view the histogram. A design with a healthy, wide distribution of tones across the entire grayscale range is far more likely to produce a stunning piece of laser art than one with tones clustered only in the middle.
The Engraving Process From Start to Finish
With your chosen wood and high-quality grayscale file in hand, it’s time to translate your digital design into a physical piece of laser art. This process requires precision and a clear understanding of how your machine’s settings interact to sculpt the wood. The first step is to import your grayscale image into your laser control software, such as LightBurn or RDWorks. Ensure the image is sized correctly for your workpiece and positioned accurately within the software’s workspace. Before touching any settings, it’s crucial to select the correct processing mode. You must choose the “Grayscale” option in your layer or cut settings. This mode is the key to the entire process, as it instructs the software to modulate the laser’s power based on the black, white, and gray values of your image. Avoid using “Dithering” modes (like Jarvis, Stucki, or Floyd-Steinberg), as these are designed to simulate shades by varying the dot patterns, which will not create the smooth, contoured depth required for a convincing 3D illusion.
Calibrating Critical Laser Parameters
Now, we must define the parameters that will govern the engraving. These settings are interdependent and will vary significantly based on your laser’s wattage and the type of wood you are using. This is why a test run is not just recommended—it’s essential.
- Power: In Grayscale mode, you will set a Minimum and Maximum power. The software maps the grayscale spectrum to this range. Max Power (typically set between 60-80%) corresponds to pure black in your image and creates the deepest burn. Min Power (often set very low, from 0-5%) corresponds to pure white and should barely mark the wood, if at all. The range between these two values determines the overall contrast and depth of your final piece.
- Speed: Speed is inversely related to power’s effect. A slower speed allows the laser beam to dwell on a single spot for longer, burning away more material. For deep 3d illusion laser engraving, a slower speed (e.g., 100-300 mm/s) is generally required to achieve significant depth.
- DPI (Dots Per Inch) / Line Interval: This setting determines the resolution of the engraving, essentially controlling how much the engraved lines overlap. A higher DPI (300-600) creates a smoother, more refined finish with fewer visible lines, which is ideal for this technique. The trade-off is a significantly longer engraving time.
Before engraving your final piece, perform a test on a scrap of the exact same material. An excellent test is to create a small grayscale gradient bar in your software and engrave it using your proposed settings. This will show you exactly how your laser translates the different shades into depth and darkness. Examine the test piece. Is the lightest gray visible but not scorched? Is the darkest black deep and rich without excessive charring? Is the transition between shades smooth? Adjust your power and speed settings based on these results until you are satisfied with the dynamic range and clarity.
Once calibrated, secure your main workpiece firmly to the laser bed, ensuring it is perfectly flat. An uneven surface will lead to inconsistent focus and a ruined engraving. Double-check that your laser is focused precisely on the wood’s surface. Start the job and monitor it closely, especially during the first few minutes. Stay with the machine, observing the process. Ensure your air assist is functioning correctly to blow away smoke and debris, which prevents flare-ups and results in a cleaner cut. Watching your design emerge from the wood, line by line, as the laser meticulously carves depth and shadow, is where the science of settings transforms into the magic of art.
Finishing Touches to Maximize the 3D Effect
Once the laser has completed its final pass, your project isn’t quite finished. It emerges from the machine holding immense potential, but it’s often clouded by a layer of smoke and resin residue. This cleaning and finishing stage is not just about tidiness; it’s a critical step that can dramatically enhance the perceived depth of your work, transforming a good engraving into a breathtaking one. The first order of business is to gently clean the surface. The delicate peaks and valleys you’ve created are fragile and can be easily damaged. Start with the least aggressive method: use compressed air to blow away any loose particles and dust. Next, use a soft-bristled brush, like a nylon craft brush or a new toothbrush, to gently scrub the surface in small circular motions. This will dislodge the majority of the sticky residue without abrading the fine details. For stubborn soot, particularly in the deepest crevices, lightly dampen a lint-free cloth or a cotton swab with isopropyl alcohol. The alcohol is an effective solvent that evaporates quickly, minimizing the risk of raising the wood grain, which can happen with water. Gently wipe away the remaining residue, taking care not to soak the wood.
Selecting a Finish to Amplify Contrast
With the surface clean and dry, you’ll immediately notice an improvement in clarity. However, the application of a proper finish is what truly makes the 3d laser engraving pop. A finish serves two purposes: it protects the wood from moisture and dirt, and more importantly for our purposes, it deepens the color of the wood, saturating the burned areas to a richer, darker tone while making the lighter, un-engraved wood appear more vibrant. This boost in contrast is the key to maximizing the three-dimensional illusion. The choice of finish depends on the desired look and level of protection.
- Spray Clear Coats (Lacquer or Polyurethane): This is often the best choice for highly detailed engravings. Available in matte, satin, or gloss sheens, spray finishes are easy to apply in thin, even coats that won’t pool in the fine details of your design. A satin finish is often ideal as it enhances contrast without creating excessive glare that could distract from the illusion.
- Wipe-On Oils (Danish Oil, Tung Oil): These finishes penetrate the wood, providing a very natural, “in-the-wood” look that beautifully enhances the grain. They are excellent at making the darks profoundly dark. However, they can sometimes slightly amber or darken the entire piece, which may reduce the overall contrast on very light woods like maple. Application is simple with a soft cloth.
- Shellac: A natural, fast-drying finish that provides a warm, amber glow. It builds up in thin layers and can add a beautiful depth. It is less durable than lacquer, but excellent for decorative pieces that won’t see heavy handling.
Before applying any finish, a crucial rule to remember is: do not sand the engraved surface. Sanding will flatten the microscopic ridges and contours, effectively erasing the subtle details and destroying the 3D effect. You may lightly sand the un-engraved borders of your piece with a high-grit sandpaper (320 or higher) for a smooth feel, but the artwork itself must remain untouched. Apply your chosen finish in multiple thin coats according to the manufacturer’s instructions, allowing for proper drying time between each. As the first coat soaks in, you will witness the final transformation as the illusion of depth becomes sharper, clearer, and more compelling than ever before.
Conclusions
You now have the knowledge to transform simple wood pieces into incredible 3D masterpieces. By understanding the principles of 3d illusion laser engraving and following this guide, you can create breathtaking projects. Don’t be afraid to experiment with different wood engraving designs and settings. Start creating your own stunning illusions today and elevate your craft to a new dimension.
Frequently Asked Questions
Q: What is the best wood for 3D illusion laser engraving?
A: Light-colored hardwoods with a tight, uniform grain like Basswood, Cherry, and Maple are ideal. They provide high contrast and a smooth surface that won’t interfere with the fine details of the engraving.
Q: What kind of image file do I need for 3D laser engraving?
A: You need a high-resolution (at least 300 DPI) grayscale image that acts as a depth map. The image should have smooth gradients and a full range of shades from pure white to deep black to create a convincing illusion.
Q: Can I sand my project after it’s engraved?
A: No, you should never sand the engraved surface itself. Sanding will flatten the delicate ridges and contours that create the 3D illusion, effectively ruining the effect. You can lightly sand any un-engraved borders or the back of the piece.
Q: What is the most important setting in my laser software for this technique?
A: The single most critical setting is to select the “Grayscale” processing mode in your software’s layer settings. This mode tells the laser to vary its power based on the shades in your image. Avoid using “Dithering” modes, as they will not create the required physical depth.
Block "subscribe-popup" not found