Projects
Mastering 3D Illusion Laser Engraving on Wood
Dec
Estimated reading time: 6 minutes
Key Takeaways
- 3D illusion engraving creates perceived depth on flat surfaces by using grayscale depth maps to vary the laser’s power and burn depth.
- Proper machine setup is crucial, including using a longer focal length lens (e.g., 2.5″ or 4.0″) and focusing the laser into the material’s midpoint for sharper details.
- Always perform test engravings on scrap material to dial in the optimal power, speed, and DPI settings for your specific wood and laser.
- Post-processing, which involves cleaning with a soft brush and alcohol followed by applying a clear finish, is essential for removing residue and dramatically enhancing the final 3D effect.
Dive into the fascinating world of 3D illusion laser engraving, a technique that adds depth and dimension to your projects. This guide will walk you through the process of creating amazing 3D effects on wood, from selecting the right 3d laser engraving files to mastering the necessary laser engraving techniques. Let’s turn ordinary wood into extraordinary art.
Understanding 3D Illusion Laser Engraving
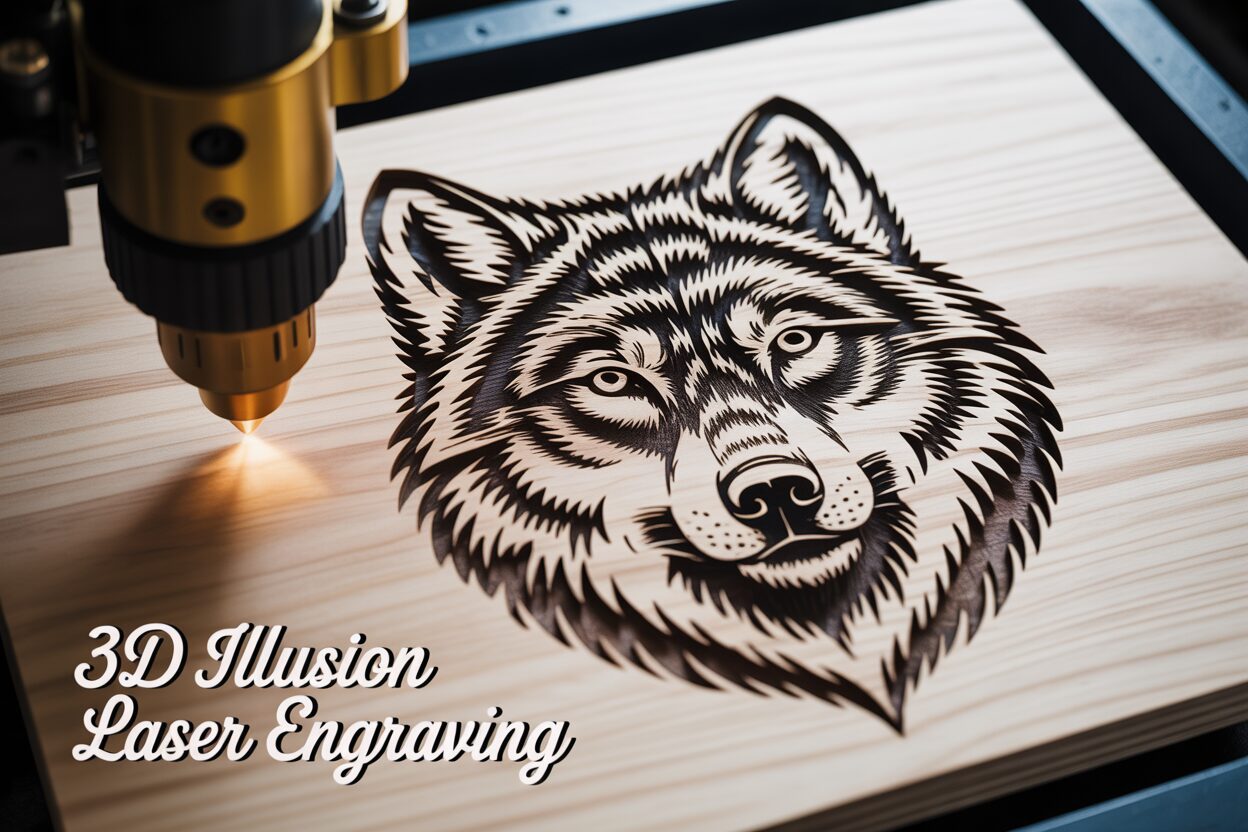
At its core, 3D illusion laser engraving is a masterful trick of the eye, a technique that transforms a flat piece of wood into a canvas of perceived depth and texture. Unlike traditional engraving, which typically involves etching vector lines or creating a raster image at a uniform depth, this method creates a true topographical relief on the material’s surface. A standard engraving might cut the outline of a wolf, but a 3D illusion engraving makes the wolf’s fur seem to rise from the wood, its snout appear to protrude, and its eyes recede into the surface. The final piece is not just seen but felt, inviting the hand to trace the contours that the laser has meticulously sculpted. This is achieved not by physically carving out large chunks of material in a 3D space, but by precisely controlling the depth of the burn point by point.
The Science Behind the Art: Grayscale Mapping and Variable Power
The secret to this captivating illusion lies in a principle known as grayscale mapping, which is executed through variable power engraving. Imagine a grayscale image where every shade, from pure white to solid black, holds a specific instruction for the laser engraver. In this digital language, white represents the highest points of the design, telling the laser to use minimal power or skip the area entirely, leaving the wood’s surface untouched. Conversely, black represents the deepest points, instructing the laser to apply maximum power, burning deeper into the material. The vast spectrum of grays between these two extremes translates into a corresponding range of laser power levels. A light gray might result in a shallow, light-tan burn, while a dark gray creates a deeper, chocolate-brown char. Your laser software reads this grayscale “depth map” and dynamically adjusts the laser’s intensity as it moves across the wood, creating thousands of minuscule variations in depth that collectively form a coherent, three-dimensional relief. This precise modulation of energy is what sculpts the gentle slopes of a cheek or the sharp ridges of a mountain range.
Wood is an exceptionally fitting medium for 3d wood engraving, largely due to its organic and responsive nature. When the laser beam interacts with the wood, it doesn’t just vaporize the material; it chars it, creating a rich palette of tones that naturally complements the illusion of depth. The deeper the burn, the darker the color, which inherently mimics the way shadows work in the real world, adding another layer of realism to the final piece. The natural grain of the wood itself can also play a vital role. On a piece of alder or cherry, the grain can flow with the contours of an engraved animal’s fur or the texture of a rocky landscape, enhancing the visual effect with an authentic, rustic quality. Light-colored, tight-grained woods like basswood and maple are particularly prized because they provide a high-contrast canvas, allowing the subtle tan-to-black gradients to stand out with stunning clarity and detail.
To achieve these breathtaking results, you cannot use just any image. The process relies on specialized 3d laser engraving files, which are essentially grayscale depth maps designed specifically for this purpose. A standard photograph must be converted and optimized to represent depth rather than just color and light. A well-crafted 3D file will have smooth, deliberate gradients that translate into a clean, detailed engraving without abrupt “stair-stepping” effects. In the following chapters, we will explore the critical laser engraving techniques needed to bring these files to life. We will cover everything from selecting and preparing the perfect piece of wood, to calibrating your machine’s power, speed, and DPI settings for optimal depth, and processing your images using software to create your very own custom 3D depth maps.
Setting Up Your Laser Engraver for 3D Effects
Achieving a convincing 3D illusion laser engraving begins long before you press the start button; it starts with the meticulous setup of your machine. Your first critical decision is lens selection. While a standard 1.5” or 2.0” focal length lens can work, a longer focal length lens, such as a 2.5” or 4.0”, is often superior for this technique. The reason lies in the depth of field. A longer lens creates a laser beam that stays focused over a greater vertical distance. As the laser carves deeper into the wood to create the dark, low-lying areas of your design, a longer lens ensures the beam remains a tight, precise point, resulting in clean, sharp detail even at the bottom of the engraving. With a shorter lens, the beam can defocus as it goes deeper, leading to wider, less-defined cuts and a muddy appearance. Once your lens is chosen, precise Z-axis calibration is non-negotiable. For the best 3d wood engraving results, you must focus the laser not on the surface of the wood, but slightly into it—typically at the halfway point of your intended maximum engraving depth. This “mid-focus” strategy helps maintain a more consistent beam spot size across the entire range of depths, from the highest untouched point to the deepest valley.
Dialing in Power, Speed, and Test Engravings
The heart of 3D engraving control lies in the interplay between power and speed. Unlike standard jobs, you will be setting a power range in your software, typically labeled as “Min Power” and “Max Power.” For a diode laser, you might set Min Power to 0% and Max Power to 100%. For a CO2 laser, you’ll need to find your tube’s minimum firing power (e.g., 10%) for the Min Power setting. Max Power will correspond to the black areas of your 3d illusion laser files, delivering the deepest cut, while Min Power will be used for the white areas, barely marking the surface, if at all. Speed is the counterweight to power; slower speeds allow the laser more dwell time on the material, resulting in deeper burns. A good starting point for a detailed 3D engraving on a softer wood like basswood with a 60W laser might be around 150-200 mm/s at 70-80% max power. However, these are merely starting points. Every machine and every piece of wood is different. Therefore, running a test grid on a scrap piece of your project wood is an essential, non-skippable step. Create a test file with a series of squares, each engraved with a different combination of speed and max power, or use a simple grayscale gradient file. This allows you to visually identify the settings that produce the widest, smoothest range of tones and depths, from a light scorch to a deep, dark char.
Your laser software, such as LightBurn, acts as the translator between your grayscale image and the machine’s hardware. Within the “Cut/Layer” settings, you must select the “Grayscale” image mode. This is the function that enables the variable power engraving we discussed previously. The software reads the 8-bit grayscale value of each pixel (from 0 for black to 255 for white) and scales your laser’s output proportionally between the Min and Max Power settings you defined. For instance, a 50% gray pixel (a value of 128) would command the laser to fire at a power level halfway between your set minimum and maximum. Getting these software and hardware settings in perfect harmony through careful testing is the key to unlocking truly jaw-dropping 3D effects on wood.
From File to Finished Product: A Step-by-Step Walkthrough
The journey of creating a 3D illusion laser engraving culminates in this step-by-step process, transforming a digital file and a blank piece of wood into a tactile work of art. Your first step is selecting a high-quality 3d laser engraving file. Look for images with smooth, gradual transitions between light and dark areas. A file with sharp, posterized bands of gray will result in a “stair-step” effect rather than a flowing, organic relief. High-resolution PNG or TIFF files are generally preferred as they preserve the delicate grayscale data better than compressed JPEGs. Once you have your file, import it into your laser software. This is where you will apply the optimal power, speed, and DPI settings you determined during your test runs. In software like LightBurn, ensure the layer is set to “Image” mode and the “Grayscale” option is selected. Size the image to fit your workpiece and use the framing tool to double-check its position on the wood. Secure your material firmly to the honeycomb bed to prevent any shifting during the engraving process, which could ruin the entire project.
Executing the Engraving and Initial Cleanup
With your file prepared and your wood in place, it’s time to begin the engraving. Before you start, perform a final check: is your focus set correctly, is your air assist on (to help clear debris and reduce flare-ups), and is your ventilation system running at full capacity? Once you initiate the job, the most critical task is to monitor the machine. Never leave a laser unattended while it is operating. Watch for excessive smoke or small flare-ups, which can occur when the laser hits a pocket of resin or sap in the wood. A properly functioning air assist should manage this, but it’s crucial to remain vigilant. The engraving process can be lengthy, sometimes taking hours for a large, detailed piece. When the job is finished, the engraved surface will be covered in a layer of dark, sticky residue composed of soot and vaporized wood resin. To clean this, let the piece cool completely. Then, using a soft-bristled brush (a toothbrush works perfectly) and a small amount of isopropyl alcohol or denatured alcohol, gently scrub the surface. Always brush with the grain of the wood to avoid scratching the un-engraved areas. The alcohol will dissolve the resin, and the brush will lift the soot out of the deep crevices, revealing the clean, detailed engraving underneath.
The final step in this process is applying a finish, which is not merely for protection but is a key part of enhancing the 3D effect. A well-chosen finish deepens the contrast between the dark, charred valleys and the light, untouched peaks, making the illusion of depth far more dramatic. Clear spray finishes, such as satin or matte lacquer or polyurethane, are excellent choices. They are easy to apply in thin, even coats, preventing the finish from pooling in the detailed low spots and obscuring the texture. Apply two to three light coats, allowing adequate drying time between each as per the manufacturer’s instructions. As the finish soaks in and cures, you will see the colors enrich and the details pop. The dark burns will become a deeper, richer brown or black, while the natural wood color of the high points will gain a subtle vibrance. This final touch is what elevates your project from a simple engraved piece of wood to a captivating 3D illusion engraving that begs to be seen and touched.
Conclusions
You now have the knowledge to create your own stunning 3D illusion laser engraving projects. By using quality 3d illusion laser files and practicing the techniques outlined, you can produce incredible 3d wood engraving art. Don’t be afraid to experiment with different settings and designs to push the boundaries of your creativity and achieve breathtaking results.
Frequently Asked Questions
Q: What is the best type of wood for 3D illusion laser engraving?
Interested in more 3D Illusion? Check out our 3D Illusion laser file designs: Click here!
A: Light-colored, tight-grained woods like basswood, maple, alder, and cherry are ideal. They provide a high-contrast canvas that makes the subtle tan-to-black grayscale details stand out with exceptional clarity.
Q: Why is a longer focal length lens recommended for 3D engraving?
A: A longer lens (e.g., 2.5″ or 4.0″) has a greater depth of field. This keeps the laser beam tightly focused even as it carves deep into the wood, resulting in sharper, cleaner details across the entire range of depths in the relief.
Q: What is grayscale mapping in laser engraving?
A: Grayscale mapping is the technique where a laser’s software interprets a grayscale image as a depth map. Pure white areas receive minimum power (highest point), pure black areas receive maximum power (deepest point), and the shades of gray in between receive proportionally scaled power levels, creating a topographical relief.
Q: How should I clean my 3D engraved wood project?
A: After the piece has cooled completely, use a soft-bristled brush (a toothbrush works well) and a small amount of isopropyl or denatured alcohol. Gently scrub the surface, always moving with the wood grain, to remove soot and resin residue and reveal the clean details underneath.
Block "subscribe-popup" not found