Tutorials
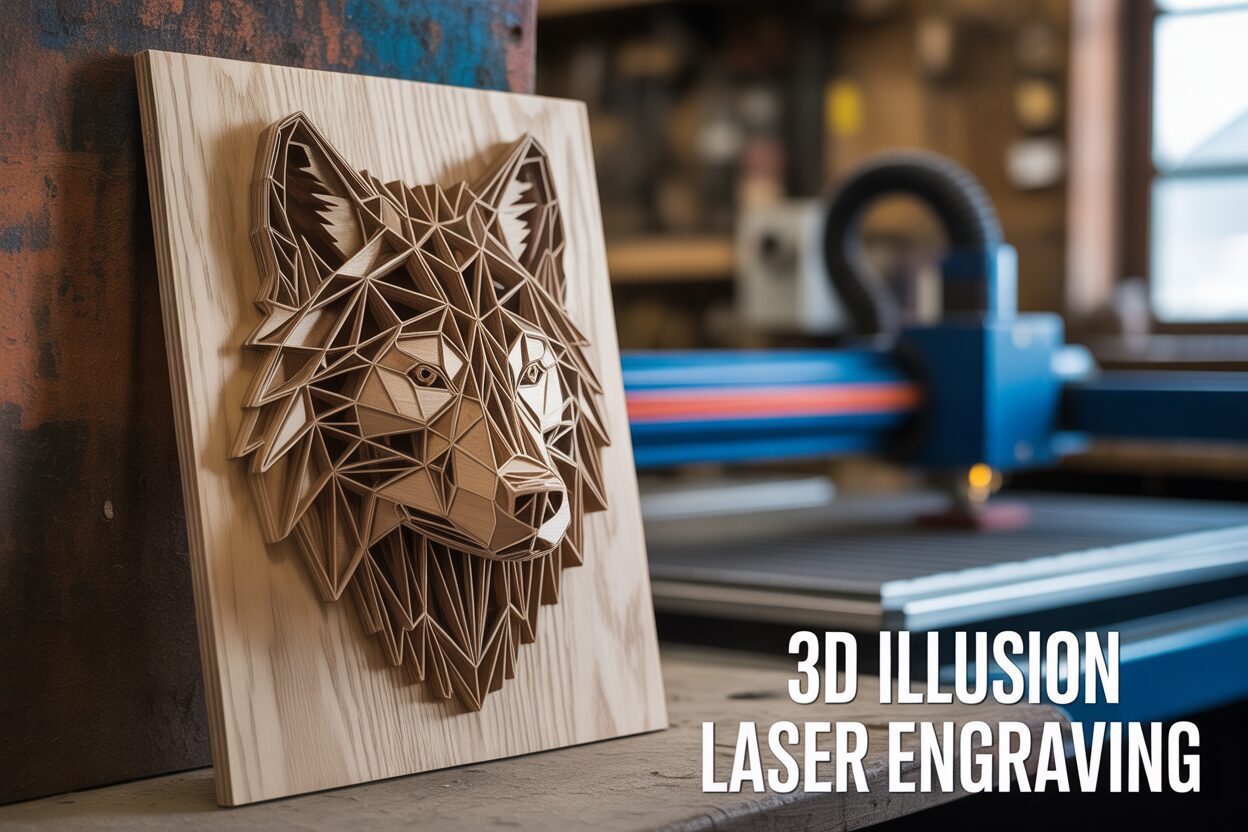
Mastering 3D Illusion Laser Engraving on Wood
Dec
Estimated reading time: 7 minutes
Key Takeaways
- The Illusion is in the Design: 3D illusion laser engraving works by tricking the brain with carefully designed patterns of lines and shading, not by physically carving depth into the wood.
- File Quality is Paramount: The success of your project depends heavily on using high-quality vector (SVG, AI) or raster (JPG, PNG) files specifically created for 3D illusion effects. Vector files offer the most control over individual line depths.
- Master Your Settings: Achieving a convincing 3D effect requires a range of laser settings. You must balance power, speed, resolution (LPI), and even focus to create a full spectrum of tones from light highlights to dark shadows.
- Always Run a Test Grid: Before engraving your final piece, always run a power/speed test grid on a scrap of the same wood. This creates a visual reference chart, saving time, preventing material waste, and ensuring predictable results.
Table of Contents
- Introduction
- The Science of Optical Illusions in Laser Art
- The Blueprint for Deception: The 3d Illusion Laser File
- Choosing and Preparing Your Digital Design Files
- Fine-Tuning Your File for Perfection
- Perfecting Laser Settings for Wood Engraving
- The Essential Test Grid: Your Path to Predictable Results
- Conclusions
- Frequently Asked Questions
Introduction
Dive into the fascinating world of 3D illusion laser engraving. This technique creates mind-bending designs that appear three-dimensional on a flat wooden surface. This guide provides a comprehensive walkthrough, from selecting the right 3d illusion laser files to perfecting your laser settings, enabling you to produce breathtaking pieces of art that capture attention and showcase your skill.
Interested in more 3D Illusion? Check out our 3D Illusion laser file designs: Click here!
The Science of Optical Illusions in Laser Art
Our journey into creating three-dimensional effects begins not with the laser, but with the human brain. Your mind is a remarkable prediction machine, constantly interpreting visual cues to construct a 3D model of the world from the 2D images received by your eyes. It uses shortcuts learned over a lifetime—how light creates shadows, how objects appear smaller in the distance, and how textures change with perspective. 3D illusion laser engraving is the art of deliberately manipulating these shortcuts. We are essentially feeding the brain a carefully constructed set of visual lies on a flat piece of wood, and the brain, following its programming, willingly perceives depth, curves, and layers that don’t physically exist. The laser doesn’t carve a 3D object; it burns a 2D pattern so cleverly designed that it forces a 3D interpretation.
The success of this deception hinges on a few key visual principles. Think of them as the fundamental tools in your illusionist’s toolkit:
- Line Thickness and Shading: Just as an artist uses a soft pencil to create a dark shadow, your laser uses higher power settings to create deeper, darker burns. Our brains instinctively interpret darker areas as being in shadow or further away from a light source. In an illusion design, thick, dark lines will appear to be in a valley or form a sharp, receding edge, while thin, light lines or unburned areas appear closer or highlighted.
- Line Spacing and Density: The proximity of engraved lines to one another is a powerful cue for curvature. Lines that are spaced far apart create a sense of a flat, open surface. As those same lines get closer and closer together, they create a visual density that our brain reads as a surface curving away from us, like the texture on a sphere becoming compressed as it wraps around the edge.
The Blueprint for Deception: The 3d Illusion Laser File
These principles are not applied randomly; they are meticulously encoded into the digital design, known as a 3d illusion laser file. This is far more than a simple outline of a shape. It is a sophisticated map where every line, curve, and shade of gray is deliberately placed to contribute to the final illusion. When you load one of these files, you are providing your laser with the exact instructions on where to burn dark and heavy, where to engrave lightly, and where to leave the wood untouched. The file is the script, and the laser is the actor bringing the performance to life. The quality of the illusion is therefore almost entirely dependent on the quality of the design file. A poorly designed file will result in a flat, confusing engraving, while a masterfully crafted one will make the wood appear to warp, bulge, or recede.
Specific patterns within the file are engineered to produce predictable effects. To create the illusion of a concave bowl, for example, a designer will use a pattern of concentric lines that are thin and widely spaced at the outer edge, becoming progressively thicker, darker, and more tightly packed towards the center. This mimics how shadow would gather inside a real bowl. Conversely, to create a convex dome, the pattern is inverted: the darkest, densest lines are at the outer perimeter to simulate the surface curving away, while the center is left light or unburned, representing the point closest to the viewer and catching the most light. By mastering the interplay of these patterns, a flat surface can be transformed into a dynamic, seemingly three-dimensional work of art.
Choosing and Preparing Your Digital Design Files
The most powerful laser cutter is useless without a proper blueprint. In our craft, that blueprint is the digital design file. The stunning depth you see in professional pieces is born long before the laser fires; it is meticulously crafted within the file itself. Simply finding a cool pattern online is not enough. You need high-quality 3d laser engraving files specifically designed to manipulate perception. These files are not just images; they are precise instructions. The lines are spaced and weighted with mathematical intention, and the shading is calculated to create specific highlights and shadows. When searching for designs, look for files explicitly labeled for 3D illusion or depth effect engraving. These are often found on marketplaces specializing in 3d laser cut files and are superior to generic patterns that lack the necessary visual engineering.
Understanding the difference between the two main file types is crucial for preparing your project:
- Vector Files (SVG, AI, DXF, LBRN): These are the gold standard for most geometric 3D illusions. A vector file is not made of pixels; it’s a collection of mathematical paths, lines, and curves. The huge advantage here is control. Each line or shape can be assigned a specific color. In laser software like LightBurn, each color can then be assigned a unique set of parameters—power, speed, and focus. This allows you to command the laser to burn black lines deep and dark while lightly scoring red lines, all within the same job. This level of granular control is how you fine-tune the illusion.
- Raster Files (JPG, PNG, BMP, TIF): These are pixel-based images, like photographs. They are excellent for creating illusions based on smooth shading and gradients rather than sharp lines. Your laser software interprets a raster image using a process called dithering, converting shades of gray into patterns of dots or lines. Darker pixels translate to more laser power, creating a deeper or darker burn. While less precise for geometric patterns, raster files are perfect for creating embossed, photographic-style depth.
Fine-Tuning Your File for Perfection
Even the best 3d wood design laser cut file may require adjustments for your specific machine and material. This is where you transition from operator to artist. Open your vector-based laser engraving file for wood in a program like LightBurn or Adobe Illustrator. The first step is to analyze the color layers. A well-designed file will use different colors to denote different depths. In LightBurn, you will see these colors in the ‘Cuts / Layers’ panel. Here, you can experiment. For instance, the designer might intend for the black lines to be the deepest part of the illusion. You can start with a setting of 80% power and a slow speed. For the next layer, perhaps blue lines, you might try 50% power at a medium speed. For the finest highlight lines, colored red, you could use a very low power (15-20%) and high speed. Don’t be afraid to ungroup the design and select specific lines to change their color, thereby moving them to a different power layer to enhance or reduce a specific part of the effect. This process of assigning and testing power settings is the key to translating the 2D digital design into a compelling 3D illusion on wood.
Perfecting Laser Settings for Wood Engraving
With a well-prepared digital file in hand, we now turn our attention to the laser itself. This is where the digital blueprint becomes a physical reality, and your success hinges on calibrating your machine with precision. The goal of 3D illusion laser engraving isn’t simply to burn a pattern, but to command the laser to produce a wide spectrum of tones, from a faint tan to a deep, rich brown. This tonal range is your palette for creating depth. The primary variables you will manipulate to achieve this are power, speed, resolution, and focus. Think of them as the fundamental controls for your laser’s “paintbrush.”
- Power & Speed: These two settings work together in an inverse relationship. Increasing power or decreasing speed results in a darker, deeper burn because more energy is delivered to a single spot. Conversely, decreasing power or increasing speed yields a lighter mark. For illusions, you don’t want one perfect setting; you want a whole range of them. A deep “shadow” line might require 80% power at a slow speed, while a faint “highlight” line might only need 15% power at a very high speed.
- Resolution (LPI/DPI): Lines Per Inch (or Dots Per Inch) determines how close together the engraved lines are. A low LPI (e.g., 150) will leave tiny gaps of unburned wood between each pass, creating a lighter, textured appearance. A high LPI (e.g., 300 or more) will cause the lines to overlap, producing a very dark, smooth, and solid fill. You can use varying LPI settings on different layers of your design to add another dimension to your shading.
- Focus: While a perfectly focused beam creates the sharpest lines, a slightly de-focused beam can be a secret weapon. By raising or lowering your laser head by just 1-2mm from the optimal focus point, the beam becomes slightly wider. This softens the edges of the burn, creating a “softer” shadow effect, much like an airbrush, which is perfect for smooth gradients.
The Essential Test Grid: Your Path to Predictable Results
Never engrave a final project without first running a test grid on a scrap piece of the exact same material. This single step will save you countless hours and prevent wasted wood. Most laser software, including LightBurn, has a built-in tool to generate a material test grid. This tool creates a matrix of squares, systematically varying power on one axis and speed on the other. When you run this test, you’ll get a visual reference chart. Look at the resulting grid and identify the squares that show a beautiful range from light tan to dark brown without any heavy, sooty charring. These are your working parameters. For example, you might find that your “lightest” useful setting is 20% power at 4000 mm/min, and your “darkest” is 75% power at 1000 mm/min. You now have a proven palette of settings to assign to the different colored layers in your design file.
The type of wood you use will dramatically alter these settings. A softwood like pine has inconsistent density and will burn dark very quickly, requiring lower power and higher speeds. A light-colored, even-grained hardwood like basswood or alder is ideal, as it engraves cleanly and consistently, allowing for subtle gradients. Darker woods like cherry or walnut provide less contrast, so you may need to use higher power settings to make the burn stand out, focusing on creating deeper physical grooves to catch the light. Always run a new test grid for every new type of wood you use. Keep these test pieces and label them; they will become an invaluable library for all your future projects.
Conclusions
You now have the knowledge to transform simple wood pieces into incredible 3D art. By understanding the principles of illusion, preparing your files correctly, and fine-tuning your laser, you can consistently produce stunning results. Experiment with different 3d wood design laser cut files and materials to further explore the limitless possibilities of 3D illusion laser engraving.
Frequently Asked Questions
Q: What exactly is 3D illusion laser engraving?
A: It’s a technique that uses a laser to engrave a meticulously designed 2D pattern onto a flat surface, typically wood. The pattern uses principles of optical illusion, like shading, line thickness, and line density, to trick the human eye into perceiving depth, curves, and three-dimensional shapes where none physically exist.
Q: What is the best file type for 3D illusion engraving?
A: Vector files (like SVG, AI, LBRN) are generally preferred for geometric illusions because they offer precise control. You can assign different power and speed settings to different colored lines within the file, allowing you to fine-tune the depth of each element. Raster files (JPG, PNG) are better for illusions that rely on smooth, photographic-style gradients.
Q: Why is a material test grid so important?
A: A test grid is crucial because every type of wood (and even different pieces of the same wood) reacts differently to the laser. Running a grid that tests various power and speed combinations allows you to find the perfect settings for a range of tones, from light highlights to dark shadows, ensuring your final engraving looks exactly as intended without wasting your project piece.
Q: What are the best types of wood for this technique?
A: Light-colored hardwoods with a consistent, even grain are ideal because they provide high contrast and engrave cleanly. Woods like basswood, alder, and maple are excellent choices. While you can use softwoods like pine, their inconsistent density can lead to uneven burns. Darker woods like walnut can also be used, but you’ll need higher power to create contrast.
Block "subscribe-popup" not found