Tutorials
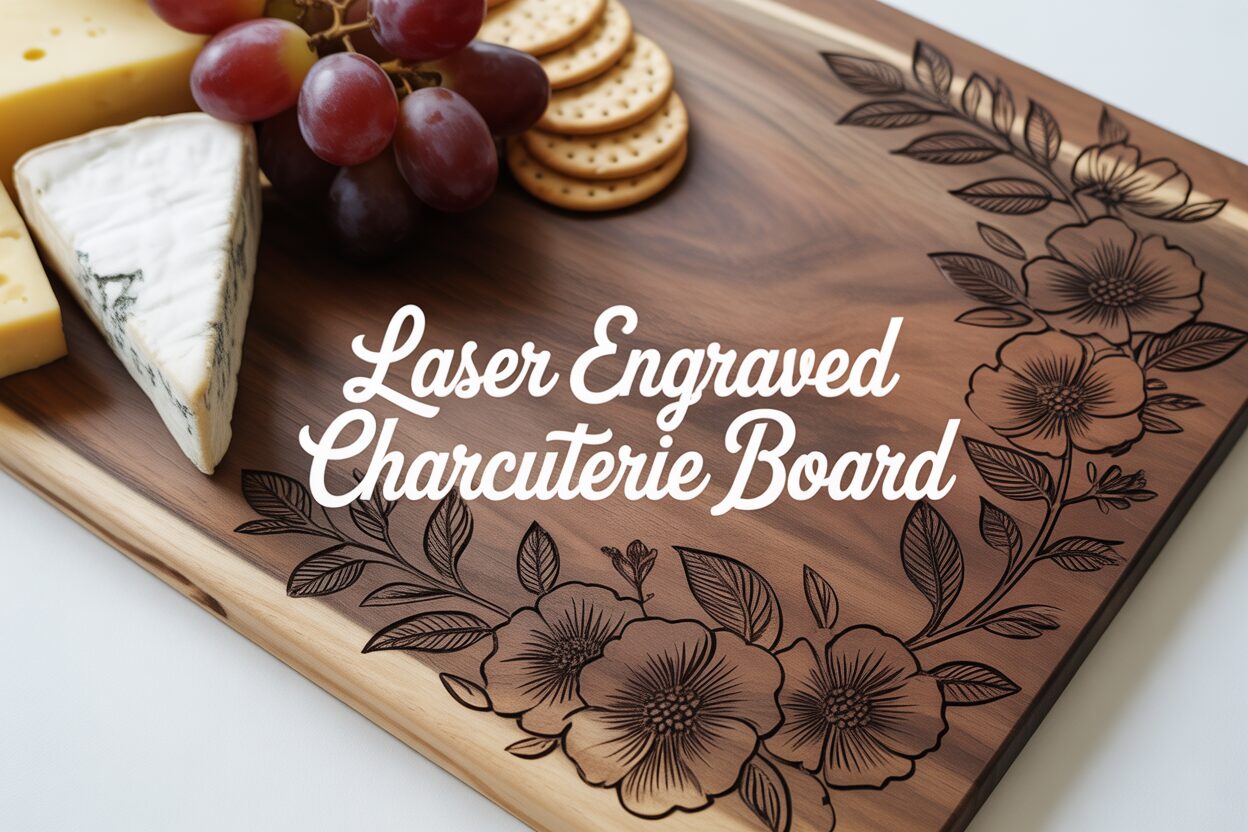
How to Make a Stunning Laser Engraved Charcuterie Board
Aug
Estimated reading time: 8 minutes
Key Takeaways
- Choose the Right Wood: The best results come from dense, closed-grain hardwoods like Maple, Cherry, Walnut, or Acacia, which are food-safe and provide a smooth surface for crisp engravings.
- Preparation is Paramount: A flawless finish requires sanding the board with fine-grit sandpaper (like 220-grit) and cleaning it with isopropyl alcohol to remove dust and oils before engraving.
- Test Your Laser Settings: Always run a test on a scrap piece of the same wood to dial in the perfect combination of power, speed, and DPI. This prevents ruining your final board and ensures a clean, professional burn.
- Apply a Food-Safe Finish: Sealing the board with a non-toxic finish like mineral oil, fractionated coconut oil, or a beeswax blend is essential for food safety, durability, and bringing out the wood’s natural beauty.
Table of Contents
- Selecting the Perfect Wood and Design
- Prepping Your Board and Dialing in Laser Settings
- Engraving and Applying a Food-Safe Finish
- Conclusion
- Frequently Asked Questions
Elevate your hosting game by learning to create a custom laser engraved charcuterie board. This tutorial guides you through every step, from selecting the right wood and design to applying a beautiful, food-safe finish. It’s a perfect project for hobbyists looking to make personalized gifts or sell unique, high-demand items, blending creativity with practical craftsmanship.
Selecting the Perfect Wood and Design
The foundation of any stunning laser engraved charcuterie board is, quite literally, the board itself. Your choice of wood impacts not only the final aesthetic and durability but also the food safety of your project. This is not the time to grab any spare plank from your workshop; selecting the right material is paramount. We strongly recommend using dense, closed-grain hardwoods. These woods are durable enough to withstand knife marks and frequent use, and their tight grain provides a smooth, consistent surface for the laser to create crisp, detailed engravings.
Here are the top choices for a food-safe and beautiful result:
- Maple: Often considered the gold standard for cutting boards, maple is incredibly hard and has a light, creamy color. Its grain is very fine and subtle, which creates a high-contrast canvas where your engraving will stand out sharply. The laser produces a rich, dark burn on maple, making it perfect for intricate designs and text.
- Cherry: Famous for its warm, reddish-brown hue that deepens beautifully over time, cherry offers a softer, more luxurious look. It’s slightly softer than maple but still very durable. The engraving on cherry is typically a few shades darker than the wood itself, resulting in an elegant, lower-contrast appearance that is sophisticated and timeless.
- Walnut: For a dramatic and premium feel, walnut is an exceptional choice. Its deep, chocolate-brown color provides a rich backdrop for engravings. The laser burn is often even darker, creating a subtle, tone-on-tone effect that exudes class. The grain can be straight or swirled, adding character to every piece.
- Acacia: Known for its sustainability and striking visual appeal, acacia features a dynamic, often multi-toned grain with high color variation. It is extremely hard and naturally water-resistant. Engraving on acacia can be less predictable due to the color shifts in the wood, but this can also lead to a wonderfully rustic and unique outcome.
A Note on Food Safety and Woods to Avoid
Food safety is non-negotiable. The woods listed above are favored because their closed-pore structure prevents bacteria from getting trapped and multiplying. Conversely, you must avoid open-pored woods like Red Oak, which can harbor germs. Softwoods like pine are also poor choices; they are not durable, can impart a resinous flavor to food, and their inconsistent density leads to uneven engraving. Most importantly, never use manufactured woods like MDF or plywood, or any chemically pressure-treated lumber. The heat of the laser will vaporize the glues and chemicals, releasing toxic fumes that are dangerous to inhale and will render the board completely unsafe for contact with food. Always start with a solid, untreated slab of hardwood.
Choosing a Design for Your Personalized Charcuterie Board
Once you’ve selected your wooden canvas, the real fun begins: choosing the design. This is where a simple serving platter transforms into a cherished keepsake. A personalized charcuterie board is an ideal gift for weddings, housewarmings, or holidays precisely because it can be tailored so specifically to the recipient. Consider engraving a newly married couple’s monogram and wedding date, a family name with an “Established” year, or even a company logo for a unique corporate gift. For a truly personal touch, you can scan and engrave a handwritten family recipe, turning the board into a functional piece of family history. Intricate floral patterns, geometric borders, or whimsical quotes also make for beautiful decorations. This versatility makes this one of the most satisfying DIY laser engraving projects you can undertake. Even if you are just dipping your toes into wood engraving for beginners, the process is straightforward and the results are impressively professional, giving you a beautiful and functional piece of art you can be proud of.
Prepping Your Board and Dialing in Laser Settings
With your beautiful hardwood and compelling design chosen, the next phase is preparing the surface and calibrating your laser. This meticulous preparation is what separates a good result from a truly professional one. Before the laser even warms up, your focus should be on creating the perfect canvas. Begin by thoroughly sanding your charcuterie board. Even if it feels smooth to the touch, you want to ensure a perfectly uniform surface. Using a fine-grit sandpaper, such as 220-grit, work with the grain of the wood until the entire surface has a silky, flawless finish. This step is not just for aesthetics; a perfectly flat and smooth surface ensures that the laser beam remains in focus across the entire design, preventing any soft or blurry spots in the final engraving. Once you are satisfied with the sanding, it’s crucial to clean the board. Wipe it down with a lint-free cloth lightly dampened with isopropyl alcohol. This removes all the fine wood dust from the pores and, more importantly, strips away any surface oils that could cause inconsistent burns or minor flare-ups during the engraving process. Let the alcohol fully evaporate before placing the board in your laser cutter.
Dialing in Your Laser Settings for the Perfect Burn
Now you can move to the laser itself. Finding the ideal settings is a delicate balance between three key parameters, and it’s the most critical technical step in any DIY laser engraving projects. Getting this right is what will make your personalized charcuterie board look crisp and clean.
- Power: This setting controls the intensity of the laser beam. Higher power produces a deeper, darker burn. For dense hardwoods like maple or walnut, you will generally need more power than for softer woods. However, too much power can lead to excessive charring, creating a thick, sooty residue and blurring fine details.
- Speed: This dictates how fast the laser head moves across the wood. Speed works inversely with power; a slower speed allows the laser to dwell on each spot for longer, resulting in a darker and deeper mark, while a higher speed produces a lighter engraving. The goal is to find a speed-to-power ratio that “caramelizes” the wood rather than simply incinerating it.
- DPI (Dots Per Inch): For raster engraving, your design is made up of thousands of tiny dots burned by the laser. DPI determines the density of these dots. A higher DPI (e.g., 300-600) will create a higher-resolution, more detailed engraving, which is ideal for intricate patterns or photos. A lower DPI is faster but can result in visible lines or a less-filled appearance. For most text and logos on a laser engraved charcuterie board, a DPI setting around 300 is often a perfect starting point.
This brings us to the single most important rule of wood engraving for beginners: always perform a test run. Wood is a natural material with variations in density and moisture content, even within the same species. Settings that worked perfectly on a piece of cherry yesterday might need a slight adjustment for the piece you are using today. Take a small, unseen piece of the same wood—ideally a scrap offcut from your board—and engrave a test file. Many laser software programs include a test grid feature that engraves a matrix of small squares using different combinations of power and speed. This allows you to visually identify the exact setting that produces the crisp, rich brown color you’re looking for, without having to risk your final project. This five-minute test is the best insurance you can have against ruining a beautiful piece of wood.
Engraving and Applying a Food-Safe Finish
With your board prepped and settings perfected, you’ve reached the most exciting stage: watching your design come to life. Securely place your charcuterie board onto the laser bed. Use a honeycomb pin, a heavy weight on a non-engraving area, or a small jig to ensure the board cannot shift even slightly during the engraving process—any movement will ruin the alignment of the design. Set your laser’s focus to the top surface of the wood and move the laser head to the starting point of your design. Double-check that your ventilation system is running, close the lid, and send the job to the laser. Once the engraving is complete, carefully remove the board. You will notice a dark, sooty residue on and around the engraved area. This needs to be cleaned thoroughly. The best method is to use a soft-bristled brush (an old toothbrush works perfectly) to gently whisk away the loose char from the detailed crevices of your design. For any stubborn residue, lightly dampen a clean, lint-free cloth with isopropyl alcohol and carefully wipe the engraved area. Be gentle to avoid smearing the soot into the raw wood grain surrounding your design. Let the board air dry completely.
Sealing for Safety and Beauty with a Food-Safe Finish
This final step is absolutely critical and non-negotiable. Applying a food-safe wood finish not only brings out the rich color and grain of the wood, turning your project into a professional-grade piece, but it also seals the wood pores, creating a protective barrier that is essential for making your laser engraved charcuterie board safe for contact with food. This finish prevents moisture and bacteria from penetrating the wood and makes the board easier to clean. Never use finishes like polyurethane, lacquer, or Danish oil, as they are not food-safe. Stick to one of these proven, non-toxic options:
- Mineral Oil: This is the most common and affordable choice. Use only 100% food-grade mineral oil, which is a non-drying oil that soaks deep into the wood to hydrate and protect it from within. It is colorless and odorless.
- Fractionated Coconut Oil: A great alternative to mineral oil, fractionated coconut oil has had the long-chain triglycerides removed, which means it remains liquid at room temperature and, most importantly, will not go rancid like regular kitchen coconut oil.
- Beeswax Blends: Often sold as “board butter” or “wood conditioner,” these products typically blend mineral oil with beeswax and sometimes carnauba wax. The oil penetrates, while the wax creates a more robust, water-repellent seal on the surface, providing a beautiful satin sheen and a silky feel.
The application process is simple but should be done with care. First, ensure your board is completely clean and dry. Apply a generous amount of your chosen oil or conditioner onto the surface. Using a clean, lint-free cloth, spread the finish evenly across the entire board—top, bottom, sides, and directly into the engraved area. Don’t be shy; you want the wood to drink up the finish. Let the board sit and absorb the oil for at least 30 minutes, but for the best results, let it soak overnight. The wood will look darker and the grain will pop with vibrant contrast. Finally, take another clean cloth and buff the entire board, removing any excess oil from the surface until it feels smooth and dry to the touch, not greasy. Your stunning, personalized, and food-safe board is now complete.
Conclusion
You now have the complete process for creating a professional-quality laser engraved charcuterie board. By carefully selecting your materials, dialing in your laser settings, and applying a food-safe wood finish, you can produce stunning, functional art. This project is a fantastic way to hone your skills and create items that are sure to impress family, friends, or customers.
Frequently Asked Questions
Q: What is the best wood for a laser engraved charcuterie board?
Interested in more Charcuterie Board? Check out our Charcuterie Board laser file designs: Click here!
A: The best woods are dense, closed-grain hardwoods. Maple is a top choice for high-contrast engravings, Cherry offers a warm, luxurious look, and Walnut provides a dark, premium feel. Acacia is another great, durable option with striking grain patterns.
Q: Why can’t I use plywood or MDF for a charcuterie board?
A: You should never use manufactured woods like plywood or MDF because they contain glues, resins, and other chemicals. The heat from the laser will vaporize these substances, releasing toxic fumes that are dangerous to breathe and making the board completely unsafe for any contact with food.
Q: Is it really necessary to do a test engrave?
A: Yes, it is absolutely essential. Wood is a natural material with variations in density and moisture, even within the same board. A quick test on a scrap piece of the same wood allows you to find the perfect laser settings (power/speed) for a crisp, clean result without risking your final project.
Q: Can I use cooking oil like olive oil or regular coconut oil to finish my board?
A: No, you should not use standard cooking oils. They are not “drying” oils and can become rancid over time, creating a bad smell and taste that will transfer to your food. Stick to 100% food-grade mineral oil, fractionated coconut oil, or a beeswax-based board conditioner, which are stable and non-toxic.
Block "subscribe-popup" not found