Tutorials
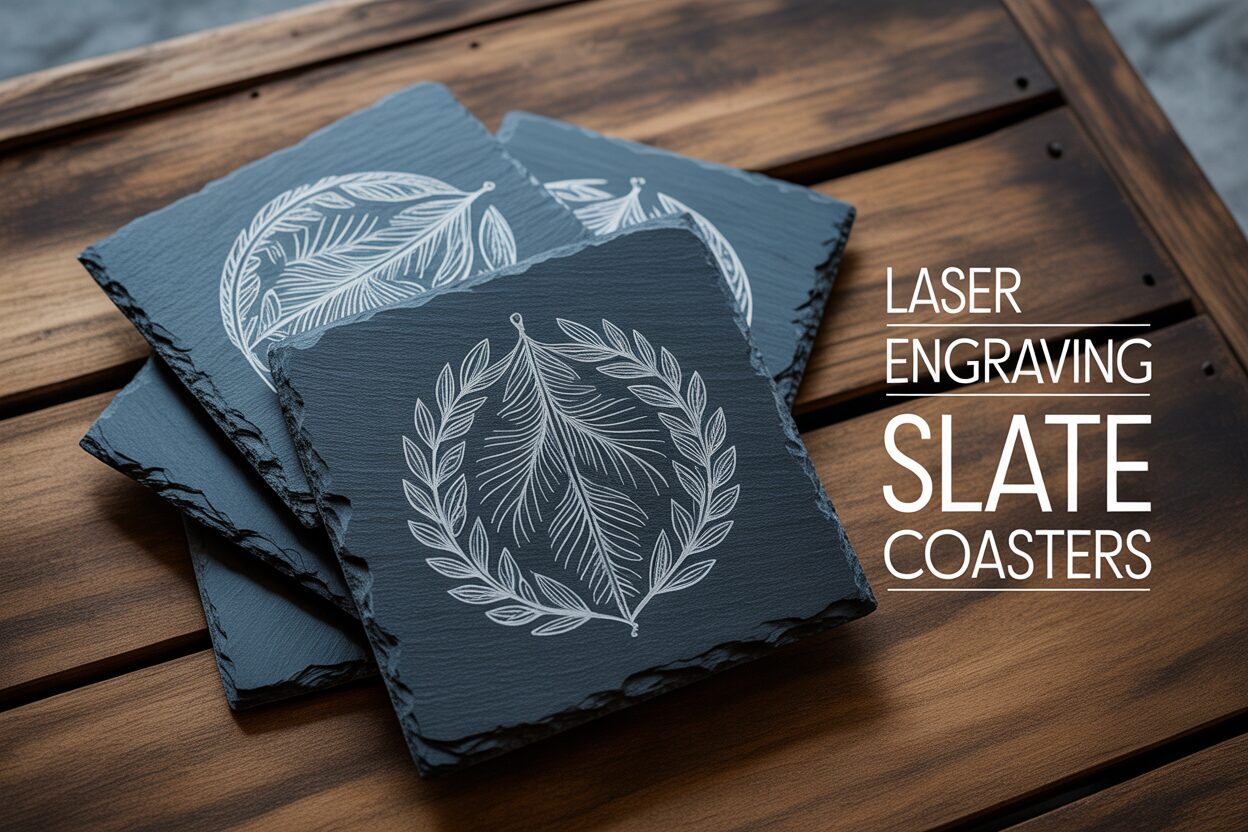
How to Laser Engrave Perfect Slate Coasters
Aug
Estimated reading time: 7 minutes
Key Takeaways
- Material is Paramount: Always choose raw, untreated slate for a crisp, high-contrast white engraving. Coated slate often results in a yellowish, lower-quality mark because the laser burns the sealant first.
- Preparation is Non-Negotiable: A clean, dry surface is essential. Wipe coasters with isopropyl alcohol to remove dust and oils, ensuring direct laser contact for the sharpest possible result.
- Calibrate Every Time: Never rely on generic settings. Run a power and speed test grid on a scrap piece from your current batch of slate to find the precise settings for a bright white mark without overburning.
- Finish for Professional Contrast: After engraving and cleaning, apply food-safe mineral oil or a stone sealer. This deepens the slate’s color to a rich black, making the white design pop dramatically.
Table of Contents
- Selecting and Preparing Your Slate Coasters
- Calibrating Your Laser for Optimal Results
- The Engraving Process and Final Finishing
- Conclusions
- Frequently Asked Questions
Laser engraving slate coasters is a fantastic project that turns a simple, natural material into a piece of personalized art. It’s a rewarding process for both beginners and experts. This guide will walk you through every step, from selecting the right materials to applying the finishing touches, ensuring you can create stunning, high-contrast designs on your own.
Selecting and Preparing Your Slate Coasters
Selecting the best material is the foundational step that dictates the quality of your final product. Not all slate is created equal, and understanding the differences will save you time, material, and frustration. The ideal slate for laser engraving has a relatively smooth, flat surface and a uniform dark color. While natural clefts and textures are part of slate’s charm, extreme unevenness or flakiness can lead to inconsistent focus and patchy engraving. When sourcing your coasters, look for those specifically marketed for crafting or engraving, as they are often pre-selected for better surface quality.
The most critical distinction to make is between natural, untreated slate and coated slate. Natural slate is the superior choice for achieving that highly sought-after, crisp white mark. The magic of engraving on slate isn’t a burning process; it’s a thermal reaction. When the focused laser beam strikes the surface, its intense heat causes the mineral content within the slate—primarily silicates and pyrite—to undergo a rapid change. This process, known as ablation or spalling, fractures the minerals and alters their composition, turning them into a much lighter, almost pure white substance. This creates a permanent, high-contrast mark that is embedded in the stone itself. Conversely, some slate coasters come with a pre-applied food-safe or protective coating. While this sealant is useful for finished products, it acts as a barrier to the laser. The laser must first burn through this clear coat, which often results in a yellowish or brownish discoloration from the burnt sealant, rather than the bright white of the slate underneath. This can also produce more smoke and a sticky residue, leading to a much lower-quality result. For these reasons, always start with raw, untreated slate for the most professional finish.
Preparing Slate for Laser Engraving
Once you’ve selected your high-quality, untreated slate coasters, proper preparation is non-negotiable for achieving a flawless result. The surfaces of raw slate are often covered in fine dust from the cutting and shaping process, as well as natural oils from handling. These contaminants can interfere with the laser, blocking its energy and causing weak or inconsistent engraving. A clean surface ensures the laser has direct, unobstructed contact with the stone, leading to the brightest and sharpest possible mark.
Follow these simple steps to prepare your slate:
- Step 1: Inspect Each Coaster. Before you clean, give each coaster a quick look. Set aside any with significant chips on the edges, deep cracks, or extreme flaking on the main surface. It’s better to identify unsuitable pieces now than after you’ve spent time engraving them.
- Step 2: Clean the Surface. You have two excellent options for cleaning. The most effective method is using isopropyl alcohol (IPA) with a concentration of 90% or higher. Lightly dampen a clean, lint-free microfiber cloth with the alcohol and wipe the entire surface of the coaster. The IPA will evaporate quickly, lifting away any oils and dust without leaving a residue. Alternatively, you can use a solution of warm water with a small drop of mild dish soap. Use a damp—not soaking wet—cloth to wash the surface, then immediately wipe it with another cloth dampened with only water to rinse away any soap.
- Step 3: Dry Completely. Whether you used alcohol or soap and water, it is imperative that the slate is 100% dry before it goes into the laser. Air drying on a rack is perfect. Any residual moisture can turn to steam when hit by the laser, potentially cracking the slate or affecting the engraving quality.
A common question that arises during preparation is whether to use a transfer mask (also known as application tape). For most slate engraving projects, masking is not necessary and often not recommended. The primary purpose of masking is to protect the surrounding area from smoke residue or to make cleanup easier. However, the dust created from slate engraving is minimal and easily wiped or washed off afterward. The main drawbacks of masking slate are that it can absorb some of the laser’s energy, requiring you to increase your power settings, and the adhesive can sometimes leave a sticky residue that is more difficult to clean than the slate dust itself. Where a mask can be useful is for extremely intricate designs with many fine, delicate lines. In these rare cases, it can help prevent tiny dust particles from settling into un-engraved crevices. For beginners and the vast majority of designs, however, going unmasked on a clean, dry surface will yield the best and most straightforward results.
Calibrating Your Laser for Optimal Results
After preparing your slate coasters, the next critical phase is calibrating your laser. This is arguably the most important technical step in the entire process. Unlike wood, which can be forgiving, slate has a very narrow window for optimal settings. The difference between a stunning, bright white engraving and a faint, yellowish mark or a flaky, overburnt mess can be a mere 5% change in power or a small adjustment in speed. Simply using settings you found online is a gamble, as every laser machine has slight variations in power output, and even different batches of slate can react differently. The only reliable method to guarantee professional results is to run a calibration test on a scrap piece of slate from the same batch you plan to use for your final coasters.
Creating and Interpreting a Test Grid
The most effective calibration tool is a test grid, also known as a power/speed scale. This involves creating a matrix of small shapes (squares are perfect) in your laser software, with each square assigned a different combination of power and speed. For example, you might create a grid with speeds ranging from 1500 mm/min to 3500 mm/min along the X-axis and power levels from 70% to 100% along the Y-axis. When you run this file on your scrap slate, you will have a physical catalog of how your laser performs at each setting. Inspect the grid closely under good light. You are looking for the square that produces the brightest, most consistent white color without any visible chipping or flaking at the edges. A magnifying glass can be helpful here. You may find that higher power doesn’t always mean a better result; often, the best mark comes from a balanced combination of moderate speed and just enough power to trigger the mineral reaction without overheating the material.
To achieve that perfect balance, you must understand the key variables at your disposal:
- Power: This is the output intensity of your laser beam. For slate, the goal is not to vaporize material but to apply enough thermal energy to fracture the surface minerals. Too much power will overheat the slate, causing it to melt slightly into a glassy, gray finish instead of a crisp white. It can also cause excessive spalling, where small flakes or chips of slate break away, leaving a rough and pitted surface. You are looking for the lowest power setting that still produces a vibrant white mark at your chosen speed.
- Speed: This dictates how quickly the laser head moves across the material. Speed and power have an inverse relationship; a slower speed allows the laser to dwell on each spot longer, delivering more energy. Therefore, you can often achieve a similar result with lower power and slower speed as you can with higher power and faster speed. The sweet spot is typically a moderate speed that allows for a clean mark without drastically increasing your engraving time.
- DPI/LPI (Dots Per Inch/Lines Per Inch): This setting controls the resolution of your engraving by determining how close together the engraved lines are. While a higher DPI provides more detail on materials like wood, it can be counterproductive on slate. A very high DPI (e.g., 500+) causes the laser passes to overlap significantly, essentially hitting the same spot multiple times. This can lead to overheating and a less distinct mark. For most slate designs, a DPI between 250 and 350 provides excellent detail and contrast without over-exposing the material, and it significantly reduces engraving time.
As a starting point for your test grid, here are some general baseline ranges. Remember, these are for creating your test matrix, not final settings:
- For Diode Lasers (10W-20W): Start your test grid with speeds between 1000 mm/min and 4000 mm/min, and power levels between 70% and 100%.
- For CO2 Lasers (40W-60W): Your machine is much more powerful, so you’ll use higher speeds and lower power. Start your grid with speeds between 200 mm/s and 400 mm/s, and power levels between 12% and 25%.
Take the time to run this test. The five minutes it takes to engrave a test grid will save you from potentially ruining an entire batch of coasters and is the true secret to consistently achieving a perfect, professional-grade finish.
The Engraving Process and Final Finishing
With your laser settings perfectly calibrated, you are now ready for the main event. Place your clean, dry slate coaster into the laser bed, ensuring it is level. A critical final check before you press start is your laser focus. Slate is an unforgiving material, and even a millimeter of incorrect focus can diffuse the laser’s energy, resulting in a weak or blurry mark. Use your machine’s focusing tool precisely. Once you’re confident in the placement and focus, run the engraving job. Always ensure your ventilation system or air exhaust is running at full capacity, as the process will create fine particulate dust that needs to be safely removed from your workspace. As the laser works its magic, you’ll see the design appear, but don’t be discouraged if it looks dusty and muted at first—the real transformation happens in the post-processing stage.
How to Clean Engraved Slate
Once the engraving is complete and you have safely removed the coaster from the machine, you will notice that the engraved area is covered in a fine layer of gray dust. This is the pulverized mineral residue from the ablation process. While the design is visible, its contrast is poor. Your first instinct might be to just wipe it with a cloth, but this will only smear the dust and leave the engraving looking dull. The key to revealing the brilliant white mark hidden underneath is a proper cleaning.
- Step 1: Initial Dust Removal. Take a soft, dry brush—an old toothbrush or a small nylon brush works perfectly—and gently sweep away the loose surface dust. This prevents you from turning the dust into a slurry in the next step.
- Step 2: Wash and Scrub. Take the coaster to a sink and run it under cool water. Using your soft brush, gently scrub the engraved areas. You don’t need much pressure; the goal is simply to dislodge all the fine particles from the microscopic nooks and crannies created by the laser. You will immediately see the water run cloudy with the residue as the white design underneath becomes dramatically brighter and more distinct.
- Step 3: Rinse and Dry. Once you’ve scrubbed the entire design and the water runs clear, give the coaster a final rinse. Pat it dry with a clean, lint-free cloth and then stand it on its edge to air dry completely. At this point, the coaster is technically finished, with a crisp white design on a natural dark gray slate background.
Applying a Finish for Professional Contrast and Protection
To take your DIY laser engraved coasters from great to exceptional, the final step is to apply a finish. This optional but highly recommended step serves two purposes: it dramatically enhances the contrast of your design and it provides a layer of protection against moisture and stains. When dry, natural slate has a matte, medium-gray appearance. Applying an oil or sealer darkens the stone to a rich, near-black color, which makes the bright white engraving pop with incredible visual impact.
For a simple and effective finish, use food-safe mineral oil, the same kind used for wooden cutting boards. Pour a small amount of oil onto a clean cloth and wipe it evenly across the entire surface of the coaster, including the edges. You will instantly see the slate darken. Let the oil soak in for 10-15 minutes, then take a second, clean cloth and thoroughly buff off any excess oil until the surface feels dry to the touch. This method creates a beautiful, deep contrast and a subtle satin sheen. For a more permanent and durable finish, you can use a clear spray sealer with a matte or satin finish, specifically one formulated for stone or tile. Apply one or two light, even coats in a well-ventilated area, allowing it to dry completely between coats. This provides robust protection and locks in that stunning contrast, giving your coasters a truly professional and long-lasting finish.
Conclusions
You now have the knowledge to masterfully create your own custom slate coasters. By following the key steps of careful preparation, precise settings calibration, and detailed finishing, you can achieve professional-grade results every time. Embrace this process to craft beautiful gifts, products, or personal items that are sure to impress and last a lifetime.
Frequently Asked Questions
Q: Why did my engraving turn yellow or brown instead of white?
A: This usually happens when engraving slate that has a pre-applied sealant or coating. The laser burns the coating, causing discoloration. Always use raw, untreated slate for a crisp white mark.
Q: Is it necessary to use a mask or application tape on slate?
A: No, for most projects, masking is not necessary or recommended. The dust from slate engraving is minimal and easy to clean. Masking can weaken the laser’s power and leave a sticky residue.
Q: What’s the most important setting to get right for slate engraving?
A: A balanced combination of power and speed is most important. Too much power can create a gray, melted look instead of a bright white. The only way to find the perfect setting is by running a calibration test grid on a scrap piece from the same batch.
Q: How do I make the engraving look darker and more contrasted after cleaning?
A: Apply a finish like food-safe mineral oil or a stone sealer. This darkens the natural gray of the slate to a rich black, making the white engraved design stand out dramatically.
Block "subscribe-popup" not found