Projects
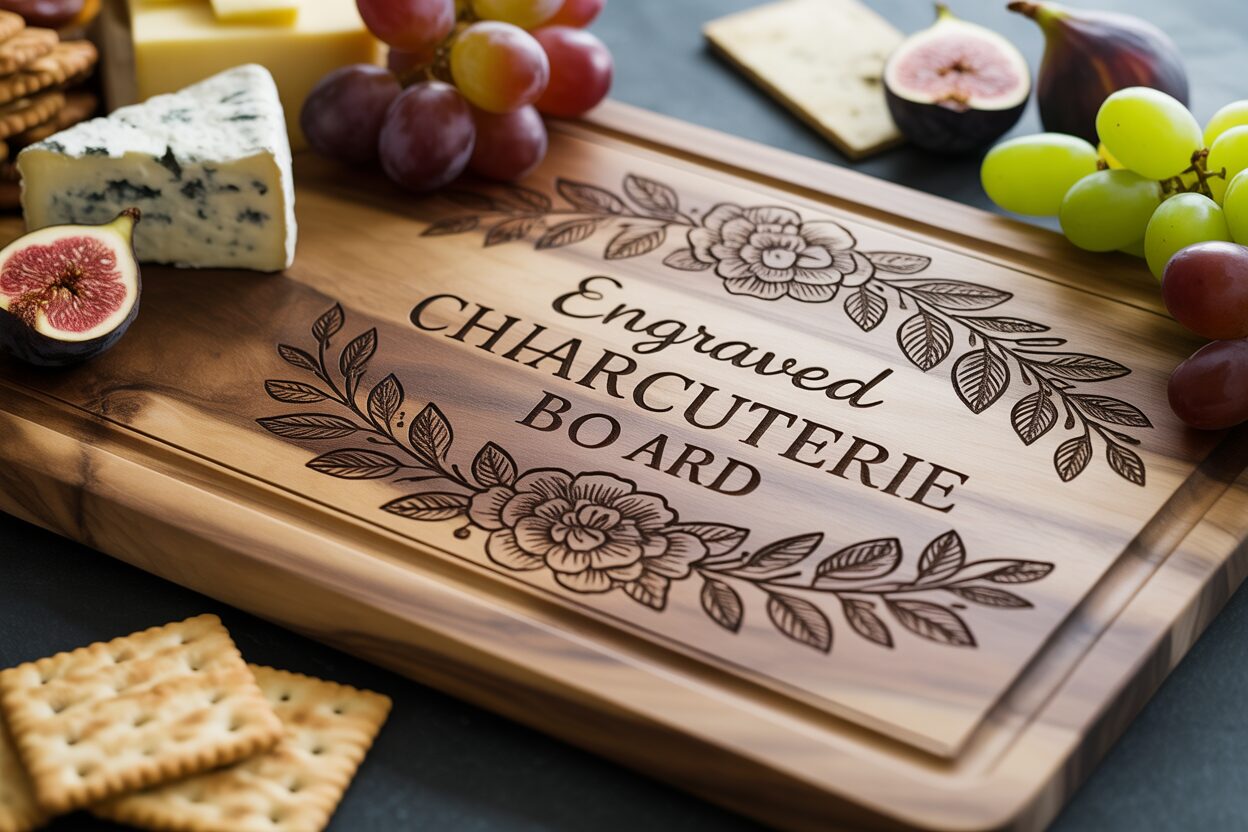
How to Create a Stunning Engraved Charcuterie Board
Feb
Estimated reading time: 8 minutes
Key Takeaways
- Wood Selection is Crucial: The success of your project depends on choosing food-safe, closed-grain hardwoods. Maple offers high contrast, Walnut provides subtle elegance, and Cherry gives a warm, rich tone.
- Vector Files are Essential: For crisp, scalable designs, always use vector file formats like SVG, AI, or DXF. Pixel-based files like JPEGs will result in a blurry, low-quality engraving.
- Test Engraving Settings First: Never engrave your final piece without first running a test grid on a scrap piece of the same wood to find the perfect balance of power and speed.
- Finishing is Non-Negotiable: After cleaning the engraved residue, always seal the board with a food-safe mineral oil to protect the wood, enhance its appearance, and ensure it’s safe for serving.
Table of Contents
- Selecting the Perfect Wood for Your Charcuterie Board
- Finding and Preparing the Perfect Engraving Design
- Setting Up Your Laser for Flawless Wood Engraving
- The Engraving Process and Professional Finishing Touches
- Conclusions
- Frequently Asked Questions
Discover the art of creating a personalized, engraved charcuterie board. This guide offers a complete walkthrough, perfect for both hobbyists and professionals. Learn how to transform a simple piece of wood into a functional work of art, ideal for gifting or elevating your own home entertaining. Let’s dive into the process of making a beautiful custom piece.
Interested in more Charcuterie Board? Check out our Charcuterie Board laser file designs: Click here!
Selecting the Perfect Wood for Your Charcuterie Board
The foundation of a truly stunning engraved charcuterie board is, without a doubt, the wood itself. Your choice of material will influence everything from the board’s durability and longevity to the final appearance of your engraved design. It’s more than just a surface; it’s the canvas that brings your creation to life. When selecting wood, you must balance three critical factors: food safety, durability, and its suitability for wood laser engraving. Not all woods are created equal, and making the right choice at this stage is essential for a beautiful and functional piece that will last for years. Focus on hardwoods with a closed-grain structure, as they are less porous, making them more resistant to bacteria and easier to clean.
Top Wood Choices for Engraving
When it comes to creating a high-quality laser engraved cutting board, a few specific hardwoods consistently stand out for their exceptional properties. These woods not only provide a safe and durable surface for serving food but also react beautifully to the laser, resulting in crisp, clear engravings. Here are the top contenders:
- Maple: Often considered the gold standard for cutting boards, Hard Maple is prized for its extreme durability and dense, closed-grain structure. Its light, creamy color provides a high-contrast canvas, causing laser engravings to appear sharp, dark, and highly visible. This makes it an excellent choice for intricate designs, detailed text, or logos that need to pop. Its minimal grain pattern ensures that the design remains the focal point without competing with the wood’s natural texture.
- Walnut: For a more luxurious and sophisticated look, Walnut is an unbeatable choice. Its rich, dark brown tones create a beautiful, subtle engraving. Instead of a stark black burn, the laser produces a tone-on-tone effect, charring the wood to a slightly darker shade that looks incredibly elegant. The grain of walnut can be straight or wavy, adding a unique character to each board that can beautifully complement simpler, bolder designs. While the contrast is lower than maple, the result is a premium, understated piece.
- Cherry: Cherry wood offers a perfect middle ground. It has a beautiful reddish-brown hue that deepens and grows richer with age, a process called patina. The laser engraving on cherry produces a lovely dark contrast that is clear and defined but feels warmer and less stark than on maple. Its smooth, uniform texture and fine, straight grain make it a delight to work with and engrave. A cherry board provides a warm, inviting feel, perfect for personalized gifts.
Regardless of your choice, always ensure you are sourcing wood that has not been treated with harmful chemicals. Opt for solid, single-piece boards or those glued together with a food-safe, waterproof adhesive like Titebond III. Avoid softwoods like pine, which can easily be damaged by knives and may impart a resinous flavor to food, and open-grained woods like Red Oak, as its porous nature can trap food particles and promote bacterial growth, making it unsafe for direct food contact. Your selection will define the final aesthetic, so consider whether you want the bold statement of maple, the understated elegance of walnut, or the warm charm of cherry.
Finding and Preparing the Perfect Engraving Design
With your perfect piece of wood selected, the next step is to choose a design that will transform it from a simple board into a personalized work of art. The digital file is the blueprint for your laser, and its quality will directly impact the final engraving. You can find excellent cutting board engraving files from various sources, each offering different styles and levels of customization. Online marketplaces like Etsy, Creative Fabrica, and Design Bundles are treasure troves for this, where you can purchase a professional-grade charcuterie board laser file specifically created for laser cutting and engraving. These platforms feature thousands of designs, from intricate monograms and floral wreaths to humorous kitchen quotes and family name templates. When searching, look for designs that are clean, well-defined, and not overly cluttered, as simpler designs often produce the most striking results on wood.
The most critical factor in a design file is its format. For laser engraving, you must use vector files, as they are composed of mathematical paths, not pixels. This allows them to be scaled to any size without losing quality, ensuring your engraving has crisp, sharp edges. Raster files, like JPEGs or PNGs, are made of pixels and will become blurry or jagged when enlarged, resulting in a poor-quality engraving. The ideal file formats for your laser software are:
- SVG (Scalable Vector Graphics): This is the most common and versatile vector format. It’s compatible with almost all design software and laser control programs.
- AI (Adobe Illustrator): If you use Adobe Illustrator, working with its native file format is seamless and preserves all layers and editing capabilities.
- DXF (Drawing Exchange Format): An older but highly reliable format, often used in CAD programs. It’s excellent for designs that rely on precise lines and outlines.
Always check the file type before purchasing or downloading to ensure it is one of these vector formats.
Preparing Your Design for Engraving
Once you have your chosen design file, you’ll likely need to customize it to fit your specific board and vision. This is done using vector editing software like Adobe Illustrator, CorelDRAW, or free alternatives such as Inkscape. The first step is to accurately measure the surface area of your charcuterie board where you intend to engrave. In your software, create a digital outline of your board’s dimensions to serve as a guide. Import your chosen laser designs for chopping boards into this workspace. You can now resize the design to fit perfectly, ensuring you leave a pleasing margin around the edges. When resizing, always lock the aspect ratio to prevent distorting the design. This is also your opportunity to add personal touches. You can insert text, such as a family name, a special date, or a favorite quote. Pay close attention to font selection; very thin or delicate script fonts may not engrave well and can get lost in the wood grain. A slightly bolder font often yields better results. Crucially, once you are happy with your text, you must convert it to paths (or “create outlines”) to turn the letters into vector shapes, ensuring the laser engraves them correctly. Finally, review your entire design, making sure all elements are properly arranged and there are no overlapping lines that could cause issues for the laser. This preparation ensures your digital vision translates flawlessly onto the wood.
Setting Up Your Laser for Flawless Wood Engraving
Once your design is finalized, it’s time to translate it from the screen to the wood. This is where meticulous machine setup becomes paramount. Proper preparation of your laser engraver is the key to achieving a crisp, clean, and professional-looking result. Rushing this stage can lead to misaligned designs, blurry engravings, or even damaged wood. The three pillars of physical setup are securing your material, setting the correct focal height, and ensuring your optics are clean. First, place your charcuterie board on the laser bed. It is absolutely crucial that the board cannot move even a fraction of a millimeter during the engraving process. Use clamps, honeycomb pins, or even heavy weights along the edges (outside the engraving area) to secure it firmly in place. Next, you must set the focus of the laser. The focal height is the optimal distance between the laser lens and the surface of the wood, where the laser beam is at its smallest and most powerful point. An out-of-focus laser will produce a wide, blurry line and a weak, inconsistent engraving. Most machines come with a manual focusing tool or an auto-focus feature; use it precisely according to your manufacturer’s instructions. Finally, make a habit of regularly cleaning your laser’s lens and mirrors with a proper lens wipe and isopropyl alcohol, as a dirty lens will scatter the beam and reduce its power, leading to poor results.
Dialing in Your Settings: The Critical Test Run
The single most important rule of wood laser engraving is to never run a job on your final piece without testing your settings first. Every piece of wood is unique; even two boards of the same species can react differently due to variations in density, grain, and moisture content. To find the perfect settings, you must perform a test run on a piece of scrap material that is identical to your charcuterie board. The two primary settings you will be adjusting are power and speed.
- Power: This setting controls the output intensity of the laser. Higher power results in a deeper and darker burn.
- Speed: This controls how quickly the laser head moves across the material. Higher speeds result in a lighter, shallower mark because the laser spends less time on any given spot.
The goal is to find the perfect balance between these two for your specific wood. A great method is to create a small test grid on your scrap piece, engraving a series of small squares with varying combinations of power and speed. This allows you to visually compare the results and choose the “sweet spot” that gives you the desired contrast and depth without scorching the wood. For an engraved charcuterie board, you typically want a clear, dark mark, but not one that is so deep it creates heavy charring and becomes difficult to clean. For example, hard maple often requires higher power or slower speeds to get a good dark mark. Cherry, on the other hand, engraves very nicely but can char easily, so you might use a faster speed. For dark woods like walnut, you may opt for lower power to achieve a subtle, elegant tone-on-tone effect rather than a harsh black burn. This testing phase takes only a few minutes but is the ultimate insurance against ruining your beautiful board.
The Engraving Process and Professional Finishing Touches
With your laser settings perfected and the board securely in place, you are ready for the most exciting part: bringing your design to life. Send the file to your laser engraver, close the lid, turn on your ventilation system, and begin the job. It is absolutely critical that you never leave a laser engraver unattended while it is in operation. Stay and monitor the process. Watch for any excessive smoke or small flare-ups, which can occasionally happen with woods that have pockets of resin. Keep a fire extinguisher rated for electrical fires nearby as a standard safety precaution. As the laser head moves back and forth, you will see your design begin to emerge, etched permanently into the wood. The smell of burning wood will fill the air as your digital creation becomes a tangible, beautiful reality on your laser engraved cutting board.
Once the laser has completed its work and the machine is fully stopped, allow a minute for the ventilation to clear any remaining smoke before opening the lid. Your newly engraved board will look fantastic, but it’s not quite finished. The engraving process leaves behind a residue of soot and vaporized wood resin around the etched areas. Cleaning this off properly is essential for a crisp, professional appearance. To do this, take a soft cloth or a paper towel slightly dampened with isopropyl alcohol or denatured alcohol. Gently wipe the engraved area. The alcohol will dissolve the resinous residue without raising the grain of the wood. For intricate designs with fine details, you can use a soft-bristled brush, like an old toothbrush, to gently scrub the residue out of the small crevices. Be careful not to scrub too hard, as you don’t want to damage the delicate wood fibers. After cleaning, let the board air dry completely, which should only take a few minutes as the alcohol evaporates quickly.
The Final, Crucial Step: Sealing and Protecting
This final step is what separates a good project from a great one. Applying a finish will not only dramatically enhance the look of your board but is also vital for its longevity and food safety. The raw, engraved wood is porous and susceptible to drying out, cracking, and absorbing bacteria from food. You must use a 100% food-safe finish. The best and most common choice is a high-quality, food-grade mineral oil. Do not use cooking oils like olive or vegetable oil, as they will go rancid over time. To apply the finish, generously pour the mineral oil onto the surface of the board, including the engraved areas. Using a clean, lint-free cloth, spread the oil evenly over the entire board—top, bottom, and sides. You’ll immediately see the wood grain become richer and the contrast of the engraving deepen beautifully. Let the board sit for at least 20-30 minutes (or even overnight) to allow the oil to soak deep into the wood fibers. Afterwards, take another clean cloth and buff off any excess oil. For an even more premium finish, you can follow this up with a coat of board butter or conditioner, which is typically a blend of mineral oil and beeswax. This adds an extra layer of water resistance and gives the board a silky, smooth feel. This finishing touch not only protects your creation but also makes it a safe, durable, and truly stunning piece ready for serving.
Conclusions
You now have the knowledge to create a stunning engraved charcuterie board from start to finish. By selecting the right materials, preparing your design, and mastering your laser settings, you can produce professional-quality results. This project not only enhances your skills but also leaves you with a beautiful, personalized item that’s perfect for any occasion. Start creating your own masterpiece today!
Frequently Asked Questions
Q: What is the best wood for a beginner to use for an engraved charcuterie board?
A: Maple is an excellent choice for beginners. Its light color and dense grain provide a high-contrast background that makes engravings pop, and it’s very durable and forgiving with laser settings.
Q: Can I use a normal JPEG or PNG file I found online for my design?
A: It is strongly recommended to use vector files (SVG, AI, DXF) instead. JPEG and PNG files are pixel-based and will result in blurry, jagged edges when engraved. Vector files use mathematical paths, ensuring a crisp, clean result at any size.
Q: Is it really necessary to apply mineral oil after engraving?
A: Yes, this step is absolutely crucial. Applying a food-safe mineral oil is not just for looks; it seals the porous wood, preventing it from drying out and cracking. Most importantly, it creates a barrier that prevents bacteria from being absorbed into the board, making it safe for food contact.
Q: What is the most common mistake people make when laser engraving wood?
A: The single most common and costly mistake is not testing laser settings on a piece of scrap wood before running the job on the final board. Wood varies in density and moisture, and a quick test is the only way to guarantee you have the correct power and speed to get the desired result without ruining your project.
Block "subscribe-popup" not found