Tutorials
How to Create a Personalized Slate Cheese Board with a Laser Engraver
Nov
Estimated reading time: 6 minutes
Key Takeaways
- Slate Preparation is Crucial: Thoroughly cleaning the slate with mild soap and water, and ensuring it is completely dry, is essential for a crisp, clean engraving and prevents chipping.
- Design for High Contrast: The best designs for slate are high-contrast, black-and-white vector files (SVG, AI). Bold text, monograms, and intricate line art produce stunning results; avoid thin lines and gradients.
- Test Your Settings: Optimal laser settings vary by machine. Always run a power/speed test grid on a scrap piece to find the perfect combination for a bright, white mark without overburning.
- Finish for Safety and Aesthetics: After engraving, clean off all dust and apply a food-grade mineral oil. This seals the slate, makes it food-safe, and dramatically enhances the contrast between the dark stone and the light engraving.
Table of Contents
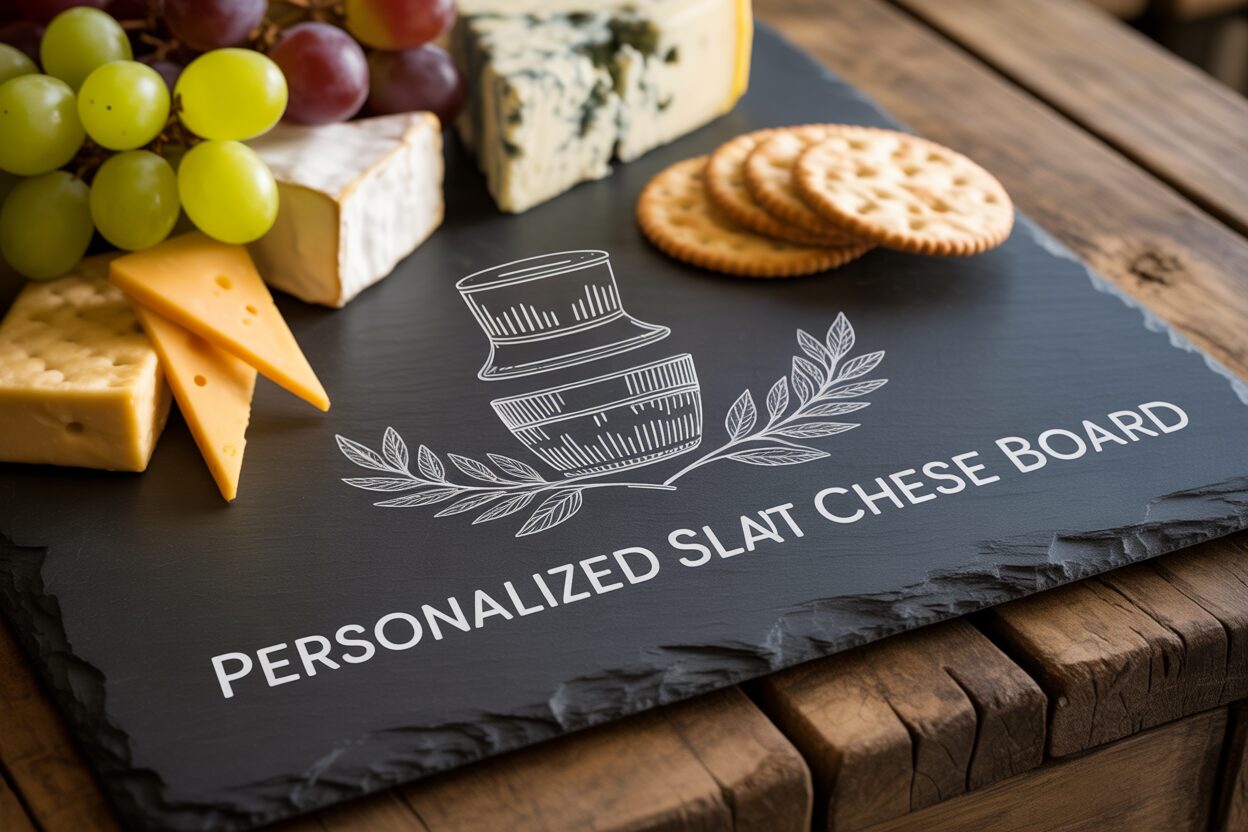
Discover the elegance of a personalized slate cheese board, a perfect gift or addition to your home. This guide provides a step-by-step tutorial on transforming a simple slate board into a work of art using a laser engraver. We’ll explore everything from initial setup to the final food-safe touches, ensuring a beautiful and functional result.
Interested in more Slate Cheese Board? Check out our Slate Cheese Board laser file designs: Click here!
Design Choice and Slate Preparation
The success of your personalized slate cheese board begins long before the laser fires. This initial phase of preparation, encompassing both the physical slate and the digital design, is foundational to achieving a crisp, clean, and professional-looking result. Skipping these steps can lead to inconsistent engravings and wasted materials, so dedicating time here is a crucial investment in your final product.
Preparing Your Slate for Flawless Engraving
Slate, being a natural stone, often arrives from the supplier with a layer of dust, oil from handling, or residue from the cutting process. These contaminants can interfere with the laser beam, absorbing its energy unevenly and resulting in a blotchy or faded engraving. To ensure the laser interacts directly and consistently with the stone surface, a thorough cleaning is essential. Begin by washing the slate board with warm water and a mild dish soap. Use a soft cloth or sponge to gently scrub the entire surface, including the edges. Avoid abrasive scrubbers that could scratch the slate. Once clean, rinse it thoroughly under running water to remove all soap residue, which could also cause issues during engraving.
The most critical part of this physical preparation is ensuring the slate is completely dry. Any residual moisture, even that trapped within the porous layers of the stone, can turn to steam when hit by the intense heat of the laser. This can cause the slate to chip, create a blurry engraving, or even, in rare cases, crack the board. After washing, you can either let the board air dry for several hours or carefully pat it dry with a lint-free towel. To be absolutely certain, it’s a good practice to let it sit for at least an hour after towel drying before taking it to your laser engraver.
Choosing and Preparing Your Design
With a clean and dry slate ready, your focus shifts to the digital design. Slate’s dark, matte surface provides a fantastic canvas for high-contrast imagery. The laser works by ablating or fracturing the top layer, revealing a lighter gray tone underneath. Therefore, designs that work best are those that are strictly black and white, without gradients or shades of gray. Bold text, such as monograms, family names, or meaningful quotes, engraves beautifully. Intricate vector art, like floral wreaths, geometric patterns, or detailed illustrations, also produces stunning results, provided the lines are not too fine. High-contrast logos are another excellent choice.
When creating your design, keep a few key laser engraving tips for slate in mind. Firstly, avoid extremely thin lines or delicate fonts. The natural, flaky texture of slate can cause fine details to be lost or appear broken. As a general rule, ensure your lines have enough thickness to be robust and clearly visible. Secondly, consider the unique texture of your specific piece of slate. It is not a uniform material; it has natural layers and variations. A design that embraces this organic quality, perhaps with a rustic or hand-drawn aesthetic, often looks more harmonious than a rigidly perfect design that might be jarred by a natural vein in the stone.
Finally, you must prepare the digital file for your laser software. The ideal format for line art and text is a vector file, such as an SVG, AI, or DXF. Vectors are infinitely scalable without losing quality, ensuring the laser follows a clean, precise path. Create your design on an artboard that matches the exact dimensions of your slate board. This allows you to position it perfectly before sending it to the laser. Ensure all elements to be engraved are set to a single color (typically black) and that there are no unintended overlapping lines. Once your design is finalized, save it in a compatible vector format, and it will be ready to import into your laser control software for the next exciting step.
Dialing in the Perfect Laser Engraving Settings
With your design finalized and your slate board clean and dry, you are ready to bridge the gap between the digital and physical worlds. This stage is where precision and testing are paramount. There is no universal “magic number” for slate engraving settings; the optimal parameters depend heavily on your specific machine, the power of your laser, and the unique composition of your piece of slate. Mastering this process involves understanding your equipment and conducting a methodical material test to achieve that perfect, high-contrast mark.
The type of laser you are using is the primary factor influencing your starting settings. CO2 lasers are generally more powerful and can engrave slate at much higher speeds. A 40W CO2 laser, for example, might achieve a beautiful result at 15-25% power and a speed of 300-400 mm/s. In contrast, engraving with a diode laser on slate requires a different approach. A 10W optical output diode laser will likely need to run at a much higher power level, typically 80-100%, but at a slower speed, often in the range of 1000-3000 mm/min. Notice the change in units from mm/s to mm/min, which is common between CO2 and diode software platforms. The key takeaway is that diode lasers trade speed for accessibility, but are perfectly capable of producing stunning results with the right settings.
Conducting a Material Test
The most reliable way to find your ideal settings is to run a power/speed test grid on a spare piece of slate or an inconspicuous area of a test board. Most laser software, like LightBurn, has a built-in feature for creating these test grids. The process involves creating a matrix of small shapes, where each shape is engraved with a unique combination of power and speed. For instance, you could set up a grid where the X-axis represents speed (e.g., 1000, 1500, 2000, 2500 mm/min) and the Y-axis represents power (e.g., 70%, 80%, 90%, 100%). After running the test, you can visually inspect the results. You are looking for the square that shows the brightest, crispest white or light gray mark with minimal chipping around the edges. Too little power will result in a faint, barely visible engraving. Too much power can “overburn” the slate, sometimes causing a yellowish tint or excessive flaking. This simple test removes all guesswork and ensures your main project will be a success.
Key Laser Engraving Tips for Slate
Beyond power and speed, a few other settings are critical. First, correct focus is non-negotiable. An out-of-focus laser beam will be wider and less concentrated, resulting in a blurry and weak engraving. Use your machine’s focusing tool precisely before starting the job. Because slate can be slightly uneven, it’s best to set your focus on the center of your engraving area. Second, the use of air assist is highly recommended. A gentle stream of air directed at the engraving point helps to blow away the fine dust created as the slate is ablated. This prevents the dust from interfering with the laser beam and settling back into the engraved lines, leading to a much cleaner and higher-contrast result. Finally, remember that the power level directly controls the color. On slate, you are not burning the material but rather fracturing its surface. More energy (higher power or slower speed) creates a more intense fracture, resulting in a brighter, whiter appearance. Finding the sweet spot on your test grid will give you complete creative control over the final look.
Post-Engraving Cleanup and Food-Safe Finishing
Once the laser has finished its work and the machine is silent, you are left with a beautifully etched piece of slate. However, the project is not yet complete. This final stage of cleaning and finishing is what elevates your project from a raw engraving to a professional, durable, and functional piece of art. It not only enhances the visual appeal of your design but, most importantly, ensures the board is prepared for its intended use, making the final result a truly food safe slate engraving. The laser process ablates the surface, creating a fine, light-colored dust that settles in and around the engraved areas. This residue must be thoroughly removed before any finishing treatment can be applied.
The cleanup process should be done gently to avoid marring the surface of the slate or the crisp edges of your design. Take a soft, damp cloth—a microfiber towel works exceptionally well—and carefully wipe down the entire surface of the board. The goal is to lift the dust out of the engraving without scrubbing. You may need to rinse the cloth and repeat the process a couple of times to remove all the residue. For highly intricate designs with fine details, a very soft-bristled brush, like a clean, new toothbrush, can be used to gently dislodge any stubborn dust from the crevices. Once clean, allow the slate to air dry completely, just as you did in the preparation phase. Applying a finish to a damp board will result in a splotchy, uneven coat, so patience here is key.
Sealing for Contrast and Food Safety
With the board clean and dry, you can proceed to the most transformative step: applying a food-safe finish. This is not merely an aesthetic choice; it is a critical step for safety and longevity. Untreated slate is porous, and the newly engraved areas are even more so. This means that unsealed slate can absorb oils, juices, and bacteria from food, making it difficult to clean and potentially unhygienic over time. To solve this, you will use a food-grade mineral oil. This non-toxic, non-drying oil penetrates the stone, sealing its pores. It will not become rancid like cooking oils (e.g., olive or vegetable oil), making it the industry standard for conditioning cutting boards and butcher blocks.
The application of mineral oil also has a dramatic visual effect. As the oil absorbs into the slate, it will significantly darken the stone’s natural deep gray or black color. This creates a stunning contrast with the light gray engraved design, making it “pop” in a way that the raw slate does not. To apply, pour a small amount of food-grade mineral oil directly onto the slate. Using a clean, lint-free cloth, spread the oil evenly across the entire surface, including the sides and the back. Be sure to work the oil into all the details of the engraved design. Let the board sit for at least 20-30 minutes, allowing the slate to absorb as much oil as it can. After this soaking period, take a new, clean cloth and thoroughly buff the entire surface, wiping away all excess oil. The board should have a rich, satin sheen but should not feel greasy or wet to the touch. Your personalized cheese board is now beautifully finished, food-safe, and ready to be the centerpiece of your next gathering.
Conclusions
You now have the knowledge to create stunning, personalized slate cheese boards. By following the steps for preparation, understanding the nuances of laser settings, and applying a food-safe finish, you can produce professional-quality items. This project not only enhances your skills but also opens up possibilities for creating unique gifts and products that are sure to impress.
Frequently Asked Questions
Q: What is the best type of design for slate engraving?
A: High-contrast, black-and-white vector designs like bold text, monograms, and intricate line art work best. The laser creates a light mark on the dark stone, so designs without gradients or shades of gray produce the cleanest results. Avoid extremely thin lines, as they can get lost in the natural texture of the slate.
Q: Can I use a diode laser to engrave slate?
A: Absolutely. While CO2 lasers are faster, diode lasers are perfectly capable of producing beautiful engravings on slate. You will typically need to use a higher power setting (e.g., 80-100%) and a slower speed (e.g., 1000-3000 mm/min) compared to a CO2 laser to achieve a bright, crisp mark.
Q: Why is my slate engraving blurry or faint?
A: A blurry or faint engraving is often caused by an out-of-focus laser beam. Ensure you have set the correct focal distance for your material. It could also be due to settings (power too low or speed too high) or an unclean slate surface interfering with the laser.
Q: Is it really necessary to seal the slate after engraving?
A: Yes, sealing with a food-grade mineral oil is a critical final step. It serves two main purposes: first, it makes the board food-safe by sealing the porous stone against bacteria and oils from food. Second, it dramatically enhances the visual contrast, making the dark slate darker and the light engraving “pop.”
Block "subscribe-popup" not found