Projects
How to Create a Personalized Engraved Charcuterie Board
Feb
Estimated reading time: 6 minutes
Key Takeaways
- Wood Selection is Paramount: The best results come from dense, closed-grain hardwoods like maple, cherry, and walnut, as they allow for crisp, clean laser burns without fuzziness.
- Surface Preparation is Non-Negotiable: A professional finish requires meticulous preparation, including sanding the wood smooth with fine-grit sandpaper and cleaning it with denatured alcohol to remove all dust and oils.
- Use a Mask for Flawless Results: Applying a laser-safe mask (like transfer tape) before engraving is a professional technique that prevents smoke and resin from staining the wood, ensuring an exceptionally sharp design.
- Always Use a Food-Safe Finish: To ensure the board is safe for contact with food, finish it with food-grade mineral oil or a board conditioner (a blend of oil and beeswax). Never use chemical sealants like polyurethane or lacquer.
Table of Contents
- Choosing the Best Wood for Your Charcuterie Board
- Preparing Your Design and the Wood Surface
- Engraving and Finishing for a Professional Look
- Conclusions
- Frequently Asked Questions
A personalized engraved charcuterie board is a perfect gift and a stunning addition to any kitchen. This guide provides a step-by-step tutorial on making your own, from choosing the best wood for laser engraving to applying the final food-safe finish. We’ll cover everything you need to know to create a beautiful and functional piece of art.
Interested in more Charcuterie Board? Check out our Charcuterie Board laser file designs: Click here!
Choosing the Best Wood for Your Charcuterie Board
The foundation of a truly exceptional engraved charcuterie board lies in the wood itself. While many types of wood can be used to serve food, not all are suitable for the precision of laser engraving. The best choices are dense, closed-grain hardwoods. The term closed-grain refers to woods with very small pores, creating a smooth, uniform surface. When a laser engraves a closed-grain wood, the heat creates a clean, sharp burn with minimal “bleeding” into the surrounding fibers. This results in crisp lines and intricate detail, which is exactly what you want for a personalized design. In contrast, open-grained woods like oak or ash have large, porous grains that can cause the laser burn to look fuzzy or inconsistent, as the heat follows the path of least resistance along the deep grain lines. For this reason, we will focus on the top three closed-grain hardwoods: maple, cherry, and walnut.
A Closer Look at the Top Wood Choices
Each of the premier hardwoods for engraving offers a unique aesthetic and set of characteristics. Your choice will depend on the desired final look, especially the contrast between the wood and the engraved design.
- Maple: Known for its light, creamy color and subtle grain, maple is the go-to choice for high-contrast engravings. The dark, rich brown burn created by the laser stands out dramatically against the pale wood, making text and detailed graphics incredibly clear and legible. Pros: Maximum contrast, durable, and provides a clean, bright canvas for any design. Cons: Its light color can show stains more easily if not properly maintained, and the high contrast may feel too stark for those seeking a more subtle look.
- Cherry: Cherry wood offers a beautiful middle ground. It has a warm, reddish-brown hue that provides a rich, elegant backdrop for engravings. The contrast is softer and more subtle than on maple but still distinct enough for most designs. Over time, cherry naturally darkens to a deeper patina, adding to its character. Pros: Warm, luxurious appearance; good contrast; and ages beautifully. Cons: The color will change over time, which can alter the appearance of the engraving’s contrast. It is also slightly softer than maple.
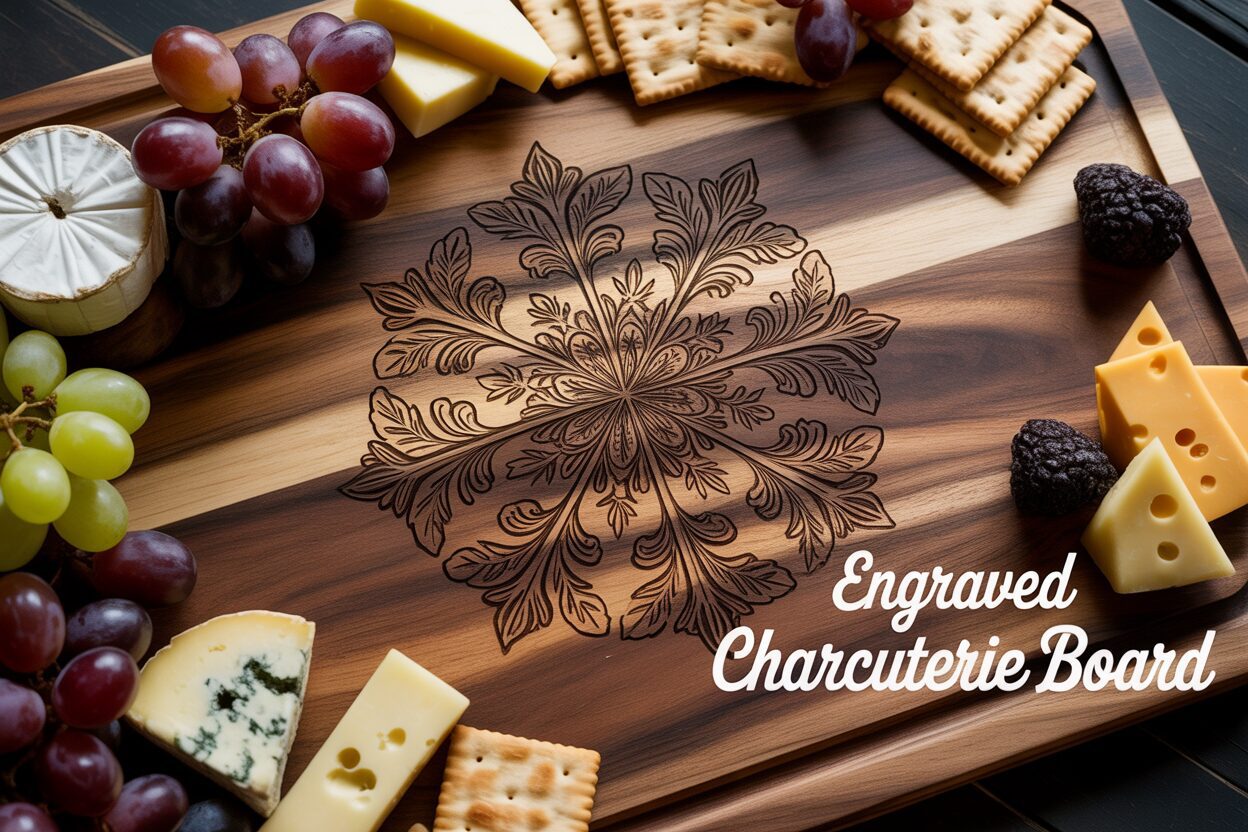
- Walnut: For a sophisticated, premium feel, walnut is unparalleled. Its deep, chocolate-brown color creates a low-contrast, tone-on-tone effect with the dark laser burn. This results in an understated, elegant marking that looks and feels high-end. Pros: Creates a subtle and luxurious “branded” look. Cons: The low contrast makes it unsuitable for intricate, fine-detail designs or small text that needs to be read from a distance. It works best with bold graphics, monograms, or large-format text.
Sourcing Your Board: Pre-Made vs. Custom and What to Inspect
Once you’ve decided on a wood type, you need to acquire the board itself. You can either purchase a pre-made board or create a custom one. Pre-made boards from kitchen or home goods stores are convenient and widely available. However, when selecting one, you must be a careful inspector. Look for a board that is perfectly flat; any warping will cause the laser to lose focus and produce an uneven engraving. Examine the surface where you plan to place the design. Avoid areas with large knots, dramatic color variations, or prominent glue lines from lamination, as these features can interfere with the final look. Ideally, choose a board that is unfinished or has a simple food-grade mineral oil finish. Thick lacquers or varnishes must be sanded off before engraving, as they can melt, produce unpleasant fumes, and ruin the burn quality. Creating a custom-shaped board offers complete freedom but requires access to woodworking tools and expertise. This path allows you to control the exact shape, size, and grain placement for a truly one-of-a-kind piece.
Preparing Your Design and the Wood Surface
With your perfect piece of wood in hand, the next stage is to bridge the gap between concept and creation. This involves finalizing your design and meticulously preparing the board’s surface to receive the laser’s mark. The beauty of custom wood engraving lies in its limitless possibilities. Popular laser engraving wood designs range from the classic to the deeply personal. Monograms, family names, and establishment dates are timeless choices for wedding or housewarming gifts. For a corporate or branded feel, a clean company logo can look incredibly professional. More artistic options include intricate floral patterns around the edges, geometric mandalas, or even a cherished family recipe etched in a beautiful script. Whatever you choose, ensure your final artwork is a high-resolution vector file (like an SVG or AI) or a high-DPI raster image (like a PNG or JPG). Vector files are generally preferred as they provide the cleanest lines for the laser to follow.
The Critical Steps of Surface Preparation
Before any engraving begins, you must prepare the wood surface to ensure the laser can do its job flawlessly. This process, often summarized as how to prepare wood for laser engraving, is non-negotiable for a professional result. First, sanding is essential. Even a board that feels smooth to the touch can be improved. Using a fine-grit sandpaper, such as 220-grit, sand the entire surface where you plan to engrave. Always sand with the grain of the wood, not against it, to avoid creating tiny scratches that will show up in the final finish. This step removes any minor imperfections and creates a perfectly uniform, flat plane, which is critical for maintaining the laser’s focus across the entire design. After sanding, the surface will be covered in fine dust. Wipe it thoroughly with a tack cloth or use compressed air to blow it clean. Follow this with a final wipe-down using a lint-free cloth dampened with denatured alcohol. The alcohol will lift any remaining dust and oils from your hands without raising the wood grain, and it evaporates quickly, leaving a pristine surface ready for the next step.
Masking and Final Design Placement
One of the most effective techniques for achieving an exceptionally crisp engraving is to apply a surface mask. This is typically a sheet of wide, medium-tack transfer tape or specialized laser masking tape. Carefully apply the mask to the prepared surface, using a squeegee or a credit card to smooth it out and eliminate any air bubbles. This mask serves a crucial purpose: it prevents smoke and resin residue from staining the wood surrounding your design. As the laser burns the wood, it creates smoke that can settle back onto the surface, creating a hazy “halo” effect. The mask catches all this residue, and when you peel it away after the engraving is complete, you are left with only the clean, sharp burn lines of your design. Once the board is masked, the final step is precise placement. Measure your board and your design carefully to determine the ideal location. Corners are a popular choice as they preserve the main surface area for serving. Use your laser software’s framing or red-dot pointer feature to trace the outline of your design onto the masked board. This allows you to visualize its exact size and position before committing. Take your time with this step; once the laser starts, there’s no going back.
Engraving and Finishing for a Professional Look
With your design perfectly placed and your board securely in the laser bed, the moment of truth has arrived. The first critical step is to accurately focus the laser. An out-of-focus laser will produce a wide, weak beam, resulting in a blurry, shallow engraving with fuzzy edges. A sharply focused laser concentrates all its energy into a tiny point, creating deep, crisp lines. Use your machine’s focusing tool or procedure to set the correct distance between the laser lens and the surface of your masked board. Next, you must dial in your power and speed settings. These settings vary dramatically between different laser machines and wood types. A piece of scrap wood from the same board is not optional—it is essential. On this test piece, run a small version of your design or a series of test squares at different settings. You are looking for the sweet spot: enough power to create a rich, dark burn without excessive charring, and a speed that is fast enough for efficiency but slow enough to achieve the desired depth. For maple, you might need higher power to get a dark mark, while walnut engraves darkly with less power. Once you have perfected your settings on the test piece, you are ready to run the final job.
From Engraved to Exquisite: The Finishing Touches
After the laser has completed its work, the process of finishing engraved wood begins, which will transform your piece from a simple project into a professional-grade product. If you used a mask, this is the satisfying moment where you peel it away. Use a small weeding tool or a craft knife to carefully lift a corner of the mask and slowly peel it back, revealing the pristine wood and the perfectly clean engraving beneath. If you did not use a mask, you will need to clean the smoke residue from the wood’s surface. A soft brush can remove any loose char, followed by a lint-free cloth lightly dampened with denatured alcohol to wipe away the smoky haze. Be gentle to avoid smearing residue into the wood grain. Inspect the engraved area. Occasionally, the intense heat of the laser can raise the grain of the wood slightly. If the surface feels rough, you can very lightly sand it with ultra-fine grit sandpaper (320 or higher), being extremely careful to avoid sanding the engraved area itself, which could soften its sharp details.
The final and most important step is applying a food-safe finish. This is non-negotiable for an item that will come into contact with food. Never use polyurethane, lacquer, or other chemical sealants. The two best options are:
- Food-Grade Mineral Oil: This is the industry standard for cutting boards and butcher blocks. It is a non-toxic, non-drying oil that penetrates deep into the wood fibers, nourishing them and preventing the wood from drying out and cracking. It also beautifully enriches the wood’s natural color and makes the grain pop.
- Board Conditioner/Cream: These products are typically a blend of food-grade mineral oil and natural waxes like beeswax or carnauba wax. The oil component soaks in to condition the wood, while the wax component stays on the surface to create a protective, water-resistant barrier with a soft, satin sheen.
To apply, generously pour the oil or scoop the cream onto the board and use a clean, lint-free cloth to rub it into all surfaces—top, bottom, and sides. Let it soak in for at least 20-30 minutes, or ideally overnight. The wood will drink up the oil. Afterward, take another clean cloth and buff off all the excess. The transformation is immediate: the colors of the wood will deepen, the engraved area will darken, and the entire piece will have a rich, finished luster, ready for both display and use.
Conclusions
You have now learned how to create a stunning and personalized engraved charcuterie board. By selecting the right materials, preparing your design carefully, and applying a proper finish, you can make a high-quality, custom piece for yourself or as a thoughtful gift. Experiment with different designs and woods to further refine your skills and create unique treasures.
Frequently Asked Questions
Q: Why can’t I just use an oak board? It’s a common and durable hardwood.
A: While oak is a durable hardwood, it is an “open-grain” wood, meaning it has large, deep pores. When a laser engraves oak, the heat and burn can bleed into these pores, resulting in fuzzy, inconsistent lines rather than the crisp, sharp detail you get from closed-grain woods like maple, cherry, or walnut.
Q: My engraving looks blurry and shallow. What did I do wrong?
A: A blurry and shallow engraving is almost always caused by an out-of-focus laser. Before running your job, it’s critical to use your machine’s focusing tool to set the perfect distance between the laser lens and the surface of your wood. An incorrect focus diffuses the laser beam’s energy, leading to a poor-quality mark.
Q: Do I really need to sand a board that already feels smooth?
A: Yes. Even a commercially prepared board can have tiny surface imperfections or milling marks that aren’t obvious to the touch. Sanding with a fine-grit sandpaper (like 220-grit) creates a perfectly uniform plane, which is essential for maintaining consistent laser focus and achieving a professional-quality engraving and finish.
Q: How often should I reapply oil or conditioner to my charcuterie board?
A: It depends on how often you use and wash the board. A good rule of thumb is to reapply a coat of food-grade mineral oil or board conditioner once a month, or whenever the wood starts to look dry or faded. Proper maintenance will prevent the wood from cracking and keep it looking rich and beautiful for years.
Block "subscribe-popup" not found