Projects
DIY Laser Cut Wood Projects for Beginners
Jun
Estimated reading time: 7 minutes
Key Takeaways
- Material Selection & Safety are Crucial: Choosing the right laser-safe wood (e.g., Baltic Birch, basswood) and ensuring proper ventilation and eye protection are fundamental for quality results and personal safety.
- Design Files: Vectors are Key for Cutting: Understanding the difference between vector (for precise cuts) and raster (for engraving) files is essential, with vector formats (SVG, DXF) being critical for clean cutting and managing kerf.
- Creative Project Versatility: Laser cutting allows for a wide range of projects from personalized gifts (coasters, keychains) to intricate home decor (mandala art, ornamental boxes) and functional items (jewelry, phone stands).
- Hobby to Business Potential: With proper niche identification, accurate pricing (covering material, time, machine wear, and profit), and effective marketing (online marketplaces, local fairs), laser cutting can evolve into a profitable venture.
Table of Contents
- Getting Started with Laser Cutting Wood
- Finding and Preparing Laser Cut Wood Designs
- Inspiring Laser Cut Wood Projects
- From Hobby to Business: Selling Your Creations
- Conclusions
This guide will walk you through the exciting world of laser cutting wood. From selecting the right materials to mastering your machine, we’ll cover everything you need to know to start creating stunning projects. Whether you’re a complete novice or have some experience, you’ll find valuable tips and inspiration to bring your creative ideas to life.
Getting Started with Laser Cutting Wood
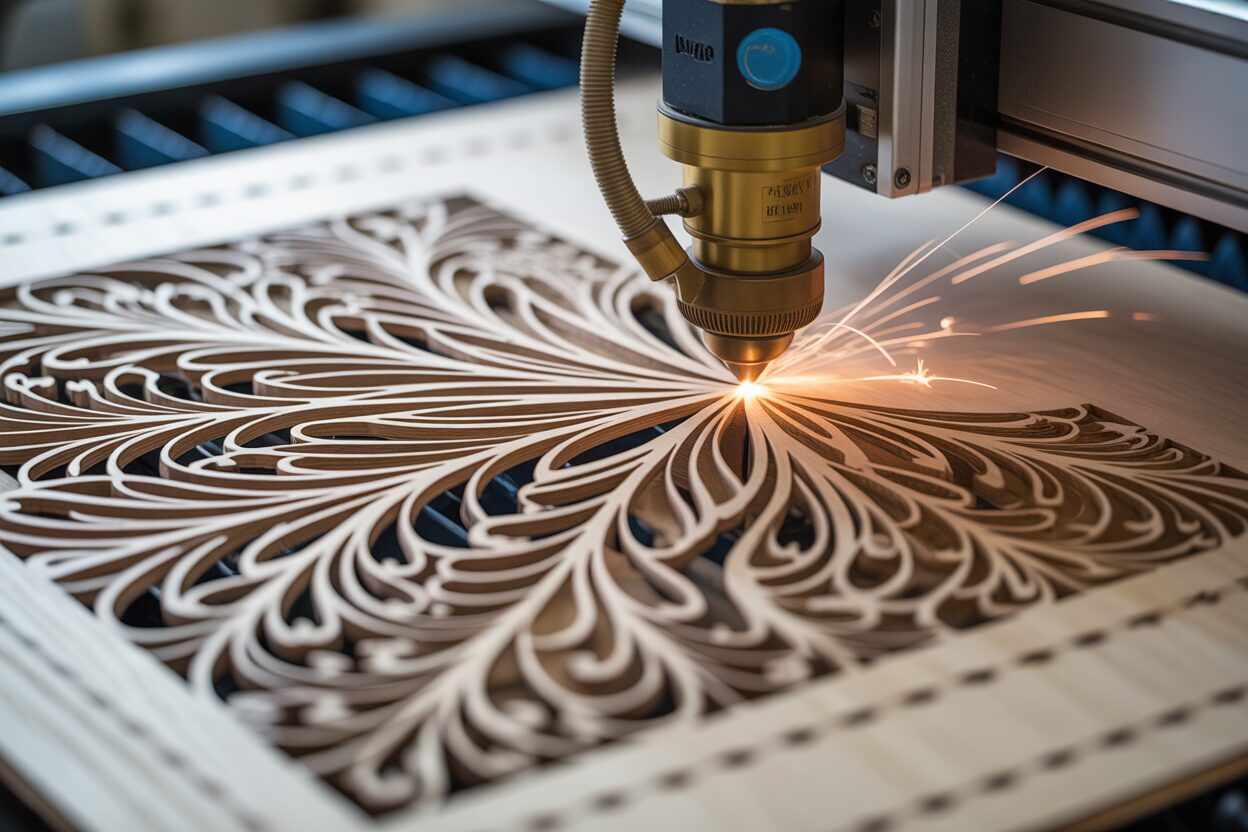
Diving into the world of laser cutting wood begins with understanding the fundamental interaction between the laser and the material. A laser cutter doesn’t mechanically slice through wood; instead, it uses a highly focused beam of light to generate intense, localized heat. This heat vaporizes, or ablates, the wood in its path, creating a precise cut or engraving. The small channel of material that is removed is known as the kerf. Understanding this process is key to troubleshooting and perfecting your settings later on. The type of wood, its density, and its moisture content will all influence how it reacts to the laser, making material selection your first critical decision.
Choosing Your Canvas: The Best Woods for Laser Cutting
Not all wood is created equal when it comes to laser cutting. Your choice will dramatically affect the ease of cutting and the quality of your final product. Here are some of the most common and reliable options for beginners:
- Plywood: This is often the go-to material for its stability and affordability. However, the type of plywood is crucial. Look for laser-safe plywood or Baltic Birch. These varieties use interior-grade glues that vaporize cleanly and have minimal voids between layers, ensuring a consistent cut. Avoid construction-grade plywood, as its exterior glues can contain formaldehyde and other chemicals that release toxic fumes and are difficult for a hobbyist laser to cut through.
- MDF (Medium-Density Fiberboard): MDF is an engineered wood product prized for its complete uniformity. It has no grain or knots, which means it engraves beautifully and cuts with perfect consistency. The downside is the binder used to create it, which releases unpleasant and harmful fumes. Excellent ventilation is non-negotiable when working with MDF.
- Solid Wood: For premium projects, nothing beats the beauty of solid wood. Lighter, less dense woods like basswood, alder, poplar, and cherry are excellent choices as they cut quickly and cleanly. Harder woods like oak or maple require more laser power and may produce more charring. Be mindful of grain direction and knots, as these variations in density can cause uneven cuts. Avoid oily or resinous woods, as the residue can create flare-ups and coat your laser’s optics.
As a rule, always avoid pressure-treated wood, which contains toxic heavy metal compounds, and any material containing PVC, as it releases corrosive chlorine gas when burned.
Preparation and Safety for a Perfect Cut
Achieving a professional-looking result requires a bit of preparation and a strict adherence to safety. To prevent smoke and residue from staining the surface of your wood, a technique called masking is essential. Before cutting, apply a layer of paper-based masking tape or specialized laser-masking film over the entire surface of the wood. Burnish it down firmly to ensure there are no air bubbles. The laser will cut through the tape and the wood, and when you’re done, you can simply peel the tape off, taking all the smoke stains with it, revealing a pristine surface underneath. For an even smoother finish, a light sanding with 220-grit sandpaper before masking can remove any minor imperfections.
Your safety is paramount. Wood smoke contains fine particulates and volatile organic compounds that are harmful to inhale. Your laser cutter must be equipped with an adequate ventilation system, typically an exhaust fan ducted directly to the outdoors. If you can smell strong, persistent smoke in your workspace, your ventilation is insufficient. Always wear the safety glasses rated for your specific laser’s wavelength; the enclosure provides protection, but stray reflections can cause irreversible eye damage in an instant. Finally, perform regular maintenance. A dirty laser lens or mirror will absorb energy, reducing cutting power and creating a fire hazard. Regularly clean your optics and clear combustible debris from inside the machine to ensure it operates safely and effectively.
Finding and Preparing Laser Cut Wood Designs
Once your physical wood is prepped and your safety measures are in place, the next step is finding a digital blueprint for your laser to follow. These blueprints are design files, and a vibrant online ecosystem exists to provide them. You can find countless laser cut wood designs on marketplaces like Etsy, where creators sell polished, project-ready files for everything from jewelry to complex 3D models. For free options, communities like Thingiverse or specialized laser forums offer files shared by fellow hobbyists. Design bundles and stock vector websites are also excellent resources, often providing professionally made files that you can adapt for your own projects. When downloading files, pay close attention to the usage rights; some are for personal use only, while others include a commercial license, which is crucial if you plan to sell your creations.
Vectors vs. Rasters: The Language of Lasers
To prepare a design, you must first understand the two fundamental types of digital images: raster and vector. A raster image (like a JPG or a PNG) is made up of a grid of tiny squares called pixels. This format is excellent for photographs and detailed, shaded engravings. However, if you try to cut a line from a raster image, the laser will see a jagged collection of pixels, not a smooth path, resulting in a poor-quality cut. A vector file (like an SVG, DXF, or AI file) is different. It’s not made of pixels; it’s a set of mathematical instructions that define points, lines, and curves. Because the laser follows these precise mathematical paths, vector files are essential for clean, accurate cutting. For any project that involves cutting shapes out of wood, you will need the design in a vector format.
Before you can send a design to your laser, it often needs to be opened and tweaked in design software. Industry-standard software like Adobe Illustrator offers powerful tools, while free, open-source alternatives like Inkscape are incredibly capable and popular within the maker community. Inside the software, your first task is to set up your cut lines. Most laser software identifies cut paths by a specific combination of stroke color and thickness. A common convention is to set all lines you want to cut to a pure red color (RGB 255, 0, 0) and a hairline thickness (often 0.001 inches or 0.01mm). Any shapes with a thicker stroke or a different color fill will typically be engraved instead of cut. This simple color-coding tells the machine exactly what to do. For a truly professional diy laser cut wood project with interlocking parts, you must account for the laser’s kerf—the small amount of material vaporized by the beam. If a tab is 1/8″ wide and its corresponding slot is also 1/8″ wide, the fit will be loose because the laser removed material from both edges. To achieve a snug fit, you need to adjust your design by slightly offsetting your paths to compensate for the kerf. Finally, to minimize material waste, practice nesting your components. This involves arranging all the individual pieces of your design as close together as possible on your digital canvas, fitting smaller parts into the cutouts of larger ones, much like a puzzle. This maximizes the use of every square inch of your expensive wood.
Inspiring Laser Cut Wood Projects
With the fundamentals of materials and design preparation under your belt, it’s time for the most exciting part: bringing your ideas to life. The versatility of a laser cutter opens up a world of creative possibilities. Here are some inspiring laser cut wood projects, perfect for beginners, to help you get started and build your skills. Each project type utilizes different techniques, from simple cuts and engraves to basic 3D assembly.
Personalized Gifts That Impress
Creating custom items is one of the most rewarding uses for a laser cutter. These small projects are quick, use minimal material, and make fantastic gifts.
- Engraved Coasters: A classic beginner project. Use 4-inch squares of 1/8″ or 1/4″ plywood or even slices of solid wood. For a more functional touch, use cork sheets. Execution Tip: This project is ideal for practicing raster engraving. To prevent the coasters from being damaged by moisture, apply a few coats of a waterproof sealant like polyurethane after cutting and cleaning. Masking the wood surface before engraving will give you a crisp image without smoke stains.
- Custom Keychains: These are perfect for using up small scraps of wood. Design a simple shape with a hole for a keyring. Use 1/8″ Alder or Cherry wood for a beautiful, lightweight result. Execution Tip: Since these are small, you can practice the nesting technique you learned about to fit dozens of keychains onto a small piece of wood, making production incredibly efficient. Test different engraving power settings to get a nice dark monogram or logo without burning too deep.
Beautiful Home Décor Items
Transform your living space with custom-made decorative pieces that reflect your personal style.
- Layered Mandala Wall Art: These intricate pieces look complex but are surprisingly simple to execute. They consist of multiple layers of geometric patterns cut from thin wood, which are then stacked and glued to create a 3D effect. Use 1/8″ Baltic Birch plywood for its stability and smooth finish. Execution Tip: Color is key. Stain or paint each layer a different shade before gluing them together for a stunning result. Precision is vital, so ensure your laser is properly focused for the cleanest possible cuts on the delicate details.
- Ornamental Boxes: A great project to practice 3D assembly. Look for designs with finger joints, which are interlocking tabs that create strong right-angle connections. 1/8″ or 1/4″ plywood is perfect for this. Execution Tip: This is where understanding kerf is critical. You will likely need to slightly adjust the design file to ensure the finger joints fit snugly together. Cut a small test piece with a few joints first to dial in your settings before cutting the entire box.
Unique Jewelry and Functional Wares
Laser cutting excels at creating fine, detailed objects that are difficult to make by hand.
- Wooden Earrings and Pendants: The precision of a laser allows you to cut incredibly delicate and lightweight jewelry. Thin hardwoods like 1/16″ or 1/8″ Basswood or Walnut are ideal. Execution Tip: Work with very low power and high speed to prevent charring on the fine details. Remember to include a tiny, perfectly placed hole for the earring hook or necklace bail directly in your design file.
- Phone or Tablet Stand: A practical item that introduces the concept of interlocking parts. Most designs consist of two flat pieces with slots that fit together to form a stable A-frame. Use sturdy 1/4″ plywood for stability. Execution Tip: Before cutting your good wood, do a test cut on a cheap material like cardboard. This allows you to check the fit of the slots and the angle of the stand without wasting your project material.
From Hobby to Business: Selling Your Creations
As you master the art of creating beautiful laser cut items, you may find yourself with a growing collection of high-quality products and a desire to share them with the world. Transitioning from a personal hobby to a small business is a natural next step, and your laser cutter is a powerful tool for generating income. There are two primary avenues to explore: selling your finished products or offering specialized laser cutting wood services to others. Both paths require a blend of creativity, business acumen, and marketing savvy. The key to success is to start small, find your focus, and build a reputation for quality and reliability.
Finding Your Niche and Pricing for Profit
Before you sell a single item, you need to define what makes your work unique. The market for laser-cut goods is competitive, so finding a niche is crucial. Do you excel at intricate jewelry? Are you passionate about creating custom wedding décor like cake toppers and signage? Perhaps your specialty is personalized pet memorials or nerdy tabletop gaming accessories. By focusing on a specific market, you can tailor your designs and marketing to a dedicated audience. Once you have a niche, build a stunning portfolio. Photograph your best work in good lighting against clean backgrounds. This portfolio is your most important sales tool, whether it’s on Instagram or a table at a craft fair.
Pricing is often the most challenging part for new entrepreneurs. A common mistake is to undervalue your time. A reliable pricing formula is: (Material Cost) + (Time Cost) + (Machine Time/Wear) + (Profit Margin) = Final Price. Calculate your material costs accurately. Pay yourself a fair hourly wage for design, preparation, finishing, and packing time. Add a small fee for machine runtime to cover electricity and eventual maintenance. Finally, add a markup for profit. Researching similar products on platforms like Etsy will give you a ballpark idea of what the market will bear, but don’t just copy others—price based on your actual costs and the quality of your work.
Marketing and Selling Your Creations
With a defined niche and a solid pricing strategy, it’s time to reach customers. You can pursue both online and local channels simultaneously.
- Online Marketplaces: Etsy is the premier platform for handmade goods. It gives you immediate access to a massive customer base actively searching for unique products. For more control over your brand, setting up your own store on a platform like Shopify is an excellent long-term goal. Use social media platforms like Instagram and Pinterest to showcase your process and finished products visually, directing traffic to your online store.
- Local Markets: Don’t underestimate the power of face-to-face sales. Craft fairs, farmers’ markets, and local festivals are fantastic places to sell your products. They allow customers to see and feel the quality of your work. Always have a range of items at different price points, from small, impulse-buy keychains to larger, premium wall art.
Beyond selling products, offering custom laser cutting wood services can be a lucrative side business. Many designers, crafters, and small businesses need parts cut but don’t own a laser. You can charge a fee based on machine time and material, cutting files that your clients provide. This approach leverages your equipment’s capabilities directly, turning machine downtime into a consistent revenue stream.
Conclusions
Now that you’re equipped with the knowledge and inspiration, it’s time to start your laser cutting wood adventure. Remember to practice, experiment with different settings and materials, and most importantly, have fun! The possibilities are endless, from personalized gifts to intricate home décor. Turn your passion into beautiful, tangible creations and maybe even a profitable business.
FAQ
Q: What’s the best wood for laser cutting for beginners?
A: For beginners, laser-safe plywood (like Baltic Birch) and less dense solid woods such as basswood, alder, poplar, and cherry are excellent choices. They cut cleanly and quickly. MDF also works well for engraving due to its uniformity, but requires excellent ventilation.
Q: Why is ventilation so important when laser cutting wood?
A: Ventilation is paramount because laser cutting wood produces smoke containing fine particulates and volatile organic compounds that are harmful to inhale. An adequate exhaust system ducted outdoors is essential to protect your health and keep your workspace safe.
Q: What’s the difference between vector and raster files in laser cutting?
A: A raster image (like JPG or PNG) is made of pixels and is best for detailed engravings or photographs. A vector file (like SVG, DXF, AI) uses mathematical paths to define lines and curves. Vector files are crucial for precise cutting as the laser follows these smooth paths, resulting in clean, accurate cuts.
Q: How do I prevent smoke stains on my laser-cut wood projects?
A: To prevent smoke stains, apply a layer of paper-based masking tape or specialized laser-masking film over the entire surface of the wood before cutting. The laser cuts through the mask and the wood. After cutting, simply peel off the mask, taking any smoke residue with it, to reveal a clean surface underneath.
Q: What is “kerf” and why is it important for my designs?
A: Kerf is the small amount of material vaporized by the laser beam during a cut. It’s important because it means the actual cut will be slightly wider than the line in your design. For projects with interlocking parts (like finger joints), you must account for kerf by slightly offsetting your design paths to ensure a snug fit rather than a loose one.
Block "subscribe-popup" not found