Projects
Designing and Crafting Personalized Charcuterie Boards with Laser Engraving
Jun
Estimated reading time: 9 minutes
Key Takeaways
- Material & Design are Crucial: Selecting food-safe, closed-grain hardwoods like maple, cherry, or walnut and optimizing designs for laser clarity ensures both beauty and functionality in your charcuterie board.
- Precision in Engraving Process: Achieving professional results requires meticulous machine setup, precise focusing, and essential test runs to dial in optimal power, speed, and frequency settings for specific wood types.
- Food-Safe Finishing & Care: Applying food-grade mineral oil and beeswax is paramount for sealing the wood, enhancing durability, and ensuring hygiene; proper hand-washing and regular re-oiling are key to the board’s longevity.
- Troubleshooting Common Issues: Understanding how to address common problems like scorching, inconsistent depth, or blurry engravings by adjusting settings or board preparation is vital for successful outcomes.
- Laser vs. Traditional Engraving: Laser engraving offers unmatched precision and intricate detail through vaporization, differing significantly from traditional hand-carving methods, allowing for unique design possibilities.
Table of Contents
Discover the art of transforming simple wooden charcuterie boards into personalized masterpieces using laser engraving. This article explores techniques for creating stunning designs, choosing suitable materials, and applying food-safe finishes, enabling you to craft beautiful and functional pieces for any occasion. Elevate your hosting or gift-giving with custom engraved boards.
Selecting Materials and Design for Your Laser Engraved Charcuterie Board
The foundation of an exceptional laser-engraved charcuterie board lies in the careful selection of materials and a well-thought-out design. These initial choices significantly influence the final aesthetic, durability, food safety, and the overall success of your engraving.
Choosing the Ideal Wood for Laser Engraving
When selecting wood for a laser engraving charcuterie board, food safety is paramount. Opt for hardwoods known for their closed-grain structure, which minimizes bacteria absorption and makes cleaning easier. Maple, cherry, walnut, and beech are excellent choices. Maple offers a light, smooth surface providing high contrast for engravings. Cherry presents a rich, reddish hue that deepens over time, while walnut provides a luxurious dark backdrop for more subtle, elegant designs. Avoid open-grained woods like red oak, as they can trap food particles, and steer clear of woods that may be toxic or impart undesirable flavors. The grain pattern itself is a design element; a highly figured grain might obscure intricate engravings, whereas a straighter, more uniform grain can make your design pop.
Beyond food safety and aesthetics, consider the wood’s suitability for laser engraving. Light-colored woods generally provide better contrast as the laser burns the wood, creating a darker mark. Darker woods like walnut will still engrave beautifully, but the contrast will be less stark, yielding a more sophisticated, tone-on-tone effect. Softer hardwoods, like cherry, may engrave deeper with less power, while denser woods like maple might require more power or slower speeds for a comparable effect. Woods high in resin, like pine, can produce inconsistent results and excess soot, so they are generally less preferred for high-quality charcuterie boards. Always ensure your wood is properly dried and flat to achieve uniform focus and engraving depth.
Conceptualizing and Sourcing Custom Charcuterie Board Designs
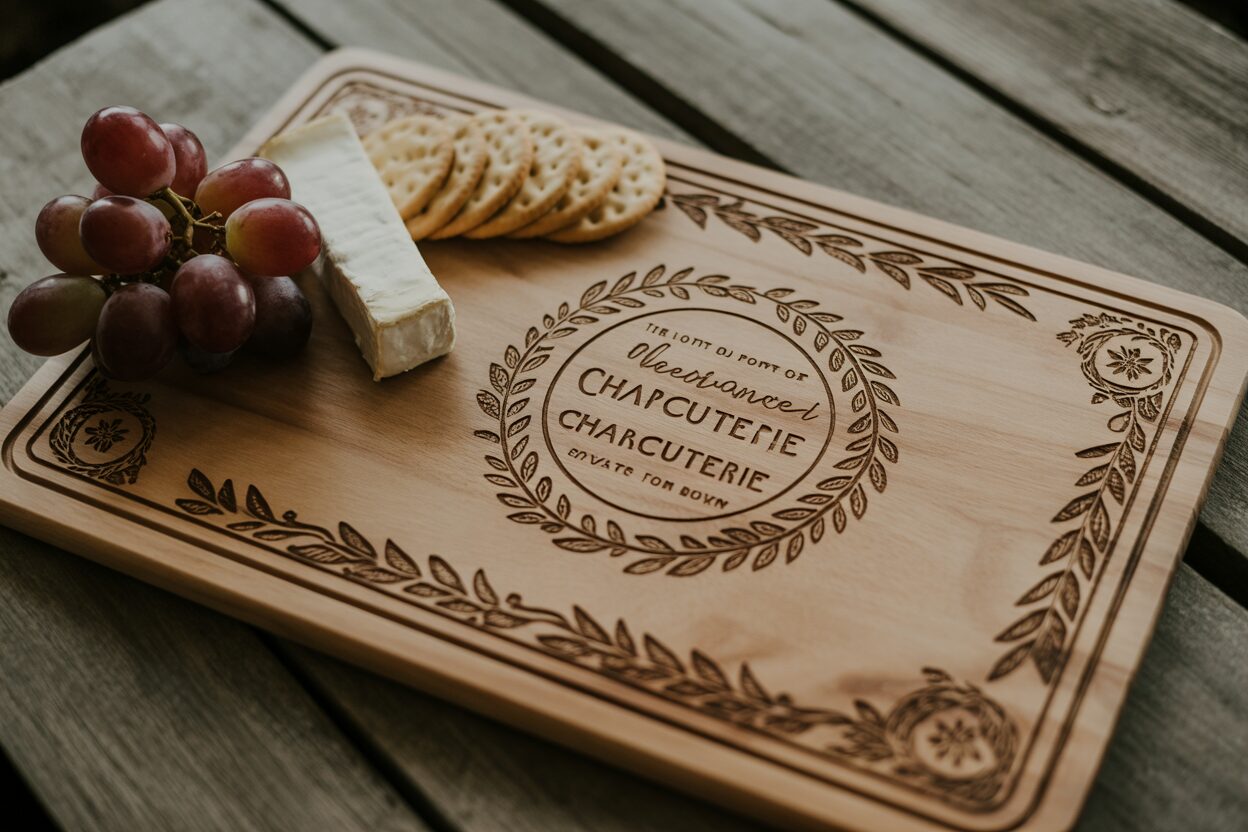
The design transforms a simple wooden board into a personalized statement. Whether you’re creating personalized charcuterie board gifts or a unique piece for your own use, the design should resonate with its purpose. For custom charcuterie board designs, start by considering the theme: a family name or monogram for a wedding gift, a favorite quote for a housewarming present, or a company logo for corporate gifting. You can sketch your ideas, use graphic design software like Adobe Illustrator or CorelDRAW, or find inspiration and customizable templates on platforms like Etsy or Creative Market.
When incorporating typography, legibility is key. Choose fonts that are clear and easy to read, even at smaller sizes. Script fonts can be elegant but ensure the lines are thick enough not to be lost during engraving. Sans-serif fonts often offer excellent clarity for modern designs. Pay attention to kerning (spacing between letters) and line spacing for a professional look. For imagery, vector graphics (SVG, AI, DXF) are ideal as they can be scaled without loss of quality and provide clean lines for the laser to follow. Simple, bold images or patterns tend to engrave more effectively than highly detailed photographs, which may lose clarity on wood. Ensure your image has good contrast; the laser essentially interprets designs in a binary way (engrave or don’t engrave specific areas), so distinct light and dark areas in your source design translate best.
How Laser Engraving Differs from Traditional Wood Engraving
Understanding the differences between laser engraving and traditional wood engraving techniques for serving boards helps in appreciating the unique qualities laser work brings. Traditional methods often involve hand tools like chisels or burins to physically carve out wood, creating depth and texture through material removal. This can result in a V-groove or U-groove cut. Laser engraving, conversely, uses a focused beam of light to vaporize or burn the wood surface. This creates a distinctive, often darkened, mark with a slight indentation. The precision of a laser is unmatched, allowing for incredibly intricate details and consistent repetition that would be challenging and time-consuming by hand. While traditional techniques offer a certain handcrafted charm and can achieve varied relief depths, laser engraving excels at fine lines, complex patterns, and photographic reproduction (though simplified for wood). The heat of the laser also interacts with the wood’s natural resins and sugars, contributing to the color of the engraved area, an effect unique to this method.
The considerations for material and design choices for a DIY laser engraved charcuterie project or a professional product line are thus distinct. The consistent depth and clean lines from a laser allow for designs that might be too fragile or complex for traditional carving. Thoughtful selection of wood that complements the burn effect of the laser, paired with a design optimized for clarity and impact when engraved, is crucial. These choices ensure your personalized charcuterie board is not only beautiful and functional but also a testament to the unique capabilities of laser technology, resulting in a truly standout piece.
The Laser Engraving Process Step-by-Step
Executing the laser engraving for your laser engraving charcuterie board is a process where precision and an understanding of your machine and materials converge. Mastering these steps is crucial for transforming your chosen wood and design into a beautifully finished product, whether it’s for a personal project, a thoughtful gift, or your business inventory.
Machine Setup and Board Preparation
Before any engraving begins, ensure your laser cutting machine is in optimal condition. This includes checking that the lens and mirrors are clean, as dirty optics can significantly reduce power and engraving quality. Secure your charcuterie board firmly to the laser bed. The board must be perfectly flat and immobile during the engraving process to ensure consistent focus and prevent skewed designs. Use clamps, hold-down pins, or a custom jig if necessary. Accurate Z-axis focusing is paramount. Whether your machine uses manual or auto-focus, ensure the laser head is at the correct focal distance from the surface of the wood. An incorrect focal point will result in blurry, weak, or inconsistent engraving. For thicker boards, make sure the laser head has enough clearance throughout the entire engraving area. It’s also wise to run a ‘frame’ or ‘trace’ function if your laser software allows it, which moves the laser head around the perimeter of your design without firing the laser. This helps confirm that your design is positioned correctly on the board before committing to the engraving.
Determining Optimal Settings and Conducting Test Runs
The core of successful laser engraving lies in finding the optimal balance of power, speed, and sometimes frequency (PPI – pulses per inch). These settings vary significantly depending on the type of wood selected for your laser engraving charcuterie board. For instance:
- Maple: Being hard and light-colored, maple often requires higher power or slower speeds to achieve a good, dark contrast.
- Cherry: This wood is generally softer than maple and engraves beautifully, often achieving a rich, dark mark with moderate power and speed. It can be prone to slightly more scorching if settings are too aggressive.
- Walnut: As a dark, dense wood, walnut provides a more subtle, tone-on-tone engraved look. You might use moderate power and speed, focusing on clarity rather than extreme darkness.
It is absolutely essential to perform test runs on a scrap piece of the exact same wood and thickness as your final charcuterie board. Create a small test grid with varying power and speed settings to observe how different combinations affect the engraving depth, color, and detail. This step is non-negotiable for achieving professional results and allows you to dial in the precise look desired for your custom charcuterie board designs. Note how different settings affect fine lines versus filled areas. Some lasers also allow adjustment of air assist; stronger air assist helps reduce charring and flare-ups but can sometimes lighten the engraving.
Fine-Tuning for Detail and Managing the Engraving Process
Once your optimal settings are determined from test engravings, you are ready to proceed with your final laser engraving charcuterie board. Ensure your design file is correctly formatted – vector files (like SVG or AI) are generally preferred for clean lines in text and graphics. For intricate details common in custom charcuterie board designs, slower speeds and appropriate DPI (dots per inch) settings in your laser software are key. Higher DPI will result in finer detail but will also increase engraving time. During the actual engraving, always supervise the machine. Wood is a natural material and can have hidden resin pockets or variations that might cause unexpected flare-ups. Proper ventilation is crucial to remove smoke and fumes. The controlled heat application is what distinguishes laser engraving, allowing for incredibly fine details that create unique personalized charcuterie board gifts or high-quality DIY laser engraved charcuterie pieces. If your design has both fine lines (vector engraving) and shaded areas (raster engraving), you may need to run separate jobs with optimized settings for each, or carefully manage your software’s color mapping features to assign different settings to different parts of the design.
Troubleshooting Common Engraving Issues
Even with careful preparation, issues can arise. Understanding how to troubleshoot them is vital.
- Excessive Scorching/Charring: This usually indicates that the power is too high, speed is too low, or air assist is insufficient. Try reducing power, increasing speed, or increasing air assist. Applying transfer tape or masking paper to the wood surface before engraving can also significantly reduce surface scorching and make cleanup easier.
- Inconsistent Engraving Depth/Color: This could be due to an uneven board surface, warped wood, incorrect focus across the entire piece, or fluctuations in the laser tube’s power. Ensure the board is flat and focus is consistent.
- Fuzzy or Blurry Engraving: The most common culprit is incorrect focal distance. Double-check your Z-axis setting. Low-resolution source files can also cause this for raster engravings.
- Engraving is Too Light: Increase power, decrease speed, or check if your PPI/frequency setting is too low for the desired effect.
- Small Flare-ups: These can occur with resinous woods or if debris accumulates. Ensure good air assist and never leave the laser unattended. Keep a suitable fire extinguisher nearby.
By methodically approaching machine setup, diligently testing settings, and knowing how to address common problems, you can consistently produce high-quality, beautifully detailed laser-engraved charcuterie boards.
Applying a Food-Safe Finish and Caring for Your Engraved Board
After the laser has worked its magic, transforming a plain piece of wood into a bespoke laser engraving charcuterie board, the critical final steps involve cleaning, finishing, and understanding long-term care. A proper finish not only enhances the wood’s natural beauty and the distinctiveness of your engraving but is absolutely essential for food safety, durability, and the longevity of the board, especially for an engraved serving board intended for regular use or as a high-quality personalized charcuterie board gift.
Selecting and Applying a Food-Safe Finish
The primary goal when finishing a charcuterie board is to seal the wood pores, making it more resistant to moisture, food stains, and bacteria. This is paramount for any DIY laser engraved charcuterie project that will come into contact with food. The most common and highly recommended food safe finish for engraved wood is a combination of mineral oil and beeswax.
- Cleaning After Engraving: Before applying any finish, thoroughly clean the board. Engraving can leave behind soot and resin residues. Use a soft brush or compressed air to remove loose debris. For more stubborn residue, especially around the engraved areas, wipe the surface gently with a slightly damp cloth (using denatured alcohol can be effective for some woods but test on a scrap piece first, as it can sometimes lighten the wood or the engraving). Ensure the board is completely dry before proceeding. Some makers prefer to lightly sand the non-engraved surfaces with very fine grit sandpaper (220 grit or higher) for an extra smooth feel, being careful not to sand the engraved design itself.
- Mineral Oil Application: Food-grade mineral oil is the workhorse for sealing wooden cutting boards and charcuterie boards. It is inexpensive, readily available, non-toxic, and penetrates deeply into the wood fibers. Warm the mineral oil slightly (by placing the bottle in a bowl of warm water) to improve its viscosity and penetration. Apply a generous amount of oil to all surfaces of the board – top, bottom, and sides. Use a clean, lint-free cloth to spread it evenly. Don’t be shy with the first coat; the wood, especially the end grain, will soak it up. Let the oil soak in for at least 4-6 hours, or ideally, overnight. You’ll notice the engraved areas may darken as they absorb the oil, often enhancing their contrast. Apply multiple coats, allowing each to soak in, until the wood no longer absorbs much oil. After the final soak, wipe off all excess oil thoroughly with a clean cloth. The board should feel smooth, not greasy.
- Beeswax Conditioner (Optional but Recommended): While mineral oil conditions and seals from within, a finish containing beeswax (often a blend of beeswax and mineral oil, or sometimes carnauba wax) adds an extra layer of protection on the surface. This creates a more water-resistant barrier, gives a subtle sheen, and helps to further seal the pores. Apply the wax conditioner after the mineral oil has been fully absorbed and the excess wiped away. Using a clean cloth, apply the paste in a circular motion, covering all surfaces. Let it sit for 15-30 minutes, then buff vigorously with a clean, soft cloth until the surface feels smooth and develops a soft luster.
There are other commercial food-safe finishes available, often based on tung oil (ensure it’s 100% pure polymerized tung oil for food safety and allow full cure time, which can be weeks) or specialized cutting board oils. Always verify their food-safe status explicitly on the product label. Avoid using vegetable oils (like olive or canola oil) as they can turn rancid over time.
Curing and Long-Term Care for Your Engraved Board
After the final buffing of a mineral oil and beeswax finish, the laser engraving charcuterie board is generally ready for light use within 24 hours, allowing the wax to fully harden. The mineral oil itself doesn’t “cure” like varnish but rather saturates the wood.
Proper ongoing care is vital to maintain the beauty, hygiene, and longevity of your engraved serving board:
- Cleaning: After each use, wash the board by hand with mild dish soap and warm water. Rinse thoroughly. Never put your wooden charcuterie board in the dishwasher, as the intense heat and prolonged moisture will cause it to warp, crack, and damage the engraving.
- Drying: Dry the board immediately and thoroughly with a clean towel. Allow it to air dry completely, standing it on its edge or on a rack to allow air circulation on all sides. Avoid laying it flat on a wet surface.
- Sanitizing (if needed): For deeper cleaning, especially after contact with raw meats (though charcuterie boards are typically for ready-to-eat foods), you can wipe the board with a solution of one part white vinegar to five parts water, then rinse and dry thoroughly.
- Re-oiling: Wood needs regular rehydration. Re-apply food-grade mineral oil whenever the board starts to look dry or dull, typically once a month with regular use, or more often if it’s frequently washed. Simply apply a coat of oil, let it soak in for a few hours or overnight, and wipe off the excess. Follow with a beeswax conditioner if desired.
- Storage: Store your board in a dry place, preferably on its edge or hung up if it has a handle with a hole.
By following these finishing and care instructions, your DIY laser engraved charcuterie project or personalized charcuterie board gifts will remain beautiful, functional, and food-safe for many years, becoming cherished items that proudly display their unique engraved designs.
Conclusions
Laser engraving charcuterie boards offers a fantastic way to combine creativity with practicality. By following the outlined steps for design, engraving, and finishing, you can produce high-quality, personalized items. These unique boards serve not only as functional kitchenware but also as cherished gifts or attractive products for sale, adding a special touch to any culinary experience.
FAQ
Q: What are the best woods for laser engraving charcuterie boards to ensure food safety?
A: Maple, cherry, walnut, and beech are excellent choices due to their closed-grain structure, which minimizes bacteria absorption and makes cleaning easier. Always avoid open-grained woods like red oak, and steer clear of any woods that may be toxic or impart undesirable flavors.
Q: How can I ensure my laser engraving is clear and detailed on the charcuterie board?
A: To achieve clear and detailed engravings, use vector graphics (like SVG, AI, DXF) for your designs, as they scale without quality loss. For intricate details, opt for slower speeds and appropriate DPI (dots per inch) settings in your laser software. Crucially, ensure accurate Z-axis focusing and always perform test runs on scrap wood to fine-tune power, speed, and frequency settings for your specific wood type.
Q: What is the recommended food-safe finish for an engraved wooden charcuterie board?
A: A combination of food-grade mineral oil and beeswax is highly recommended. Apply generous coats of mineral oil, allowing each to soak in, until the wood is saturated. Follow this with a beeswax conditioner (often a blend of beeswax and mineral oil) for an extra protective, water-resistant layer and a subtle sheen. Avoid vegetable oils as they can turn rancid.
Q: How should I clean and care for my laser-engraved charcuterie board to maintain its longevity?
A: After each use, hand wash the board with mild dish soap and warm water; never put it in the dishwasher. Dry the board immediately and thoroughly with a clean towel, then allow it to air dry completely on its edge or on a rack. Re-oil with food-grade mineral oil whenever the board appears dry or dull (typically once a month with regular use), and store it in a dry place.
Q: What are common issues during laser engraving and how can they be resolved?
A: Common issues include excessive scorching (reduce power, increase speed, or improve air assist), inconsistent engraving depth (ensure the board is flat, not warped, and focus is consistent), fuzzy or blurry engraving (check focal distance and source file resolution), and engraving that is too light (increase power, decrease speed, or adjust PPI/frequency). Always supervise the machine during engraving to manage potential flare-ups.
Block "subscribe-popup" not found