Tutorials
Creating the Perfect Personalized Charcuterie Board
Mar
Estimated reading time: 6 minutes
Key Takeaways
- Wood Selection is Crucial: Opt for dense hardwoods like maple, cherry, or walnut for durability, food safety, and high-quality engraving results. Maple provides high contrast, cherry offers a rich, warm tone, and walnut gives a luxurious, textured look.
- Use High-Quality Vector Files: For crisp, clean engravings, always use vector file formats like SVG. Pixel-based images (JPEG, PNG) will result in blurry, low-quality outcomes.
- Master Laser Settings and Preparation: Proper laser settings (power, speed, and LPI) are essential and should be tested on scrap wood. Preparing the surface by masking with tape prevents smoke stains and ensures a professional, clean finish.
- Finish with a Food-Safe Oil: The final step of applying a food-safe finish, such as pure mineral oil or a beeswax blend, is non-negotiable. It protects the wood, enhances its beauty, and ensures the board is safe for contact with food.
Table of Contents
- Selecting the Ideal Wood and Design
- Finding and Perfecting Your Design
- The Laser Engraving Process Step-by-Step
- Dialing in Your Laser Settings
- Sanding, Finishing, and Curing for Food Safety
- Applying the Perfect Food-Safe Finish
- Conclusions
- Frequently Asked Questions
Discover how to transform a simple piece of wood into a stunning personalized charcuterie board. This guide offers a complete walkthrough, from selecting the ideal wood and design files to the intricacies of laser engraving and applying a beautiful, food-safe finish. Perfect for creating a unique gift or a centerpiece for your own home, let’s get started on this rewarding project.
Selecting the Ideal Wood and Design
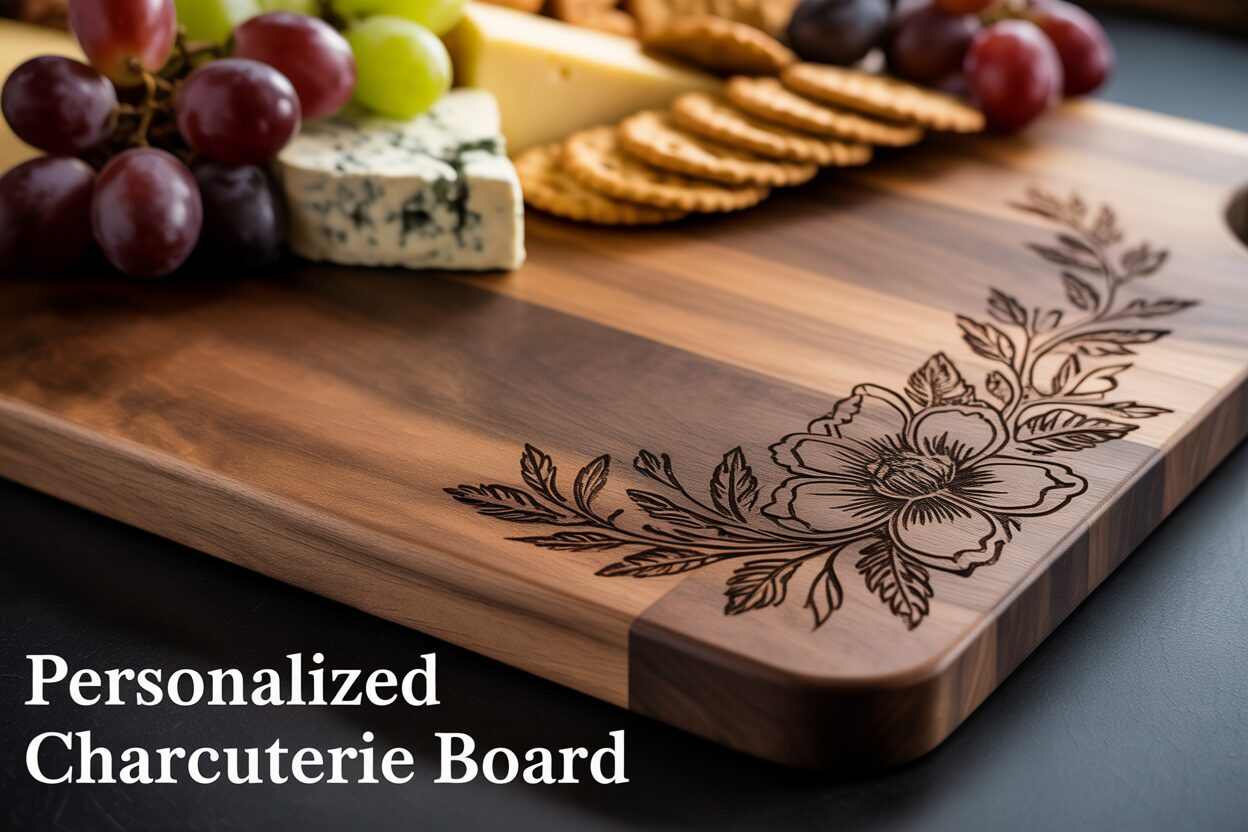
The foundation of any stunning charcuterie board lies in two critical choices: the wood it’s made from and the design it will bear. This pairing is not just about aesthetics; it’s about durability, food safety, and the final quality of the engraving. Rushing this stage can lead to a disappointing result, but a thoughtful selection will set you up for a truly professional-grade masterpiece. The first step is choosing your canvas—the wood itself. For a project that involves both food and intricate detail, hardwoods are the only viable option. Woods like maple, cherry, and walnut are industry favorites for good reason. Their dense, tight grain structure makes them incredibly durable, resistant to knife marks, and less porous than softwoods. This tight grain is crucial for food safety, as it prevents bacteria from penetrating the surface. For the process of laser engraving wood, this same characteristic ensures the laser can create clean, crisp lines without the burn “bleeding” into the surrounding grain, a common issue with porous woods like pine.
- Maple: A very hard, light-colored wood, maple provides the highest contrast for engravings. Its subtle grain pattern won’t compete with intricate designs, making it perfect for detailed logos, complex patterns, or text-heavy layouts.
- Cherry: Known for its warm, reddish-brown hue that deepens beautifully with age, cherry offers a rich and elegant look. The engraving results in a slightly darker, tonal effect that is sophisticated and subtle.
- Walnut: This premium dark wood exudes luxury. An engraving on walnut is less about high contrast and more about texture. The design will appear as a dark, matte carving against the wood’s lustrous, dark surface, creating a truly high-end feel.
Finding and Perfecting Your Design
Once you’ve selected your wood, it’s time to find the perfect design to bring it to life. The technical quality of your design file is just as important as the wood choice. For laser engraving, you must use a vector file format, with SVG (Scalable Vector Graphic) being the most common and versatile. Unlike pixel-based images (like JPEGs or PNGs), SVGs are made of lines, curves, and points defined by mathematical equations. This means they can be scaled to any size without losing quality, ensuring your laser follows a perfectly crisp path. Using a low-resolution JPEG will result in a blurry, pixelated engraving. Sourcing a high-quality charcuterie board svg is straightforward. Online marketplaces like Etsy, Creative Fabrica, and Design Bundles are treasure troves of ready-to-use designs, from intricate floral wreaths and monograms to witty kitchen quotes and family name templates. For a truly custom charcuterie board, consider personalizing a pre-made design or creating one from scratch. Free software like Inkscape or subscription-based programs like Adobe Illustrator allow you to edit SVGs. You can easily add a family name, a wedding date, or GPS coordinates of a special place. When customizing, consider your wood choice. A bold, simple monogram will look stunning on dark walnut, while a fine, detailed botanical illustration will pop on light maple. This thoughtful combination of premium wood and a high-resolution, personalized design is the essential first step toward creating a functional work of art.
The Laser Engraving Process Step-by-Step
With your chosen wood and design file ready, it’s time to bring your vision to life. This is where precision and proper technique transform a simple piece of wood into a personalized work of art. The laser engraving process can seem intimidating, but by following a systematic approach, you can achieve flawless results. The first step, before even turning on your laser, is to prepare the wood surface. Ensure it is perfectly clean, free from any dust or oils. A quick wipe with a lint-free cloth dampened with denatured alcohol is excellent for this. Next, consider a professional technique for achieving exceptionally clean results: masking. Apply a layer of low-tack, wide paper masking tape over the entire area you intend to engrave. This mask acts as a protective barrier, catching the smoke and resin residue that is released during engraving. Instead of settling into the wood grain and causing a hazy, smudged look around your design, all the residue sticks to the tape. When you peel it off later, you are left with a perfectly crisp, clean engraving.
Dialing in Your Laser Settings
Now, move to your laser control software, such as LightBurn or the manufacturer-specific software for your machine. Import your charcuterie board svg file and position it precisely where you want it on the board’s digital canvas. The most critical part of this stage is configuring the laser settings: power, speed, and resolution (often measured in Lines Per Inch or LPI). These settings vary significantly between different lasers (diode vs. CO2) and wood types, so performing a small test on a scrap piece of the same wood is always recommended.
- Power: This determines the intensity of the laser beam. For hardwoods like maple or cherry, you’ll need higher power to create a noticeable mark. A setting between 60-85% is a good starting point.
- Speed: This is how fast the laser head moves. A slower speed allows the beam to dwell longer on the wood, resulting in a deeper, darker burn. A good starting range is 1000-2000 mm/min. The balance between power and speed is key; too much power with too little speed will cause excessive charring and deep gouging.
- Resolution (LPI): This controls the detail of your engraving. A higher LPI (e.g., 300-400) creates more overlap between passes, resulting in a smoother, darker, filled-in appearance, ideal for a final engraved charcuterie board.
Once your settings are dialed in, secure your board on the laser bed. Use clamps or honeycomb pins if necessary to ensure it doesn’t move during the process. The next crucial step is to focus the laser. An improperly focused laser will produce a thick, blurry line, ruining the detail of your design. Use your machine’s focusing tool to set the perfect distance between the laser nozzle and the surface of the wood (or the masking tape, if you’re using it). With everything set, perform a final framing check to ensure the laser will engrave exactly where you intended. Now, close the lid, turn on your ventilation, and start the job. Never leave a laser running unattended. Watching the machine meticulously carve your design into a personalized charcuterie board is one of the most satisfying parts of the process.
Sanding, Finishing, and Curing for Food Safety
Once the laser has completed its work and the hum of the machine subsides, the final, crucial phase of creating your masterpiece begins. The finishing process not only protects the wood and makes it safe for contact with food but also dramatically enhances its natural beauty, deepening the color and making the grain pop. The first step is cleanup. If you used masking tape, carefully peel it away from the surface. This should remove the vast majority of smoke and resin residue, revealing a crisp, clean engraving. If any residue remains or if you didn’t use a mask, gently clean the surface with a soft brush and a cloth lightly dampened with denatured alcohol. Be careful not to saturate the wood. Next comes a light sanding. While the laser creates a clean mark, the process can slightly raise the grain of the surrounding wood. A final sanding ensures a silky-smooth finish. Using a high-grit sandpaper, such as 220-grit or higher, lightly sand the entire surface of the board, always moving with the grain of the wood. Be gentle over the engraved area to avoid softening the crisp edges. The goal is not to remove wood but simply to knock down any roughness. Once finished, use a tack cloth or a clean, dry cloth to remove every speck of sanding dust.
Applying the Perfect Food-Safe Finish
The most critical step in this final stage is the application of a food safe wood finish. This is non-negotiable for any item that will come into contact with food. Your choice of finish will protect the wood from moisture and staining while being completely non-toxic. The best and most widely recommended options for a custom charcuterie board are pure mineral oil or a blend of mineral oil and beeswax, often sold as “board butter” or “wood conditioner.” Do not use cooking oils like olive or vegetable oil, as they will go rancid over time and create an unpleasant smell and taste.
The application process is simple but should be done with care:
- Step 1: Apply Generously. Pour a liberal amount of food-grade mineral oil directly onto the board. Don’t be shy; a new board is very thirsty. Use a clean, lint-free cloth to spread the oil evenly across the entire surface, including the sides, back, and meticulously into every crevice of your engraved design.
- Step 2: Let it Soak. This is the most important part. Leave the oil to soak into the wood fibers for at least 30 minutes. For the very first coat on a new board, letting it sit overnight is even better. You will see the wood absorb the oil, restoring its moisture and enriching its color.
- Step 3: Buff Off the Excess. After the board has absorbed all the oil it can, take a second, clean, dry cloth and buff the entire surface vigorously. This removes any excess oil, preventing a sticky or greasy feel, and leaves a beautiful, satin sheen. Repeat this process with two or three coats for a new board to ensure it is fully saturated.
Finally, you must allow the board to cure. While mineral oil doesn’t “cure” in the chemical sense like varnish, it needs time to fully settle into the wood. Let the finished board sit in a dry, well-ventilated area for at least 24-72 hours before its first use. This ensures the surface is no longer oily to the touch and is completely ready and safe for serving food.
Conclusions
You now have the skills to create a beautiful and functional custom charcuterie board. By following these steps for engraving and finishing, you can produce high-quality, personalized pieces that are both safe to use and visually stunning. This project is a fantastic way to showcase your creativity and laser skills, resulting in a product that is always in demand.
Frequently Asked Questions
Q: What is the best type of wood to use for a personalized charcuterie board?
Interested in more Charcuterie Board? Check out our Charcuterie Board laser file designs: Click here!
A: The best woods are dense hardwoods with a tight grain. Maple, cherry, and walnut are excellent choices because they are durable, food-safe, and produce clean, crisp laser engravings.
Q: Can I use a regular image file like a JPEG for laser engraving?
A: No, it is not recommended. For a high-quality, sharp engraving, you must use a vector file format, such as an SVG. Vector files can be scaled to any size without losing quality, unlike pixel-based JPEGs which will result in a blurry design.
Q: Why is masking tape recommended before engraving?
A: Applying a layer of masking tape over the engraving area acts as a protective barrier. It catches smoke and resin residue, preventing it from staining the wood grain around the design. When you peel the tape off, you are left with a much cleaner and crisper result.
Q: What makes a wood finish “food-safe” for a charcuterie board?
A: A food-safe finish is non-toxic and will not go rancid. Pure mineral oil and special blends of mineral oil and beeswax (often called “board butter”) are the industry standard. Avoid using cooking oils like olive or vegetable oil, as they will spoil over time.
Block "subscribe-popup" not found