Tutorials
Creating the Perfect Engraved Charcuterie Board
Feb
Estimated reading time: 9 minutes
Key Takeaways
- Wood Choice is Crucial: Select food-safe, closed-grain hardwoods like maple, cherry, or walnut. Maple offers the highest contrast for engravings, while walnut provides a more subtle, tone-on-tone effect.
- Use Vector Files (SVG): For sharp, scalable designs that result in crisp laser engravings, always use Scalable Vector Graphic (SVG) files. This format ensures no loss of quality, regardless of size.
- Test Your Laser Settings: Before engraving your final board, always perform a test on a scrap piece of the same wood to calibrate the laser’s power, speed, and resolution (DPI) to prevent mistakes.
- Finish with Food-Safe Oil: After engraving, clean the board and apply a food-safe finish like mineral oil or a beeswax blend. This protects the wood, enhances its appearance, and makes it safe for serving food.
Table of Contents
- Selecting the Ideal Wood for Your Charcuterie Board
- Designing Your Custom Engraving
- The Laser Engraving Process: Settings and Techniques
- Applying a Food-Safe Finish
- Conclusions
- Frequently Asked Questions
Discover how a simple wooden board can be transformed into a work of art. This guide offers a comprehensive walkthrough for creating a custom engraved charcuterie board. Whether for a special gift or your own home, learn the techniques of laser engraving wood to craft a beautiful and personalized piece that is both functional and decorative.
Interested in more Charcuterie Board? Check out our Charcuterie Board laser file designs: Click here!
Selecting the Ideal Wood for Your Charcuterie Board
The foundation of a stunning engraved charcuterie board is, quite literally, the wood itself. The choice you make will influence not only the final aesthetic and the clarity of your engraving but also the board’s durability and safety for serving food. Before you even think about firing up your laser, understanding the properties of different woods is paramount. This decision balances visual appeal with practical function, ensuring your creation is both beautiful and built to last.
Food Safety First: Choosing a Closed-Grain Hardwood
Your primary consideration must be food safety. The best woods for charcuterie boards are non-porous (or ‘closed-grain’) hardwoods. This type of wood has very small pores, which prevents bacteria, moisture, and food particles from getting trapped within the grain. Hardwoods like maple, cherry, and walnut are excellent choices. Conversely, you should avoid ‘open-grain’ woods like red oak and ash for serving food. Their large, porous structures can harbor bacteria and are difficult to clean and sanitize properly. Always ensure the board you purchase is untreated or finished with a food-safe oil, like mineral oil or a specialized board conditioner.
A Trio of Top Contenders: Maple, Cherry, and Walnut
While many hardwoods are suitable, three stand out for their exceptional performance in both the kitchen and the laser engraver. Each offers a unique canvas for your design.
- Maple: The High-Contrast Classic. Maple is a dense, incredibly durable hardwood with a light, creamy color and a subtle, uniform grain. This pale background makes it the ideal choice for achieving a sharp, high-contrast engraving. The laser burns the wood to a dark brown or black, creating a design that pops.
- Pros: Excellent durability, resists knife scarring well, provides maximum engraving contrast, has a clean and modern look.
- Cons: Its light color can be more prone to showing stains from colorful foods like berries or cured meats if not oiled properly.
- Cherry: The Warm and Elegant Choice. Known for its smooth grain and beautiful, warm reddish-brown hues, cherry adds a touch of elegance. It develops a richer, darker patina over time, which many people find highly desirable. Engraving on cherry results in a deep, rich brown tone that offers good, yet slightly more subtle, contrast than on maple.
- Pros: Gorgeous, warm coloring that deepens with age, provides a rich and clear engraving, very smooth to the touch.
- Cons: It is slightly softer than maple, making it more susceptible to scratches and dents with heavy use.
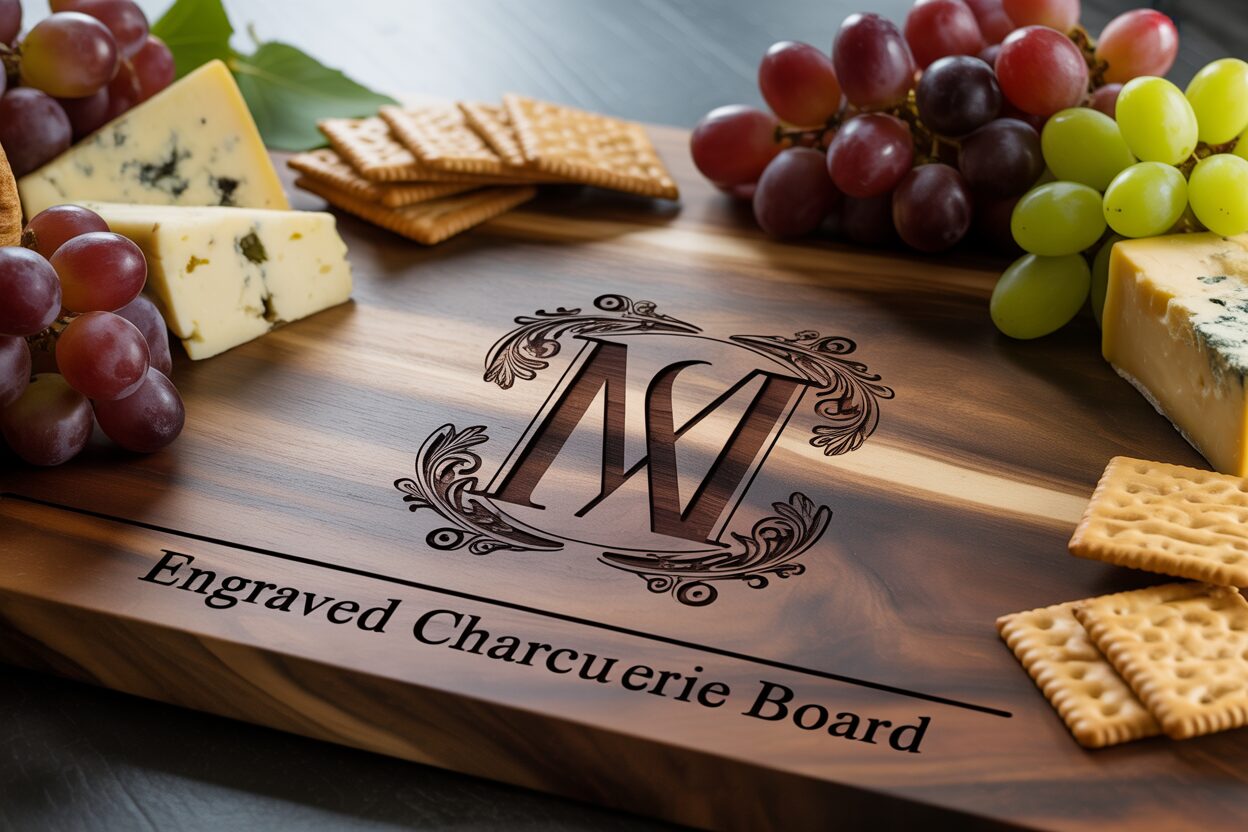
- Walnut: The Dark and Luxurious Option. Walnut is a premium hardwood celebrated for its deep, chocolate-brown color and often stunning, complex grain patterns. It creates a sophisticated and high-end feel. Laser engraving on walnut is a game of subtlety; it produces a ‘tone-on-tone’ effect, where the engraved area is only a few shades darker than the wood itself. This creates an understated, elegant mark rather than a bold one.
- Pros: Rich, luxurious appearance, hides stains well, offers a sophisticated and subtle engraving style.
- Cons: Lowest contrast between the wood and the engraving, making fine details less prominent from a distance.
Edge Grain vs. End Grain Construction
Finally, consider how the board is constructed. You will primarily encounter two types: edge grain and end grain. For a project that balances engraving beauty with practical use, edge grain is the superior choice. These boards are made by laminating long strips of wood together, displaying the side of the grain. This creates a smooth, stable, and uniform surface that is perfect for laser engraving. End grain boards, which look like a checkerboard of wood blocks, are fantastic for heavy-duty chopping as they are ‘self-healing’ to knife marks. However, their uneven, porous surface is not ideal for the crisp, clean lines required for a detailed laser engraving, and the pattern can distract from your design. Stick with a quality edge grain board to provide the perfect canvas for your art.
Designing Your Custom Engraving
With your perfect piece of wood selected, you’ve created a blank canvas. Now comes the most exciting part: deciding what masterpiece to engrave upon it. The design is what transforms a simple cutting board into a cherished keepsake. Whether you’re a seasoned graphic designer or a complete beginner, creating a beautiful and meaningful design is entirely within your reach. The key is to start with the right file type and a clear vision for the final product.
The Power of the Vector: Why an SVG is Essential
Before you get lost in creative ideas, it’s crucial to understand the technical foundation of a great engraving: the design file. For laser engraving, you should always work with vector files, the most common of which is the SVG (Scalable Vector Graphic). Unlike pixel-based images like JPEGs or PNGs, which lose quality and become blurry when enlarged, vectors are made of mathematical paths. This means a charcuterie board svg file can be scaled to any size without losing a single bit of sharpness. This is critical for the laser, which follows these paths precisely to create crisp, clean lines and perfectly filled shapes. You can find pre-made SVG files on marketplaces like Etsy or design sites, or you can create your own using software like Adobe Illustrator, Inkscape (which is free), or Canva. Starting with a quality SVG ensures your final engraving will be as sharp and professional as your design.
Ideas for Everyday Personalization
A personalized board makes an incredible gift for housewarmings, birthdays, or just because. The possibilities are limited only by your imagination. Consider these popular and effective design concepts:
- The Family Name: A classic for a reason. Engraving a family name, often accompanied by “Est.” and the year the family was established or moved into their home, is a timeless choice.
- Monograms and Initials: A single, ornate initial for a surname or a combination of a couple’s initials offers a touch of simple elegance.
- Meaningful Coordinates: Engrave the GPS coordinates of a special location—a first home, a wedding venue, or a place of birth—for a modern and discreetly personal touch.
- Custom Graphics: Think about what makes the recipient unique. A simple line drawing of their house, their beloved pet, or a symbol representing their favorite hobby can make the board truly one-of-a-kind.
- A Favorite Recipe: For a truly special heirloom, consider engraving a treasured family recipe, perhaps even in the original handwriting of a loved one by tracing it into a vector format.
Designing the Perfect Wedding Gift Charcuterie Board
An engraved charcuterie board is one of the most popular and appreciated wedding gifts. It’s both practical and deeply personal, a piece the couple will use for years to come as they host gatherings and build their new life together. When designing for a wedding, aim for a balance of romance and classic style.
- Names and Date: The most popular design features the couple’s first names and their wedding date. You can experiment with different font pairings—a romantic script for the names and a clean, modern font for the date often works beautifully.
- Mr. & Mrs. [Surname]: A traditional and elegant option that celebrates their new shared identity. Including the wedding date below the name is a common addition.
- Romantic Quotes: A short, meaningful quote about love or partnership can be a beautiful touch. Place it subtly along an edge or in a corner to avoid overwhelming the board’s surface. Examples include “Happily Ever After” or a simple “Always & Forever.”
- Interlocking Designs: Consider graphics that symbolize unity, such as interlocking rings, a heart with their initials inside, or a simple ampersand (&) creatively placed between their names.
When designing for a wedding, think about the couple’s style. Are they modern and minimalist, or rustic and traditional? Let their personality guide your font choices and graphic elements to create a gift that feels like it was made just for them.
The Laser Engraving Process: Settings and Techniques
With your design finalized and your beautiful hardwood board waiting, it is time to bring your vision to life. This is where precision and preparation meet creativity. The laser engraving process itself is largely automated, but the quality of the final result depends entirely on the groundwork you lay beforehand. Rushing this stage is the quickest way to turn a perfect project into a disappointment. By taking a methodical, step-by-step approach, you can ensure your laser engraved cutting board file translates into a stunning, flawless engraving.
Preparation is Paramount: Positioning and Focusing
Before you even send the file to the laser, your first steps happen inside the machine.
- Clean the Surface: Wipe the surface of your charcuterie board with a clean, lint-free cloth and a small amount of isopropyl alcohol. This removes any dust, oils from your hands, or residue that could interfere with the laser beam, ensuring a clean and consistent burn.
- Secure the Board: Place the board in the laser cutter’s bed. It is absolutely crucial that the board does not move during the engraving process. Use honeycomb pins, small clamps, or even heavy weights at the corners (outside the engraving area) to secure it firmly in place.
- Set Your Focus: An accurately focused laser is non-negotiable for a sharp engraving. A beam that is out of focus will be wider and less powerful, resulting in a blurry, faded design. Use your machine’s auto-focus feature or manual focusing tool to set the correct distance between the laser nozzle and the surface of the wood. Double-check this measurement; an error of even a millimeter can impact the quality.
- Frame Your Design: Use your laser software’s ‘frame’ or ‘trace’ function. This will run the laser head around the outer perimeter of your design with the beam turned off. Watch it carefully to confirm that your design is perfectly positioned on the board, making adjustments as needed. Check that it’s centered, level, and clear of any handles or edges.
Calibrating Your Laser Settings for Hardwood
Laser settings are a delicate balance between power, speed, and resolution. While the exact numbers will vary based on your specific laser’s wattage and type (CO2 vs. Diode), here are the general principles for hardwoods like maple, cherry, and walnut:
- Power: This determines the depth and darkness of the engraving. Hardwoods require more power than softwoods to get a good mark. A higher power percentage results in a darker burn.
- Speed: This is how fast the laser head moves. For a deep, rich engraving on hardwood, you’ll want to use a relatively slow speed. Speed and power have an inverse relationship; slowing down the speed has a similar effect to increasing the power, as it exposes the wood to the laser for a longer period.
- DPI (Dots Per Inch) / LPI (Lines Per Inch): This setting controls the resolution. A higher DPI (typically in the range of 250-500 for wood) will create more overlap between passes, resulting in a smoother, more filled-in appearance. For highly detailed graphics or photos, a higher DPI is better. For simple text, a slightly lower DPI is often sufficient.
The Golden Rule: Always Perform a Test Run
Never engrave your final piece without first testing your settings. This is the single most important step to prevent costly mistakes. Find a scrap piece of the exact same wood and thickness, or plan to use the back of the charcuterie board for a small test. Engrave a small part of your design—like a single letter or a small graphic element—using the settings you plan to use for the main job. Analyze the result. Is it too light? Increase power or decrease speed. Is it too dark or overly charred? Decrease power or increase speed. Make small adjustments and test again until you achieve the exact look you want. This small investment of time will guarantee the final product is perfect.
Applying a Food-Safe Finish
Your design is now permanently etched into the wood, but the job isn’t quite finished. The laser process leaves behind a slightly dull surface and some residue. The final, critical step is to clean and finish your engraved charcuterie board, which not only brings out the rich color and grain of the wood but also seals and protects it, making it completely food-safe and ready for its delicious debut. This finishing touch is what elevates your project from a piece of engraved wood to a functional work of art.
Post-Engraving Cleanup
The laser vaporizes wood, which creates smoke and a fine, soot-like residue, especially within the detailed crevices of your engraving. It is essential to clean this off before applying any finish.
- Begin by gently brushing out the engraved areas with a soft-bristled brush, like a clean toothbrush, to dislodge any loose particles.
- Next, take a clean, lint-free cloth and lightly dampen it with isopropyl alcohol. Gently wipe down the entire surface of the board, paying special attention to the engraved design. The alcohol will effectively lift the smoky residue without raising the wood grain or leaving a film.
- Let the board air dry completely for a few minutes. You will immediately notice the engraving looks cleaner and sharper.
Choosing and Applying a Food-Safe Finish
Never use standard woodworking finishes like varnish, lacquer, or polyurethane on a surface intended for food. These are not food-safe. Instead, you must use a penetrating oil that is non-toxic and will not go rancid.
- Food-Grade Mineral Oil: This is the industry standard for wooden cutting boards and butcher blocks. It is inexpensive, readily available, and completely safe. Mineral oil soaks deep into the wood fibers, hydrating them and preventing the board from drying out and cracking. It also provides the initial layer of protection against moisture.
- Beeswax and Mineral Oil Blends: Often sold as ‘board cream’ or ‘cutting board conditioner,’ these products offer a superior level of protection. The mineral oil penetrates and moisturizes the wood, while the beeswax remains on the surface, creating a water-resistant barrier that helps repel food juices and stains. This blend also gives the board a beautiful, silky-smooth feel and a subtle, low-gloss sheen.
The Finishing Process
Once your board is clean and dry, the application is simple but should not be rushed.
- Apply a generous amount of your chosen oil or board cream onto the surface. Don’t be shy; the wood is thirsty.
- Using a clean, lint-free cloth, work the finish into the wood in a circular motion. Be sure to cover every surface, including the engraved area, the sides, and the back.
- Now, let it rest. This is the most important part. You want the oil to penetrate as deeply as possible. Let the board sit for at least 4-6 hours, or ideally, overnight.
- After the board has had time to soak, take another clean cloth and buff off all the excess oil from the surface. The wood should feel hydrated and smooth, not sticky or greasy.
Long-Term Care for a Lasting Gift
Your personalized charcuterie board is now complete. To ensure it lasts for years, it requires simple but consistent care. Instruct the recipient to wash the board by hand with mild soap and warm water, and to never put it in the dishwasher or let it soak in the sink. The board should be re-oiled every month or so, or whenever it starts to look dry and pale. This regular maintenance will keep the wood healthy, protect the engraving, and ensure it remains a beautiful and functional centerpiece for countless gatherings to come.
Conclusions
You now have the knowledge to create a stunning engraved charcuterie board from start to finish. This project not only enhances your laser engraving skills but also results in a high-quality, personalized item perfect for gifting or personal use. Experiment with different designs and wood types to continue creating unique and memorable pieces for any occasion.
Frequently Asked Questions
Q: What is the best wood for a laser engraved charcuterie board?
A: The best woods are food-safe, closed-grain hardwoods. Maple is excellent for high-contrast designs, cherry offers a warm, elegant look, and walnut provides a luxurious, subtle engraving. Always choose an edge grain board for a smooth engraving surface.
Q: Why do I need an SVG file for laser engraving?
A: An SVG (Scalable Vector Graphic) is a vector file, meaning it’s made of mathematical paths, not pixels. This allows the design to be scaled to any size without losing sharpness, ensuring the laser can create crisp, clean lines for a professional-quality engraving.
Q: How do I make my engraved charcuterie board food-safe?
A: After engraving and cleaning off any residue, you must apply a food-safe finish. Use 100% food-grade mineral oil or a cutting board conditioner made from a blend of mineral oil and beeswax. Never use non-food-safe finishes like varnish or lacquer.
Q: Should I test my laser settings before engraving the final board?
A: Absolutely. Always perform a test run on a scrap piece of the same wood or on the back of the board. This allows you to perfect your laser’s power, speed, and DPI settings to achieve the desired darkness and clarity without risking your final piece.
Block "subscribe-popup" not found