Tutorials
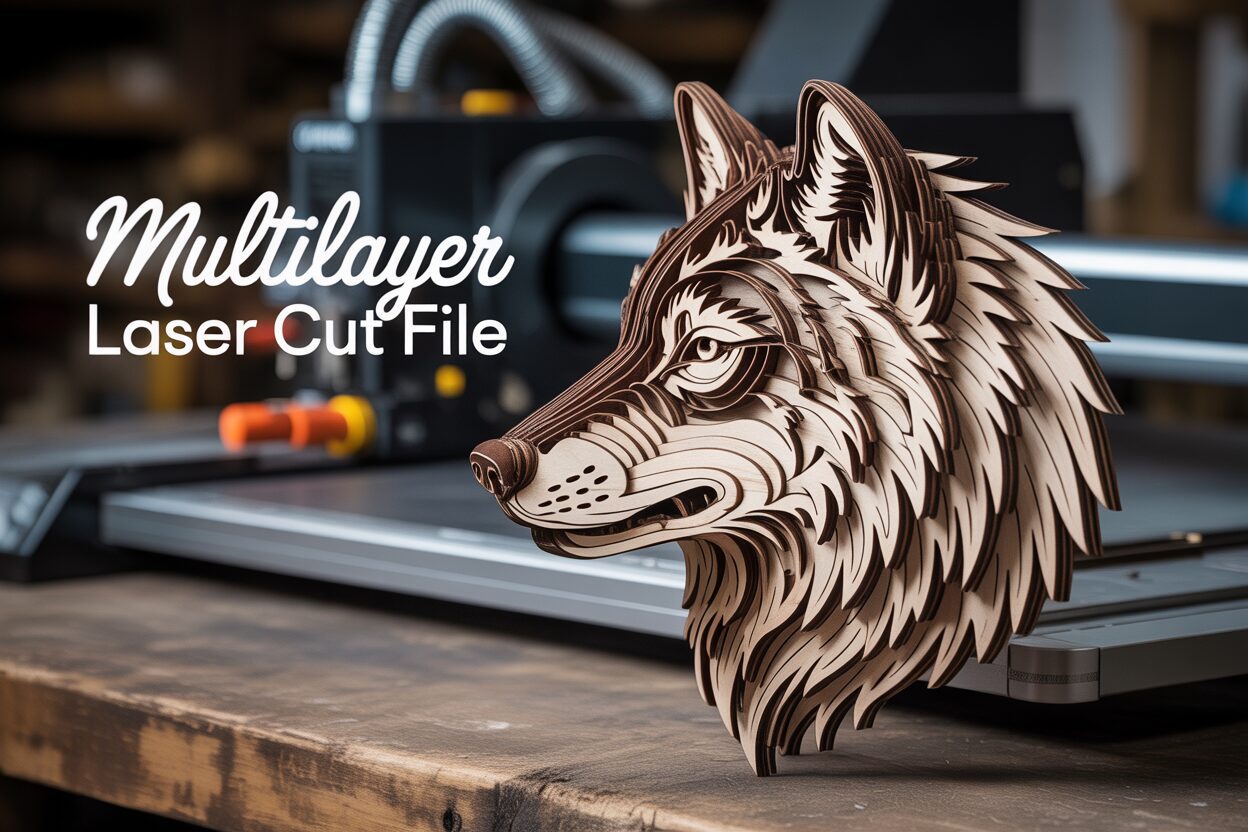
Creating Stunning Layered Wood Art with Multilayer Laser Cut Files
Jan
Estimated reading time: 7 minutes
Key Takeaways
- The quality of your digital multilayer laser cut file is the single most important factor for achieving a clean, professional result, so choose a well-vetted design.
- Material selection is crucial; Birch Plywood offers a natural look, MDF is ideal for painted projects, and Basswood excels for intricate details.
- Achieving the perfect cut requires calibrating laser settings (power, speed, focus) for your specific material, making a test cut an essential, non-negotiable step.
- Proper finishing—including cleaning smoke residue, using the right adhesive, and applying a protective sealer—is what transforms individual pieces into a stunning, durable work of art.
Table of Contents
- Selecting the Perfect Design and Materials
- From Digital File to Cut Pieces: A Laser Cutting Guide
- The Art of Assembly and Finishing
- Conclusion
- Frequently Asked Questions
Dive into the captivating world of layered wood art. This guide will walk you through transforming a digital multilayer laser cut file into a breathtaking piece of decor. We’ll cover everything from choosing materials to the final finishing touches, making it one of the most rewarding laser cut projects you can undertake.
Selecting the Perfect Design and Materials
The journey to creating breathtaking layered wood art begins not at the laser cutter, but at your computer. The digital design you choose is the fundamental blueprint for your entire project. A high-quality multilayer laser cut file is non-negotiable; it is the single most important factor in achieving a clean, professional result. A poorly designed file with overlapping lines, open paths, or improperly nested layers will translate directly into wasted material, frustrating cutting errors, and a final piece that lacks the intended depth and precision. Think of the file as your architectural plan: if the plan is flawed, the building will be unstable, no matter how good your materials are. Investing time or a few extra dollars in a well-vetted design from a reputable creator will save you immense frustration and ensure your project starts on the right foot.
Evaluating the Digital Blueprint
So, what separates a great file from a problematic one? First, examine the level of detail. Highly intricate designs with extremely thin lines can be stunning, but they are also fragile and prone to charring or breaking during and after cutting, especially for smaller-scale projects. Conversely, a design with too little detail might look simplistic and fail to leverage the unique 3D potential of layering. The key is to match the design’s complexity to your intended final size and the material you plan to use. Second, consider the number of layers. A design with only three or four layers will create a subtle 3D effect, while one with eight or more will produce dramatic depth and shadow. For beginners, starting with a design of five to seven layers is a great way to understand the assembly process without feeling overwhelmed. A well-constructed file will have logically organized layers that build upon each other cohesively, with clear alignment markers or shapes to guide the assembly process.
Material Matters: From Plywood to MDF
Once you have a stellar design, the next critical choice is your canvas: the wood itself. The material you select profoundly impacts both the cutting process and the final aesthetic of your laser cut wood designs. Your choice will influence everything from the color of the engraved edges to the ease of painting and finishing. There is no single “best” wood; the ideal material depends on the desired look and feel of your final piece. Understanding the characteristics of common options is essential for the success of your laser cut projects.
- Birch Plywood: Often considered the industry standard, birch plywood is prized for its strength, stability, and light, uniform color. Its smooth surface is an excellent base for both stains and paints, and it cuts cleanly with a pleasingly toasted edge. It is the perfect all-rounder, ideal for designs where you want a natural wood grain to show through. Be aware that internal voids or inconsistencies in the glue layers can occasionally cause cutting issues, so sourcing high-quality, laser-grade plywood is recommended.
- MDF (Medium-Density Fiberboard): If your project is destined to be painted, MDF is an excellent and economical choice. As an engineered wood product, it has no grain and a perfectly consistent density, which means the laser cuts through it with unmatched uniformity. Its surface is incredibly smooth, providing a flawless canvas for paint. However, MDF’s aesthetic weakness is its raw appearance and its dark, sooty cut edges. It also produces more dust and odor when cut, so proper ventilation is crucial.
- Basswood: For projects featuring delicate, intricate details, basswood is a premium option. This solid, lightweight hardwood is soft and has a very fine grain, allowing the laser to cut through it like butter with minimal charring. This results in incredibly crisp and clean lines. The trade-off is its cost and relative softness, which makes the final piece more susceptible to dents and scratches compared to sturdy plywood.
From Digital File to Cut Pieces: A Laser Cutting Guide
With your design selected and materials in hand, it is time to translate the digital blueprint into physical reality. This stage, where the 3d wood design laser cut actually happens, is a blend of digital precision and hands-on calibration. Successfully navigating your laser cutter’s software and settings is crucial for transforming a flat sheet of wood into a collection of perfectly cut pieces ready for assembly. The first step is preparing your multilayer laser cut file. Most laser software (like LightBurn, RDWorks, or brand-specific programs) will import standard vector formats such as SVG, AI, or DXF. Once imported, do a quick visual inspection. A well-designed file should have all layers clearly separated and color-coded. In laser cutting, colors are not just for aesthetics; they command the laser to perform specific actions. Conventionally, red might be assigned to ‘cut’ and blue to ‘score’. Ensure your software interprets these colors correctly and that all lines intended for cutting are assigned the ‘cut’ parameter.
Dialing in the Perfect Cut
The secret to a flawless cut lies in the holy trinity of laser settings: power, speed, and focus. These three variables work in tandem and must be perfectly calibrated for your specific material. Think of it this way: power is the strength of the laser beam, speed is how quickly the laser head moves across the material, and focus is the point at which the beam is at its most concentrated and powerful. Cutting through 3mm birch plywood requires a different combination of these settings than cutting through 5mm MDF. There are no universal “magic numbers”; every laser and every piece of wood is slightly different. This is why performing a test cut is not an optional step—it is an essential one for all cnc laser projects. Create a small test file, often a grid of small squares, and run it on a scrap piece of the exact same material you’ll be using for your project. By assigning different speed and power settings to each square, you can quickly identify the “sweet spot”: the lowest power and highest speed that cuts cleanly all the way through the material. This optimal setting minimizes burn marks (charring) on the top surface and reduces flashback (burn marks from the laser reflecting off the bed) on the back, giving you the cleanest possible pieces to work with.
Before you press ‘start’ on the main project, ensure your wood is perfectly flat on the machine’s honeycomb bed. Any warping, however slight, will alter the distance between the laser nozzle and the material, throwing off the focus and resulting in incomplete cuts. Use hold-down pins or weights on the edges of the wood if necessary. As you begin cutting, it’s wise to process the layers in an organized fashion. If your design fits on a single sheet of wood, that’s great for material efficiency. However, it’s crucial to keep track of the pieces as they are cut. A simple pro tip is to lightly pencil the layer number on the back of each component as you remove it from the laser bed. This small act of organization will prevent immense confusion later during the assembly stage. Monitor the machine while it is running, especially with plywood, which can have hidden glue pockets that may cause small flare-ups. Once the laser has finished its work, you will have a satisfying puzzle of wooden components, each one perfectly shaped and ready for the creative journey of assembly and finishing.
The Art of Assembly and Finishing
You now have a collection of precisely cut wooden pieces, a puzzle waiting to be brought to life. This final stage of assembly and finishing is where your meticulous preparation transforms into a stunning work of layered wood art. The first, and often overlooked, step is cleaning. The laser cutting process, by its nature, leaves a slight smoky residue or char along the cut edges. For a flawless finish, this needs to be addressed. A simple method is to gently wipe the faces and edges of each piece with a baby wipe or a cloth slightly dampened with isopropyl alcohol. Be cautious with MDF, as it can swell if it gets too wet. For a truly pristine surface, especially if you plan to use a light-colored stain or paint, a quick pass with a high-grit sandpaper (220 or higher) will remove any stubborn residue and prepare the wood to accept a finish beautifully. A professional tip for future projects is to apply masking tape to the wood’s surface before cutting; peeling it off afterwards removes almost all surface smoke stains instantly.
Precision in Assembly and Adhesion
With your pieces clean and laid out in their numbered order, the assembly begins. Accuracy is paramount. Many 3d wood design laser cut files include clever alignment guides, such as small, perfectly matched holes or corner markers that you can use to line up the layers. If your design relies on visual alignment, work slowly from the bottom layer up, using prominent features of the design as your guideposts. The choice of adhesive is critical and depends on your workflow.
- Wood Glue: For a strong, permanent bond, a quality PVA wood glue (like Titebond II) is unmatched. It allows for a few minutes of “open time,” giving you the ability to slightly reposition layers for perfect alignment before it begins to set. Apply a thin, even coat using a small brush, roller, or even your finger. The biggest challenge is “squeeze-out,” where excess glue is forced from the edges. This must be wiped away immediately with a damp cloth before it dries.
- Spray Adhesive: For designs with large surface areas or incredibly intricate, delicate pieces, a spray adhesive can be a faster alternative. It provides an even coat with no risk of squeeze-out. The downside is its immediacy; most spray adhesives are far less forgiving and offer little to no repositioning time. Overspray can also be an issue, so protect your work surface.
Regardless of your choice, apply even pressure to each layer as you add it. Using heavy books or clamps (with a piece of scrap wood to distribute pressure and prevent dents) will ensure a tight bond with no gaps.
The Final Flourish: Painting and Sealing
The final finishing is where you impart your personal artistic style onto the project. A key decision is whether to paint or stain the pieces before or after assembly. Finishing before assembly allows for crisp, clean color separation between layers but requires careful planning. Finishing after assembly gives the piece a more unified look and is often faster, though detailing inner edges can be tricky. Acrylic craft paints are perfect for adding vibrant color, whether applied by hand with fine brushes for detail work or with an airbrush or spray can for smooth, even coats. Wood stains are ideal for enhancing the natural beauty of materials like birch plywood, and using different stain colors on alternating layers can create a spectacular sense of depth. Once you are satisfied with the color and assembly, the final step is to seal your artwork. This protects it from dust, moisture, and UV light. Several light coats of a clear spray sealer—available in matte, satin, or gloss finishes—will provide durable protection without obscuring the fine details, completing your stunning layered wood art project.
Conclusion
You now have the knowledge to create your own intricate layered wood art. By starting with a quality multilayer laser cut file and following these steps, you can produce professional-grade art. Embrace this technique to elevate your cnc laser projects and add stunning, handcrafted pieces to your collection or online store.
Frequently Asked Questions
Q: What is the most important part of starting a layered wood art project?
A: Without a doubt, the most critical element is the digital multilayer laser cut file. A high-quality, well-designed file is the foundation for a successful project and will prevent countless cutting errors and frustrations.
Q: What is the best wood to use if I want to paint my final piece?
A: MDF (Medium-Density Fiberboard) is the best choice for painted projects. Its perfectly smooth, grain-free surface provides a flawless canvas for paint, and its consistent density ensures uniform laser cuts.
Q: Do I really need to do a test cut?
A: Yes, absolutely. Every laser cutter and every piece of wood is slightly different. A test cut is the only way to find the optimal power and speed settings to get a clean cut through your specific material, which saves time, prevents waste, and yields the best possible results.
Q: Should I paint the wood layers before or after I glue them together?
A: It depends on the look you want. Painting before assembly allows for crisp, clean color separation between each layer. Painting after assembly is often faster and gives the piece a more unified, cohesive look.
Block "subscribe-popup" not found