Projects
Creating Stunning 3D Illusions with Your Laser Cutter
Dec
Estimated reading time: 6 minutes
Key Takeaways
- 3D illusion files are 2D vector designs (SVG, AI, DXF) that use techniques like forced perspective and engraved shading to create a convincing optical illusion of depth on a flat surface.
- The choice of material is critical; light-colored woods with a fine grain, such as Baltic Birch, Basswood, and Maple, provide the best contrast to enhance the 3D effect.
- These projects are versatile and can be made with various laser cutters, from hobbyist-level diode lasers to professional CO2 machines like the Glowforge.
- Proper finishing is essential. Cleaning the piece with isopropyl alcohol and applying a finish like lacquer or oil dramatically deepens the engraved shadows, making the illusion “pop.”
Table of Contents
- What Are 3D Illusion Laser Files?
- The Art of Deception: How the Illusion is Crafted
- Essential Tools and Materials for Your 3D Wood Design
- A Step-by-Step Guide to Cutting and Finishing Your 3D Illusion
- Conclusions
Dive into the captivating world of 3D illusion laser files. This article will guide you through transforming a simple piece of wood into a stunning work of art with incredible depth. We’ll cover everything from selecting the perfect design file to the final finishing touches, making this a perfect project for both hobbyists and seasoned creators.
Interested in more 3D Illusion? Check out our 3D Illusion laser file designs: Click here!
What Are 3D Illusion Laser Files?
At first glance, a 3d illusion laser file might seem like magic, but its secret lies in the clever manipulation of 2D design principles to deceive the human eye. Unlike a true 3D model file (like an STL or STEP file) used for 3D printing, a 3D illusion file is a standard 2D vector file, typically in an SVG, AI, or DXF format. It contains no actual depth information. Instead, it’s a masterfully crafted blueprint of lines and patterns that, when cut and engraved onto a flat piece of material like wood, creates a powerful perception of three-dimensional space. The entire effect is an optical illusion, relying on how our brains interpret visual cues like perspective, layering, and shadow.
The Art of Deception: How the Illusion is Crafted
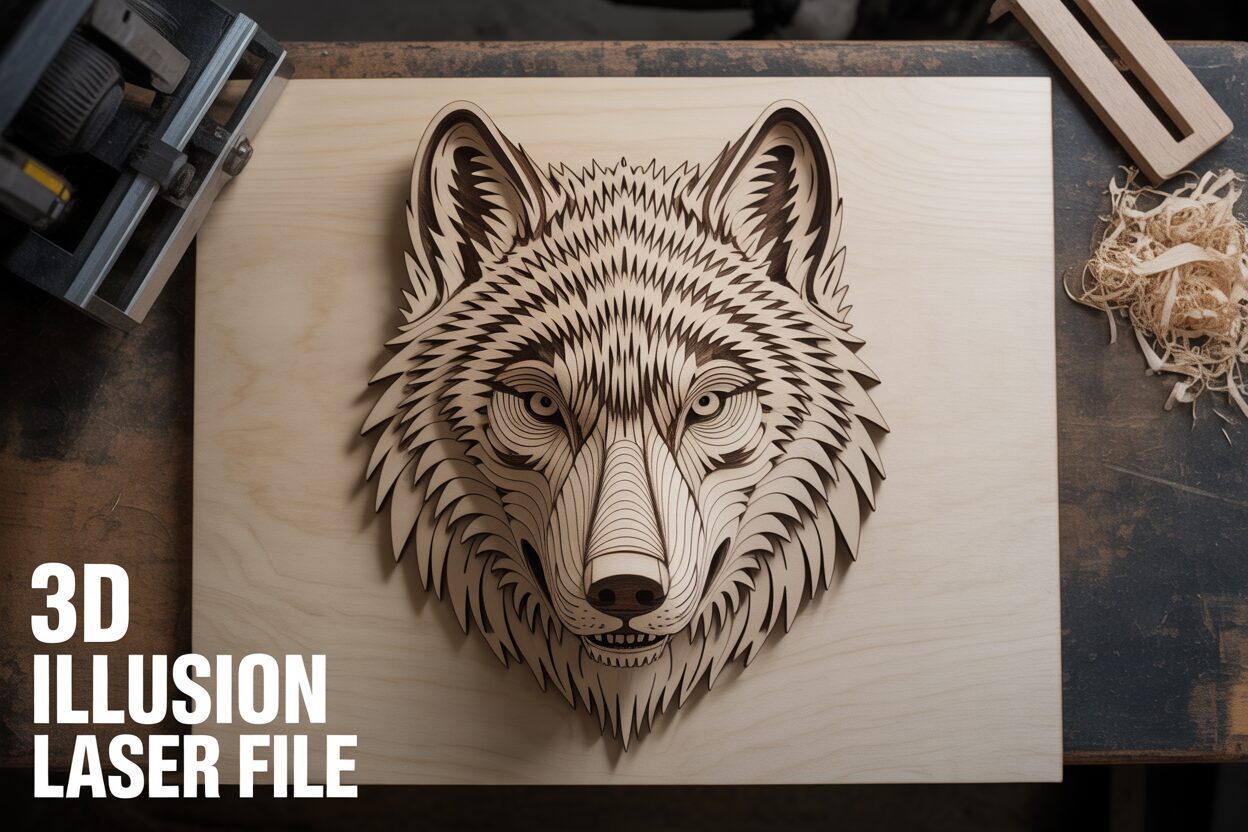
The core of a 3D illusion file is its strategic use of vector cut lines and engraved patterns. Designers employ several techniques, often in combination, to build the illusion of depth. The most prominent method is forced perspective. This involves creating a design with a defined “frame”—be it a simple square, a geometric pattern, or a scenic background. The main subject, like an animal or a vehicle, is then designed to partially overlap and extend beyond the boundaries of this frame. When you see a wolf’s snout physically cut outside the border while its neck remains inside, your brain automatically interprets the wolf as being in front of the frame, literally jumping out at you. Other key techniques include:
- Strategic Line Work: Lines within the design are drawn to mimic artistic perspective, converging towards an imaginary vanishing point to create a sense of distance and depth.
- Interrupted Lines: A line that forms the background will be cut off where the foreground object passes “in front” of it. This simple interruption is a powerful cue for our brains to perceive one object as being closer than another.
- Engraved Shading: This is where a laser engraving file for wood truly shines. The file includes detailed engraving patterns—not just for texture, but for shadow. By varying the power or speed of the laser, designers can create darker, deeper engravings that mimic shadows, making parts of the design appear to recede. Lighter engraving can simulate highlights, making surfaces seem closer or curved towards a light source.
This intricate combination of cut lines and engraved shading is what sets these files apart. A standard cutting file is simply a collection of outlines meant to produce a specific shape. A standard engraving file is designed to mark a surface with an image or text. A 3D illusion file, however, is a hybrid where every cut and every engraved mark is intentionally placed to contribute to a single, cohesive optical illusion.
Popular themes for these designs capitalize on this “breakout” effect. Wildlife is a perennial favorite, with eagles, bears, and lions appearing to burst from the wood. The organic, dynamic shapes of animals provide a stunning contrast to the rigid, geometric frames they emerge from. Geometric and mandala-style patterns also work exceptionally well, using repeating lines and precise shading to create tunnels or floating layers that draw the viewer’s eye inward. Abstract art allows for endless creativity, with flowing shapes and interlocking forms that appear to hover over one another. For any of these themes, wood is an ideal medium. The natural grain adds its own layer of texture and depth, and the charring effect of the laser creates rich, dark shadows that enhance the illusion far more effectively than on materials like acrylic or metal. A well-designed file will even consider the wood’s properties, using engraving patterns that work with or against the grain to maximize the final piece’s visual impact.
Essential Tools and Materials for Your 3D Wood Design
With your 3D illusion file chosen, the next step is to gather the right tools and materials to bring it to life. The good news is that you don’t need an overly complex or expensive setup. The centerpiece, of course, is your laser cutter. These designs are famously popular as Glowforge projects because of that machine’s ease of use and strong community support. However, the vector-based nature of these files makes them compatible with nearly any laser cutter on the market. Whether you have a high-powered CO2 laser or a more modest diode laser, you can achieve fantastic results. The primary difference will be in speed and power settings; a lower-wattage diode laser might require a slower speed or multiple passes to cut through the wood cleanly, but the final illusion will be just as effective. This versatility makes these projects an excellent starting point for anyone new to the craft.
Selecting Your Canvas: Wood and Finishing Supplies
The material you choose has a dramatic impact on the final result of a 3d wood design laser cut. For optical illusions, the goal is maximum contrast between the engraved areas (the “shadows”) and the untouched wood. This is why light-colored woods with a tight, uniform grain are highly recommended. A busy or dark grain pattern can compete with the fine lines of the design, weakening the illusion. The best choices include:
- Baltic Birch Plywood: An all-around favorite for laser artists. It’s stable, affordable, and has a bright, clean surface that provides excellent contrast for engravings.
- Basswood: A soft, lightweight hardwood with a very fine, even grain. It cuts and engraves beautifully with low power, making it perfect for intricate details and a great option for those with diode lasers.
- Maple: A premium hardwood known for its creamy white color and subtle grain. It creates a striking, high-contrast look and gives the final piece a more substantial, high-quality feel.
- Cherry: While slightly darker, cherry wood has a fine, straight grain and a rich, warm tone that darkens beautifully with an oil finish, making the engraved portions appear incredibly deep and rich.
Beyond the wood and the laser, a few simple workshop staples are essential for cleaning and finishing your project. These items elevate your piece from a simple cutout to a finished work of art and are crucial for getting that professional look. Consider this your essential post-processing toolkit, perfect for even beginner laser projects:
- Sandpaper: Keep a few grits on hand, such as 220 and 400. A light sanding before cutting can give you a smoother surface for engraving, and a gentle pass after cutting can remove any minor “flash” or charring along the cut edges.
- Wood Glue: While many illusion designs are single-layer, some achieve extra depth by layering multiple pieces. A quality PVA wood glue is a must-have for these projects.
- Isopropyl Alcohol: This is your best friend for cleanup. After engraving, a light wipe with a cloth or cotton swab dampened with isopropyl alcohol will remove smoky residue and resin without raising the wood grain.
- Finishing Oils or Lacquers: A finish not only protects the wood but also makes the illusion “pop.” A simple mineral oil or a spray-on lacquer will deepen the color of the engraved areas, dramatically increasing the contrast and enhancing the perception of depth.
A Step-by-Step Guide to Cutting and Finishing Your 3D Illusion
Now that you have your file and materials, it’s time for the most exciting part: bringing your project to life. This process can be broken down into three key stages: software setup, the laser operation, and the final finishing touches that make the illusion pop. Follow these steps carefully for a flawless result.
Step 1: Preparing Your File and Laser Settings
First, import your 3d illusion laser file into your laser cutter’s control software, such as the Glowforge interface or LightBurn. You will notice the design is color-coded; typically, one color (like black) is used for all the engraved areas, and another color (like red) is for the cut lines. Your software will use these colors to assign different operations. Here, precision is key. There are no universal settings, as the ideal power and speed depend on your laser’s wattage and the specific type and thickness of wood you’re using. As a general rule for the engraving, you want a setting that creates a deep, dark char without being excessively powerful, which can reduce detail. For the cutting, you need enough power to get through the material cleanly in a single pass. Before you run the full project, always perform a test cut. Use a small scrap of the same material to test your engraving and cutting settings. This five-minute step can save you from wasting an entire sheet of premium wood on a job that isn’t properly calibrated.
Step 2: The Engraving and Cutting Process
Once your settings are dialed in, secure your wood on the laser bed, ensuring it’s completely flat. If your wood has a slight warp, use hold-down pins or strong magnets to flatten it. A flat surface is critical for a consistent engraving and a focused cut. Start the job and monitor your machine. The laser will typically perform the engraving operation first, moving back and forth to meticulously etch the shaded details that create the illusion of depth. Once the engraving is complete, it will switch to the cutting operation, precisely tracing the vector lines to liberate your design from the main board. Ensure your ventilation system is running properly to clear any smoke, which is crucial for both safety and achieving a clean final product.
Step 3: Finishing for Maximum “Wow” Factor
After the laser has finished, carefully remove your piece. This final stage of finishing is what transforms a simple wood cutout into a stunning piece of art.
- Cleaning: If you used masking tape, peel it off now. If not, you’ll likely have some smoke residue on the surface. Gently wipe the piece with a microfiber cloth dampened with isopropyl alcohol. This will clean off the haze without damaging the wood, instantly making the contrast between the light wood and the dark engraving more dramatic.
- Sanding: This step is optional but adds a professional touch. Using a high-grit sandpaper (220 or higher), very lightly brush the cut edges to remove any residual char. Be extremely gentle and avoid sanding the face of the design, as you don’t want to diminish the sharp details of the engraving.
- Applying a Finish: This is the most critical step for enhancing the 3D effect. Apply a clear finish like a spray lacquer, polyurethane, or a finishing oil like Danish oil. The finish will seal the wood and, most importantly, it will saturate the engraved portions, making them appear significantly darker and richer. This deepens the perceived shadows, pushing those areas visually “back” and making the un-engraved parts of the subject appear to jump forward.
The incredible visual impact of these finished pieces makes them fantastic laser projects to sell. Their unique nature grabs attention instantly at craft fairs, and they photograph well for online shops like Etsy. When selling, be sure to take photos from a slight angle to best capture the illusion of depth for your potential customers.
Conclusions
You now have the knowledge to create your own breathtaking 3D laser-cut illusions. By choosing the right 3d illusion laser file and following these steps, you can produce professional-quality pieces. Don’t be afraid to experiment with different woods and finishes to make each project unique. Start exploring our digital design files and bring your creations to life!
Frequently Asked Questions
Q: Are 3D illusion laser files actual 3D models?
A: No, they are not. They are standard 2D vector files (like SVG or DXF) that use clever design techniques, such as forced perspective and strategic shading, to create the optical illusion of three-dimensional depth on a flat piece of material.
Q: What is the best type of wood for these projects?
A: The best woods are light-colored with a fine, uniform grain to maximize the contrast with the dark laser engravings. Top choices include Baltic Birch Plywood, Basswood, and Maple, as their bright surfaces make the 3D effect more pronounced.
Q: Can I use a lower-power diode laser for 3D illusion projects?
A: Absolutely. While a more powerful CO2 laser might be faster, diode lasers can achieve the same stunning results. You may need to use a slower speed or perform multiple passes for the cutting portion, but the engraving and the final illusion will be just as effective.
Q: Why is applying a finish so important for the final look?
A: Applying a finish is the most critical step for enhancing the 3D effect. A clear coat like lacquer or oil dramatically darkens the engraved areas, which function as shadows in the design. This increases the contrast between the light wood and dark char, making the un-engraved parts appear to “pop” forward and solidifying the illusion of depth.
Block "subscribe-popup" not found