Projects
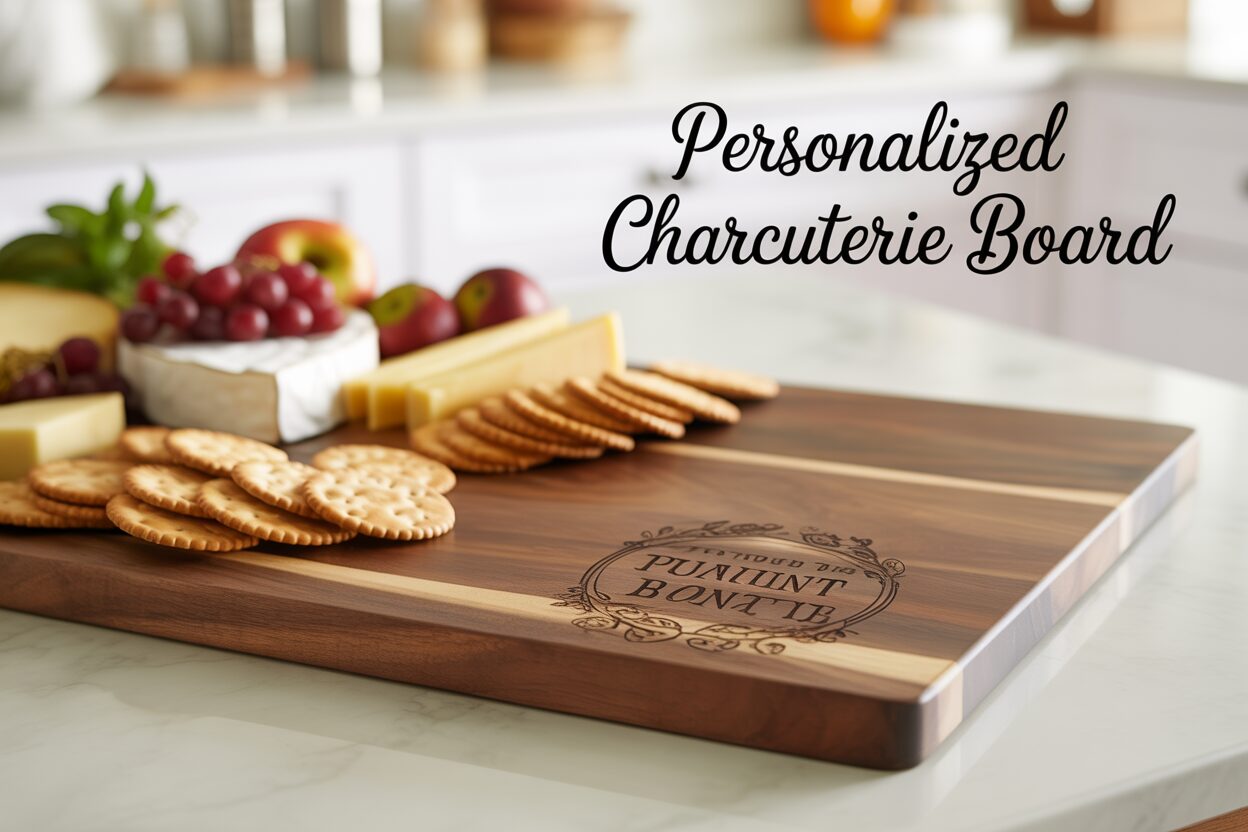
Creating a Personalized Charcuterie Board with a Laser Engraver
Jan
Estimated reading time: 8 minutes
Key Takeaways
- Choose the Right Wood: Always select a food-safe, closed-grain hardwood like Maple, Cherry, or Walnut for your charcuterie board. These woods are less porous, more hygienic, and provide a superior surface for clean laser engraving.
- Perfect Your Design: Use Scalable Vector Graphics (SVG) files for your designs to ensure they can be resized without losing quality. Before engraving, print your design to scale and place it on the board to finalize the size and composition.
- Test Your Settings: Laser settings (Power, Speed, DPI) vary based on the wood type and machine. Always run a test grid on a scrap piece of the same wood to dial in the perfect settings for a crisp, clean burn.
- Apply a Food-Safe Finish: Finishing is crucial for protection and beauty. Use a two-step process: first, a deep soak with food-grade mineral oil, followed by a protective top coat of a wood conditioner or “board butter” containing beeswax.
Table of Contents
- Choosing the Right Wood for Your Charcuterie Board
- Designing Your Custom Engraving
- The Laser Engraving Process: Settings and Techniques
- Finishing and Caring for Your Engraved Board
- Conclusions
- Frequently Asked Questions
Discover how a laser engraver can transform a simple piece of wood into a stunning personalized charcuterie board. This guide will walk you through every step, from selecting the right materials to applying the final food-safe finish. Create a beautiful custom piece for your home or a memorable gift for someone special, like a unique charcuterie board wedding gift.
Interested in more Charcuterie Board? Check out our Charcuterie Board laser file designs: Click here!
Choosing the Right Wood for Your Charcuterie Board
The foundation of any stunning engraved charcuterie board is the wood itself. Your choice will not only dictate the final aesthetic but also impact food safety, durability, and how well your design engraves. The single most important factor for a board that will come into contact with food is selecting a closed-grain hardwood. Woods with large, open pores (like oak or ash) can trap food particles and bacteria, making them difficult to clean and sanitize properly. Closed-grain woods, on the other hand, have very fine, small pores, creating a less porous surface that is more hygienic and easier to maintain. These dense hardwoods also provide a superior canvas for the laser, allowing for crisp, clean lines and intricate details.
Top Wood Choices for Your Engraved Charcuterie Board
Among the best food-safe, closed-grain hardwoods, a few stand out for their exceptional qualities. Maple is a classic choice, prized for its durability and creamy, light color. Its subtle, straight grain creates a smooth, uniform surface that provides a high-contrast backdrop for laser engraving, making your design pop. Cherry offers a warmer, reddish-brown hue that deepens beautifully over time, adding a rich character to your project. Its smooth texture engraves cleanly, yielding an elegant and warm result. For a darker, more luxurious look, Walnut is an excellent option. Its deep chocolate tones create a sophisticated engraved charcuterie board where the engraving appears as a subtle, darker shade. This tone-on-tone effect is perfect for elegant monograms or understated designs. Finally, Acacia is a popular and sustainable choice known for its dramatic, variegated grain patterns and impressive hardness. The contrast in an acacia board can be striking, though its varied density may require some fine-tuning of your laser settings for a consistent result.
Pre-Made Blanks vs. A Truly Custom Shape
Once you have an idea of the wood type you want, you face another decision: should you purchase a pre-made, blank board or create your own from raw lumber? Each path has distinct advantages and is suited to different skill levels and project goals.
- Pre-Made Blank Boards: This is the most accessible and time-efficient option. Blanks are available in a wide variety of the woods mentioned above and come in standard shapes like rectangles, paddles, and circles. Pros: They are convenient, often pre-sanded, and ready for your laser engraver right out of the box. This path is ideal for beginners or for those producing multiple boards. Cons: You are limited to the shapes and sizes offered by suppliers, which can restrict your creative vision.
- Creating a Custom Shape: If you have access to basic woodworking tools, crafting the board yourself unlocks unlimited potential. You can design unique shapes, integrate custom handles, or create a board of specific dimensions. Pros: This method gives you complete control over the final product, allowing you to craft a truly bespoke custom charcuterie board from start to finish. Cons: It is significantly more labor-intensive, requiring cutting, shaping, extensive sanding, and routing the edges for a professional finish. It demands a higher skill level and more equipment.
Ultimately, the choice between a pre-made blank and a fully custom shape depends on your desired outcome, available tools, and timeline. Both methods can lead to a beautiful and functional engraved charcuterie board that will be cherished for years to come.
Designing Your Custom Engraving
The design is the soul of your project; it’s what elevates a simple piece of wood into a personalized charcuterie board. This is where you infuse personality, sentiment, and style, creating a piece that tells a story. Whether you’re crafting a housewarming present, a corporate gift, or a memorable charcuterie board wedding gift, a well-thought-out design is paramount. The first step is deciding whether to create your design from scratch or source a pre-made file. For those with a graphic design background, software like Adobe Illustrator or the free alternative Inkscape allows for complete creative freedom. However, for most, sourcing a design is the most efficient path. Online marketplaces are treasure troves of high-quality digital files perfect for laser engraving. When searching, using terms like ‘charcuterie board svg’ will yield the best results. An SVG, or Scalable Vector Graphic, is the ideal file type for this work. Unlike pixel-based images (like JPG or PNG), an SVG is made of mathematical paths. This means you can resize it to any dimension without losing a single bit of sharpness, ensuring your laser produces impeccably crisp lines every time.
Design Elements and Personalization
The beauty of a custom charcuterie board lies in its personal touch. The possibilities for personalization are nearly endless, but here are some popular and effective ideas to get you started:
- Names and Dates: The most classic approach involves engraving a family name and an important date, such as “The Jacksons” with “Est. 2023” below it. This is the go-to design for a wedding or anniversary gift.
- Monograms: An elegant single initial or a combination of initials for a couple adds a sophisticated touch. These are perfect for placement on a corner or the handle of the board.
- Custom Logos or Artwork: For a truly unique piece, consider a custom illustration. This could be a corporate logo for a client gift, a simplified drawing from a child, or a symbol that holds special meaning for the recipient.
- Coordinates: Engraving the geographic coordinates of a special place—a first home, a wedding venue, or a cherished vacation spot—is a subtle yet deeply personal option.
- Favorite Recipes: Engraving a beloved family recipe for a dip or cocktail directly onto the board is both charming and functional.
Placement and Sizing: The Art of Composition
Where you place your design is just as important as the design itself. The goal is to complement the board, not overwhelm it. A common mistake is making the design too large or placing it in an awkward spot that will be constantly covered by food. Consider the primary use of the board. If it will be heavily laden with cheeses and meats, a smaller design in a corner or on the handle is practical. If it’s meant to be more decorative, a larger, centered design can be a stunning focal point. A great pro-tip is to print your design on paper at a 1:1 scale. Cut it out and place it on your wooden board, moving it around to visualize the final composition. This simple step helps you judge the size and placement accurately before committing to the laser. Generally, leaving a generous border around your design creates a more balanced and professional look. Remember, in design, negative space is just as important as the engraved area itself.
The Laser Engraving Process: Settings and Techniques
With your design finalized and your beautiful wooden board ready, it’s time to bring your vision to life in the laser engraver. This stage requires precision and a methodical approach, as the right settings and techniques are what separate an amateur result from a professional-quality engraved charcuterie board. The first step is surface preparation. Even if your board feels smooth, it’s wise to give it a final wipe with a tack cloth or a cloth lightly dampened with isopropyl alcohol to remove any dust or oils from your hands. For an impeccably clean engraving with sharp edges and minimal scorching, applying a layer of transfer tape or paper-based masking tape over the engraving area is a highly recommended pro-technique. This masking layer will absorb the brunt of the smoke and resin residue produced during engraving, which can then be peeled away, leaving a pristine surface behind.
Setting Up for a Perfect Burn
Once the surface is prepped, securely place your board inside the laser engraver. It is absolutely critical that the board is perfectly flat and will not shift during the engraving process. Use hold-down pins, heavy weights on the corners (outside the engraving path), or a custom-made jig to lock it in place. Any movement, no matter how slight, will result in a blurry or misaligned design. Next, you must focus the laser beam precisely on the surface of the wood (or the masking tape, if you’ve applied it). An out-of-focus laser will produce a wider, less powerful beam, resulting in a fuzzy, weak engraving rather than the crisp, dark lines you’re aiming for. Use your machine’s focusing tool and follow the manufacturer’s instructions carefully. This single step is one of the most important for achieving high-quality detail.
Dialing in Your Laser Settings
The core of the process lies in configuring the correct laser settings: Power, Speed, and DPI (Dots Per Inch). These three variables work in tandem and must be balanced for the specific wood you are using.
- Power: This dictates the intensity of the laser. Higher power results in a deeper, darker burn. Too much power can cause excessive charring or even burn completely through thin material.
- Speed: This is how fast the laser head moves across the material. Higher speed means less time spent on any single point, resulting in a lighter mark. Slower speeds create a deeper, darker engraving.
- DPI: This determines the resolution of your engraving. A higher DPI (like 300-600) packs more laser dots into each inch, creating a solid, high-detail fill. A lower DPI might leave visible lines and is better for a rustic look or faster production.
There is no single “correct” setting; it’s a balance that varies with every machine and piece of wood. A dense wood like Maple requires more power or a slower speed than a softer wood like Cherry. The best practice is to always run a test grid on a scrap piece of the same wood before engraving your final project. This allows you to see exactly how different combinations of power and speed will look. Start with your laser manufacturer’s recommended settings for hardwood and adjust from there until you achieve the desired depth and color for your engraved charcuterie board. While the technique is similar for a laser engraved cutting board intended for heavy chopping, you might opt for a slightly shallower engraving and place the design in a corner to minimize food trapping and wear from knife blades over time. For a serving-focused charcuterie board, a deeper, more prominent engraving is often desirable.
Finishing and Caring for Your Engraved Board
The laser has cooled and your design is permanently etched into the wood, but the work isn’t quite finished. The final steps of cleaning, finishing, and understanding proper care are what will transform your project into a durable, beautiful, and food-safe piece. The first task is post-engraving cleanup. If you used masking tape, carefully peel it away. You’ll likely find a small amount of soot or resin residue in and around the engraved area. The best way to clean this is with a soft-bristled brush (an old toothbrush works well) and a cloth lightly dampened with isopropyl alcohol. Gently scrub within the engraved lines to lift any residue, then wipe the entire surface clean. Be careful not to use anything too abrasive that could scratch the wood. This cleaning step ensures that your finish will be applied to a pristine surface, resulting in a flawless final look for your engraved charcuterie board.
Applying a Food-Safe Finish
Finishing is arguably the most critical step for any wooden item intended for food contact. An unfinished board is porous, susceptible to staining, and can harbor bacteria. More importantly, it will dry out over time, leading to cracking and warping. Applying a food-safe finish seals the wood, protects it from moisture, and dramatically enhances the natural color and grain, making your engraving stand out. The industry standard and best choice for this task is a two-part process using mineral oil and a wood conditioner (or “board butter”).
- Step 1: The Mineral Oil Soak. Begin with a liberal application of food-grade mineral oil. Do not use vegetable or cooking oils like olive oil, as they will go rancid over time. Pour the mineral oil directly onto the board and use a clean, lint-free cloth to spread it evenly over all surfaces, including the sides and the engraved areas. The wood will drink it up. Let the board sit for at least a few hours, or preferably overnight, to allow the oil to penetrate deep into the wood fibers. Once saturated, wipe off any excess oil.
- Step 2: The Protective Top Coat. The second step is to apply a wood conditioner, which is typically a blend of mineral oil and beeswax or carnauba wax. This wax component creates a protective, water-resistant barrier on the surface. Scoop a small amount onto a clean cloth and apply it to the board in a circular motion. Once the entire board is coated, let it sit for 15-20 minutes, then take a new clean cloth and buff the surface to a beautiful, soft sheen. This finishing process is what gives a custom charcuterie board its professional, lustrous appearance.
Long-Term Care and Maintenance
To ensure your creation lasts for years, proper care is essential. Provide these instructions to anyone you gift a board to. First and foremost: never submerge the board in water or put it in a dishwasher. The intense heat and prolonged moisture will destroy it. The correct way to clean a laser engraved cutting board is to hand wash it with mild soap and warm water, then immediately dry it with a towel. Store it standing on its edge to allow for even air circulation. Over time and with use, the finish will wear away. The board should be re-oiled whenever it starts to look dry or dull, typically once a month with regular use. A quick reapplication of mineral oil or board butter will restore its protective layer and keep it looking as good as the day it was made.
Conclusions
You now have the knowledge to create a professional-quality engraved charcuterie board. This versatile project allows for endless creativity and results in a functional piece of art. Whether for personal use or as a heartfelt gift, your custom laser engraved cutting board is sure to impress and serve as a conversation starter at any gathering.
Frequently Asked Questions
Q: What is the best wood for a charcuterie board?
A: The best choices are closed-grain hardwoods like Maple, Cherry, or Walnut. These woods are dense, durable, and non-porous, making them food-safe and ideal for providing a clean, high-contrast surface for laser engraving.
Q: Can I use a regular cutting board for laser engraving?
A: Yes, as long as it’s made from a suitable, solid hardwood. The process for a laser engraved cutting board is the same, but for boards intended for heavy chopping, you might consider a shallower engraving placed in a corner to minimize wear from knife blades over time.
Q: What finish should I use on my engraved charcuterie board?
A: Always use a 100% food-safe finish. The best method is a two-step process: first, saturate the board with food-grade mineral oil, let it soak in, and wipe off the excess. Then, apply a protective top coat of a wood conditioner or “board butter,” which is typically a mix of mineral oil and beeswax.
Q: How do I clean my engraved charcuterie board?
A: Hand wash it with mild soap and warm water immediately after use, then dry it thoroughly with a towel. Never submerge the board in water or put it in a dishwasher, as this will cause it to warp and crack.
Block "subscribe-popup" not found