Tutorials
Creating a Custom Engraved Charcuterie Board with a Laser Cutter
Mar
Estimated reading time: 7 minutes
Key Takeaways
- Choose the Right Wood: Hardwoods like Maple, Walnut, and Cherry are ideal for durability and achieving crisp, high-definition laser engravings. The wood choice is the foundation of a quality board.
- Vector is Vital: For sharp, clean designs, always use vector-based software (like Adobe Illustrator or Inkscape) or download pre-made vector files (SVGs). Pixel-based images will result in blurry engravings.
- Always Test First: Never engrave your final piece without first running tests on a scrap piece of the same wood. This allows you to perfect the laser’s power and speed settings for optimal results.
- Finish for Food Safety: Applying a food-safe finish, such as mineral oil or a beeswax blend, is a non-negotiable final step. It protects the wood from moisture and bacteria and makes it safe for serving food.
Table of Contents
- Selecting the Ideal Wood
- Creating the Perfect Design
- The Laser Engraving Process
- Applying a Food-Safe Finish
- Conclusions
- Frequently Asked Questions
Discover how to transform a simple piece of wood into a stunning, engraved charcuterie board. This guide offers a complete walkthrough, from selecting the perfect wood to applying a beautiful, food-safe finish. Ideal for both hobbyists and professionals, this project is a fantastic way to create a personalized gift or a unique piece for your own home entertaining.
Interested in more Charcuterie Board? Check out our Charcuterie Board laser file designs: Click here!
Selecting the Ideal Wood for Your Charcuterie Board
The foundation of a spectacular engraved charcuterie board is, quite literally, the wood itself. The right choice will not only ensure your board lasts for years but will also dramatically impact the final look and feel of your laser-engraved design. For projects like this, where both aesthetics and functionality are paramount, hardwoods are the undisputed champions. Their dense cellular structure makes them durable enough to withstand knife marks and frequent use, while also providing a stable, consistent surface for the laser to etch. This density prevents the laser from creating fuzzy or bleeding lines, resulting in a crisp, high-definition engraving that softer woods simply cannot match. Opting for a quality hardwood is the first and most critical step in creating a premium, long-lasting piece.
Popular Hardwood Choices for Engraving
When selecting your material, several hardwoods stand out for their beauty and suitability for laser cutter projects. Each offers a unique canvas for your design:
- Maple: Often considered the gold standard, maple is a very hard, dense, and closed-grain wood. Its light, creamy color provides a high-contrast backdrop for laser engraving, making the dark burn of the design pop. Its tight grain ensures incredibly sharp and detailed results. As a food-safe wood that is resistant to bacteria, it is a highly practical and beautiful choice.
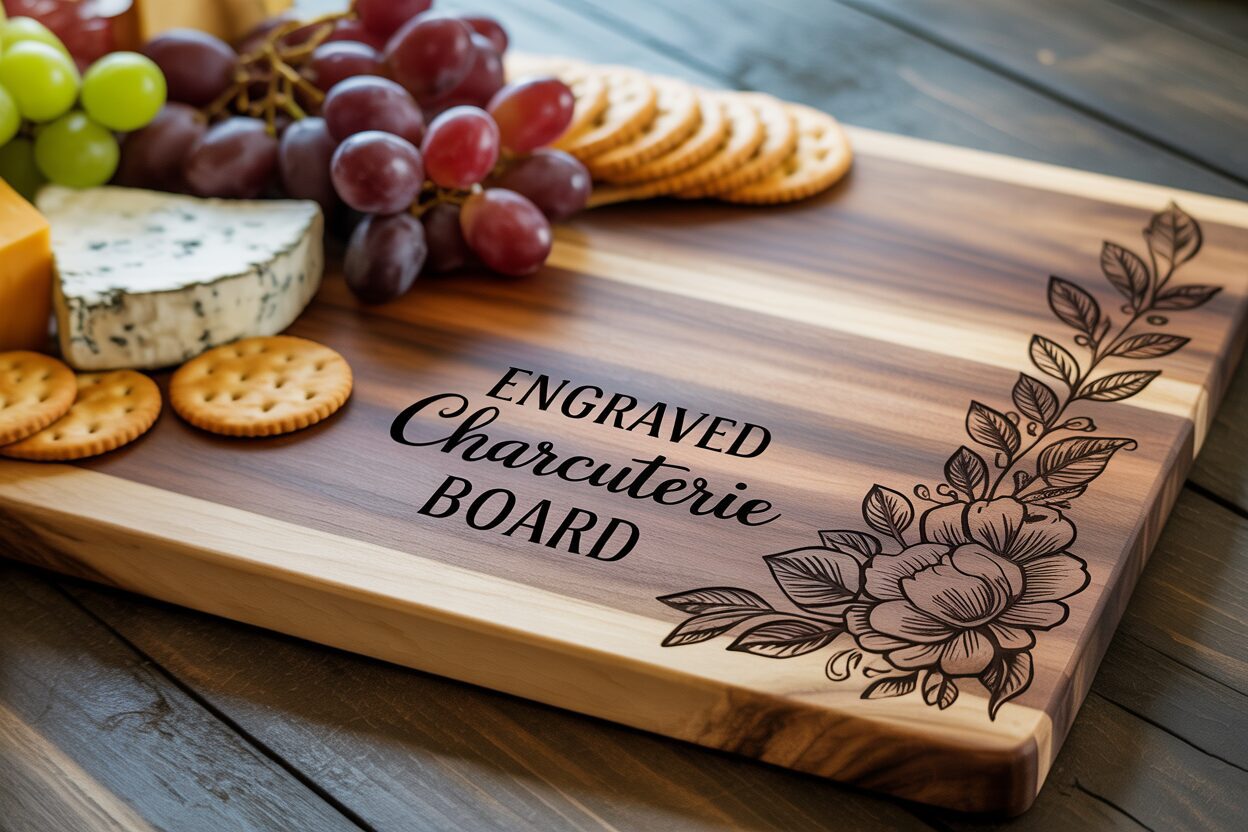
- Walnut: For a more dramatic and luxurious feel, walnut is an excellent option. Its rich, dark brown color and beautiful grain patterns create an elegant board. The laser engraving on walnut results in a subtle, tone-on-tone effect, where the engraved area becomes a slightly darker, deeper shade of brown. This creates a sophisticated, understated look rather than a high-contrast one.
- Cherry: Known for its smooth texture and warm, reddish-brown hue that deepens beautifully with age, cherry is another fantastic choice. It’s slightly softer than maple but still very durable. It engraves cleanly, producing a nice dark burn that contrasts well with its rich color. Its fine, straight grain provides a consistent surface for detailed laser work.
- Acacia: A popular and often more budget-friendly option, acacia is known for its durability and striking, often multi-toned grain patterns. While it is a very hard wood, the high variation in its grain density can sometimes lead to slight inconsistencies in the engraving’s depth and color. It’s a great choice for designs that are bold and less intricate, where these minor variations won’t detract from the overall look.
Choosing Your Starting Point: Pre-made Blanks vs. A Custom Build
Once you have a wood type in mind, you must decide whether to purchase a pre-made charcuterie board or craft one from scratch. For those new to laser cutting or woodworking, a pre-made blank is the most straightforward path. These boards are readily available online and in stores, already cut, sanded, and ready for engraving. This allows you to focus solely on the design and laser process. The main trade-off is a lack of control over the specific grain pattern and the exact dimensions of your piece. Conversely, crafting a board from raw lumber offers ultimate customization. It allows you to select the perfect piece of wood, orient the grain to complement your design, and create a unique shape and size. This route is ideal for woodworkers or ambitious creators with access to tools like a planer, jointer, and saws. It transforms the project from simply a laser-engraving task into a complete woodworking creation, resulting in a truly one-of-a-kind heirloom.
Creating the Perfect Design for Engraving
With the perfect piece of wood selected, the next step is to bring your vision to life through design. This is where you transform a simple board into a deeply personalized cutting board. The design process begins not in software, but with an idea. Consider the board’s purpose. Is it a wedding gift featuring the couple’s monogram and wedding date? A housewarming present with the family name and “Est. [Year]”? Or perhaps a decorative piece for your own kitchen, adorned with a favorite recipe or a beautiful floral pattern? Brainstorming these concepts first will guide all your subsequent design choices. Once you have a clear direction, you can move to your computer to create the digital file that the laser cutter will read. Vector design software like Adobe Illustrator, CorelDRAW, or the free alternative Inkscape is essential for this task. These programs allow you to create clean, scalable lines that result in crisp engravings, a feat not possible with pixel-based images (like JPEGs or PNGs).
From Blank Canvas to Digital Design
If you’re creating a design from scratch, start with the basics. For custom text or monograms, experiment with different fonts to find one that matches the style you’re aiming for—a flowing script font for an elegant wedding board, or a bold serif font for a classic family name board. Most software has powerful text and shaping tools that allow you to weld letters together for a seamless monogram or arrange text along a curve. For more intricate patterns, you can use the software’s drawing tools to create your own unique artwork. However, you don’t need to be a graphic designer to achieve stunning results. There is a vast and growing market for pre-made charcuterie board svg files online. Websites like Etsy are treasure troves of professionally designed files, from complex mandala patterns and kitchen-themed quotes to wreath frames perfect for encircling a family initial. Using a pre-made SVG (Scalable Vector Graphic) file can save you hours of design time and is a fantastic option for achieving a high-end look with minimal effort.
Strategic Placement and Sizing
The placement of your design is just as important as the design itself. A poorly placed engraving can make a beautiful board look awkward and unbalanced. Before you even think about engraving, take precise measurements of your board and create a digital template of its exact shape and size in your design software. This allows you to virtually place and resize your design to see how it looks. A common mistake is making the design too large and placing it directly in the center, which is often where food will be placed. For a functional custom charcuterie board, consider placing the design in a lower corner, along the top edge, or even on the handle. This ensures the engraving remains visible and celebrated, not hidden beneath a pile of cheese and crackers. A great pro-tip is to print your finalized design on paper at its actual size, cut it out, and place it on the physical board. This simple step gives you a real-world preview, allowing you to make final adjustments to size and position before committing to the permanent laser engraving.
The Laser Engraving Process Step by Step
Now that your design is finalized and your wood is chosen, it’s time for the most exciting part: bringing it all together at the laser cutter. This stage is where digital design meets physical creation, a process at the heart of so many fascinating laser cutter projects. The first step is to prepare the wood surface. Even a brand-new board should be wiped clean with a tack cloth or a slightly damp rag to remove any dust or debris that could interfere with the laser. For light-colored woods like maple, a crucial pro-tip is to apply a layer of low-tack transfer tape or paper masking over the entire engraving area. This mask acts as a protective barrier, preventing the smoke and resin produced during engraving from staining the surrounding wood. The laser will cut cleanly through the tape to engrave the wood, and once the job is complete, you simply peel the tape away, revealing a crisp design with no unsightly smoke halo. Also, ensure your board is as flat as possible; a warped board will result in an inconsistent engraving as parts of the surface move in and out of the laser’s focal point.
Dialing in Your Laser Settings: The Critical Test Run
Before you even think about engraving your final piece, you must perform a test run. This step is non-negotiable and is the single most important factor in achieving a professional-quality result. Every piece of wood is different—even two boards of the same species can have variations in density and moisture content that affect how they react to the laser. The goal is to find the perfect balance of power, speed, and frequency (or LPI – Lines Per Inch). Too much power or too little speed will result in a deep, charred engraving that looks burnt. Too little power or too much speed will create a faint, shallow mark that lacks impact. On a scrap piece of the exact same wood, create a small test file—a few small squares or a snippet of your design. Engrave these test shapes using a matrix of different settings. For example, start with the manufacturer’s recommended settings for that wood type and then create variations, slightly increasing or decreasing the power and speed for each test square. This process allows you to see exactly how the settings interact and choose the combination that produces the clean, rich, and deep engraving you desire without scorching the material.
From File to Fire: Executing the Engraving
With your settings perfected, it’s time to execute the final engraving. Securely place your charcuterie board inside the laser cutter. Use the machine’s red dot pointer and framing function to precisely align your digital design with the desired location on the board. Double-check your alignment to ensure it’s perfectly centered or positioned in the corner as planned. Next, you must set the laser’s focus. This is a critical step that ensures the laser beam is concentrated into its smallest, most powerful point right at the wood’s surface. An out-of-focus laser will produce a blurry, weak engraving. Once the board is placed and the laser is focused, send your final design file to the machine, input the optimal power and speed settings you determined during your test run, and close the lid. Start the machine’s ventilation system, and then begin the engraving. It is imperative to never leave a laser cutter running unattended. Stay and watch the magic happen as the laser meticulously etches your custom design, line by line, into the wood.
Applying a Food-Safe Wood Finish for Protection and Beauty
Once the laser has finished its work and the smoke has cleared, your engraved charcuterie board is visually complete, but it is not yet finished. The final, critical step is to apply a finish that both protects the wood and makes it safe for contact with food. This stage is non-negotiable. Raw, unfinished wood is porous and acts like a sponge, readily absorbing moisture, oils from cheeses and meats, and bacteria. This can lead to staining, warping, cracking, and an unsanitary serving surface. Applying a high-quality food safe wood finish is essential for creating a durable barrier that seals the wood pores, prevents absorption, and makes the board easy to clean. Beyond protection, the right finish dramatically enhances the wood’s appearance, deepening its color, accentuating the grain patterns, and making the contrast of your engraving stand out beautifully. It’s the step that transforms your project into a professional-grade, functional piece of art.
Comparing Common Food-Safe Finishes
When selecting a finish, it is crucial to choose one that is 100% non-toxic and safe for food contact. Never use standard woodworking finishes like polyurethane, lacquer, or varnish, as they are not meant for surfaces used for food preparation. The best choices are simple, natural, and specifically intended for culinary wood products:
- Mineral Oil: This is the most popular and straightforward choice. It’s an inert, colorless, and odorless oil that will not turn rancid like vegetable or olive oil. Food-grade mineral oil penetrates deeply into the wood fibers to hydrate and protect them from within. It is inexpensive and widely available in pharmacies or hardware stores. Its only downside is that it doesn’t provide a hard surface barrier, so it needs to be reapplied periodically to maintain protection.
- Beeswax: While mineral oil works from the inside out, beeswax works from the outside in. By itself, it can be difficult to apply, but when melted down with mineral oil, it creates a fantastic finish. The beeswax provides a water-resistant topcoat that seals the wood and gives it a soft, silky sheen, adding an extra layer of protection.
- Board Creams and Conditioners: These products offer the best of both worlds. They are typically a pre-made blend of mineral oil and beeswax (and sometimes other food-safe waxes like carnauba). This combination provides the deep conditioning of oil and the protective surface barrier of wax in a single, easy-to-use paste. This is often the preferred choice for achieving a premium, long-lasting finish on a personalized cutting board.
How to Apply Your Finish for a Perfect Result
The application process is simple but should be done with care. First, ensure your board is completely clean and free of any dust or debris from the engraving process. Use a small, stiff brush to gently clear any residue from within the engraved lines. Then, with a clean, lint-free cloth, apply a generous amount of your chosen oil or board cream. Be liberal with the first coat, covering the entire board—top, bottom, and all the edges. Use the cloth to work the finish into the engraved design. Let the board sit and absorb the finish for at least 30 minutes, or ideally, several hours. The end grain on the sides of the board will be especially thirsty. After it has had time to soak in, take a new clean cloth and buff off all the excess, wiping the surface until it no longer feels greasy. For a brand new board, it’s best to repeat this process two or three times to fully season the wood, ensuring your beautiful creation is protected and ready for its first culinary debut.
Conclusions
You now have the knowledge to create a professional-quality engraved charcuterie board. By carefully selecting your materials, perfecting your design, and applying a food safe wood finish, you can produce a beautiful and functional piece. This is one of many rewarding laser cutter projects that combines creativity with practicality, resulting in a perfect custom charcuterie board.
Frequently Asked Questions
Q: What is the best and most beginner-friendly wood for an engraved charcuterie board?
A: Maple is often considered the gold standard for beginners. Its light, creamy color provides excellent contrast for dark engravings, its tight grain ensures sharp details, and it’s a very durable, food-safe wood that is easy to work with.
Q: Can I use a regular photo file like a JPEG or PNG for engraving?
A: It is strongly recommended to use vector files (like SVG, AI, or DXF) instead. Vector files are made of lines and curves, which allow the laser to create sharp, clean edges. A pixel-based file like a JPEG will result in a less crisp, lower-quality engraving.
Q: Will my board smell burnt forever after engraving?
A: No, the smoky or burnt smell is temporary. It will dissipate significantly within a day or two. Cleaning the board and applying the food-safe finish will also help seal the wood and neutralize any remaining odor.
Q: How often do I need to reapply the food-safe finish?
A: This depends on how often you use and wash the board. A good rule of thumb is to reapply a coat of mineral oil or board cream whenever the wood starts to look dull or dry, typically once every month or two for a board in regular use.
Block "subscribe-popup" not found