Projects
Creating 3D Illusion Laser Engravings on Wood
Jun
Estimated Reading Time
9 minutes
Key Takeaways
- Grayscale-to-Depth Principle: 3D illusion laser engraving uses grayscale images as depth maps, where darker shades engrave deeper and lighter shades remain closer to the surface.
- Crucial Laser Settings: Mastering laser power, speed, and focus (sometimes a slight defocus) in raster engraving (grayscale/3D mode) is fundamental for creating smooth, dimensional effects.
- Design and Material Selection: Success hinges on crafting high-contrast grayscale depth maps from suitable images and selecting consistent, light-colored hardwoods like Maple, Alder, or Cherry.
- Multi-Pass Engraving: Employing a multi-pass approach (clearing pass for bulk removal, detailing pass for fine resolution) significantly enhances both depth and detail in complex engravings.
- Hybrid Engraving for Realism: Combining 3D carving for shape with a separate, light dithered pass for surface texture adds unparalleled hyper-realism to your finished pieces.
Table of Contents
Delve into the fascinating world of 3D illusion laser engraving. This article explores the techniques and nuances of creating stunning three-dimensional effects on wood. We’ll cover everything from the basic principles to advanced methods, helping you transform simple wood pieces into intricate works of art and successful wood engraving projects.
Principles of 3D Illusion Engraving
Chapter 2: Principles of 3D Illusion Engraving
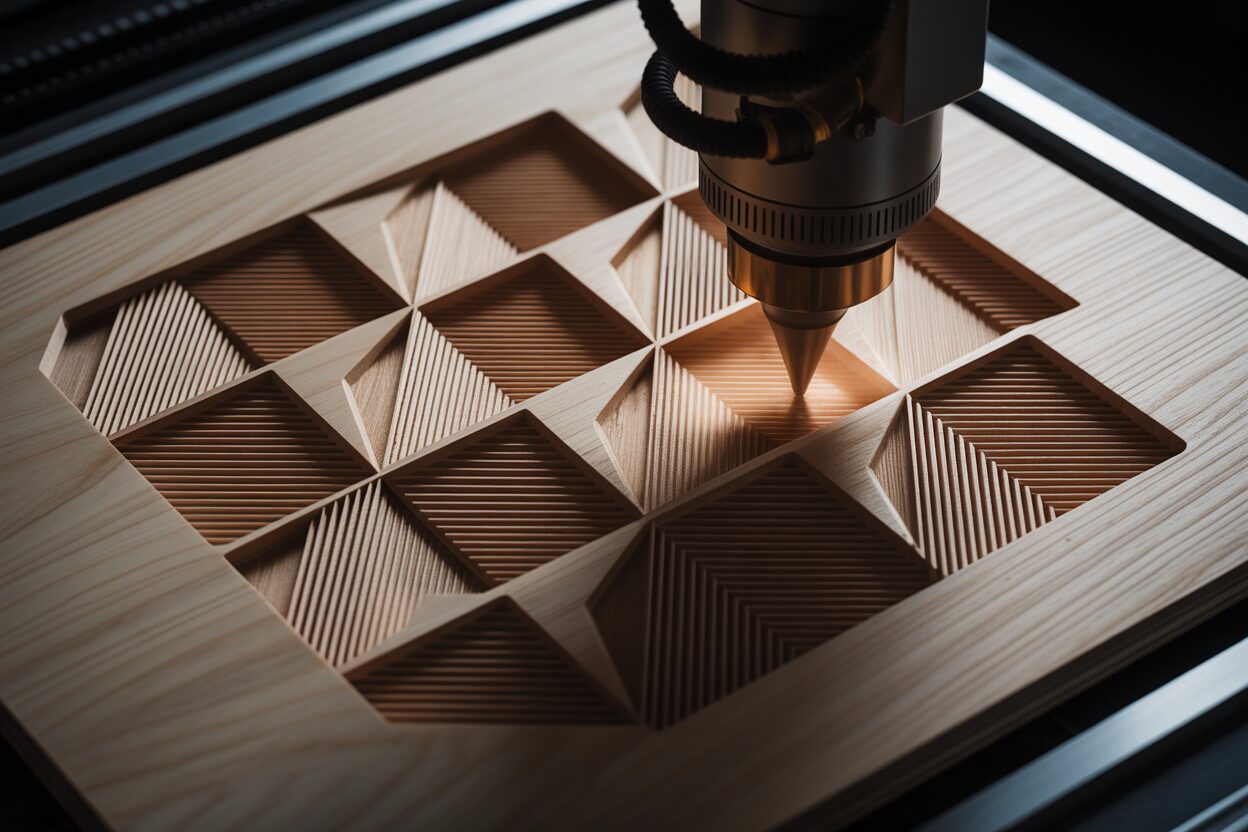
At its core, 3D illusion laser engraving is a sophisticated technique that tricks the eye and the hand into perceiving a three-dimensional object on a two-dimensional wooden surface. Unlike standard engraving, which typically involves etching lines (vector engraving) or creating a flat, photo-like image (raster engraving), this method goes a step further. It doesn’t just draw an image on the wood; it sculpts the wood itself, using varying depths of burn to create shadows, highlights, and physical contours that mimic a real 3D object. The result is a piece that has not only visual depth but also a tactile, topographical quality. While a standard raster engraving of a lion’s face will look like a flat photograph, a 3D illusion engraving will make the snout appear to protrude from the wood and the eyes seem recessed. This is the fundamental difference: we are moving from representation to simulation.
The magic behind the 3D illusion laser engraving process lies in the intelligent translation of a grayscale image into laser power. The entire technique is built upon a simple but powerful principle: the darker the color in your image file, the deeper the laser will engrave. Think of your grayscale design as a depth map.
- Pure black (Hex #000000) instructs the laser to operate at its highest power setting for that job, vaporizing the most material and creating the deepest point in the engraving. This is used for areas that should appear furthest away or most recessed.
- Pure white (Hex #FFFFFF) tells the laser to fire with zero or minimal power, leaving the wood’s surface untouched. This represents the highest point of your illusion, the part of the object closest to the viewer.
- Shades of gray fill the entire spectrum in between. A 50% gray will command the laser to fire at half of the designated maximum power, creating a depth halfway between the deepest black and the untouched white surface.
This direct correlation between shade and depth is what creates the physical ‘3D effect on wood’. As the laser head moves back and forth in a raster pattern, it doesn’t just turn on and off; it continuously modulates its power based on the gray value of each pixel it passes over. This results in the smooth slopes, rounded edges, and subtle gradients that are the hallmark of a successful 3D illusion.
Harnessing Laser Settings for Dimensionality
To master this effect, you must understand the foundational laser engraving techniques and how to manipulate your machine’s core settings. The primary mode you will use is raster engraving, but specifically with the “Grayscale” or “3D” mode enabled in your software. This is crucial, as it bypasses standard dithering patterns. Dithering, which uses dots of varying density to simulate gray, is excellent for 2D photos but will destroy a 3D illusion by breaking up the smooth tonal transitions. You need true grayscale-to-power modulation. The key variables you will control are:
- Power: You will set a maximum power percentage in your software. This percentage is what the laser will use when it encounters a pure black pixel. All gray values will be scaled proportionally below this maximum.
- Speed: Slower speeds allow the laser beam more time to burn away material at any given point, resulting in a deeper overall engraving and a more pronounced effect. Finding the right balance between speed and power for a specific wood type is essential.
- Focus: While a sharp focus is standard for cutting and vector work, a slight defocus can sometimes be beneficial for 3D illusion laser engraving. A softer focus point can smooth out the transitions between different depths, reducing sharp lines and enhancing the sculpted, organic feel of the final piece.
Mastering these principles is the first step. Before you can achieve a stunning result, you must first understand how your digital grayscale image will physically translate into a carved, dimensional work of art on wood.
Design and Material Preparation
Chapter 3: Design and Material Preparation
With an understanding of the principles, the success of your project now hinges on two critical elements: the digital design and the physical material. A flawless 3D illusion laser engraving is born from a perfect marriage between a well-prepared depth map and a carefully selected piece of wood. The process begins with choosing appropriate engraving designs for wood. Not all images are suitable candidates. Ideal source images possess inherent depth and smooth tonal transitions. Portraits, intricate textures like dragon scales or stone carvings, and 3D model renders work exceptionally well. Conversely, flat logos, cartoons, or line art lack the necessary grayscale information to create a convincing illusion. You must learn to see images not for their subject matter, but for their potential as a topographic map.
Crafting the Perfect Grayscale Depth Map
The conversion of your chosen image into a usable depth map is arguably the most artistic part of the technical process. This is where you, the creator, actively manipulate the file to define the final sculpted form, directly influencing the process of creating depth in wood. Using image editing software like Adobe Photoshop or the free alternative GIMP is essential.
- Convert to Grayscale: Your first step is to desaturate the image, removing all color information. This can be done via the “Desaturate” or “Grayscale” command.
- Analyze and Invert: Look at your grayscale image and think logically about the depth. Remember: black will be the deepest C, and white will be the highest point. In many photos, bright highlights are on the surfaces closest to the camera (like the tip of a nose), and dark shadows are in the recesses (like eye sockets). In this case, the default conversion works perfectly. However, if your source is a 3D model render where depth is already encoded as a Z-depth pass (where black is near and white is far), you may need to “Invert” the image so it conforms to the laser’s logic.
- Adjust Levels and Curves: This is the most critical step. Use the “Levels” or “Curves” adjustment tools to fine-tune your depth map. By adjusting the input sliders, you can intensify the blacks and brighten the whites. This increases the overall contrast of the map, which will translate to a more dramatic and pronounced 3D effect in the final engraving. A low-contrast image will result in a shallow, uninspired carving. For even finer control, use the “Dodge” tool to manually lighten areas you want higher and the “Burn” tool to darken areas you want deeper.
- Apply a Subtle Blur: Before saving, apply a very slight Gaussian Blur (1-3 pixels, depending on image resolution). This step smooths out any harsh, pixelated transitions in your grayscale map, preventing a “terraced” or “stair-step” look on the wood and ensuring the final result has soft, beautifully sculpted gradients.
The best wood for a 3D illusion laser engraving is one that offers consistency and contrast. Light-colored hardwoods are superior choices because they char predictably and the difference between a deep, dark burn and the untouched surface is stark. Maple, Alder, and Cherry are industry favorites. They have a fine, tight grain and uniform density, which allows the laser to carve away material evenly. Avoid woods like pine, which has unpredictable soft and hard growth rings that will engrave to different depths even with the same power setting. Also, hardwoods with a very open or coarse grain, like Red Oak, can result in a fuzzy, less detailed engraving. Plywood is the worst choice, as engraving deeply will expose unsightly glue layers and inconsistent core materials, completely ruining the illusion. For a clean, high-contrast result, always start with a smooth, well-sanded piece of solid hardwood. Masking the wood surface with high-quality transfer tape before engraving can also dramatically improve the final look by preventing smoke and resin from staining the lighter, un-engraved areas.
Advanced Techniques for Hyper-Realistic Results
Chapter 4: Advanced Techniques for Hyper-Realistic Results
Once you have mastered the fundamental relationship between grayscale depth maps and laser output, you can begin to explore advanced laser engraving techniques that elevate your work from a compelling illusion to a hyper-realistic sculpture. These methods, often used in combination, are the key to unlocking the full potential of your laser and are essential for tackling complex, advanced wood engraving projects. The goal is no longer just to create depth, but to refine that depth with incredible detail and texture, resulting in a piece that begs to be touched and examined up close. This is where true artistry in 3D illusion laser engraving begins, moving beyond the default settings and into a more deliberate, multi-layered approach.
The Multi-Pass Method for Depth and Detail
One of the most powerful techniques is multi-pass engraving. A single, slow, high-power pass can sometimes lead to excessive charring and loss of fine detail. The multi-pass method separates the process into two distinct stages: a deep “hogging” or “clearing” pass and a faster “detailing” or “smoothing” pass.
- Pass 1: The Clearing Pass. The purpose of this first run is to do the heavy lifting. You will use your grayscale depth map but set the resolution (LPI or DPI) relatively low, perhaps around 150-250 LPI. This pass carves out the main topographical shapes of your design, efficiently removing the bulk of the material. The result will look rough and may have visible “stair-stepping” between the different depths, but it establishes the core three-dimensional form without overheating any single area.
- Pass 2: The Detailing Pass. Without moving the wood, you will run the exact same grayscale file again. This time, however, you will increase the resolution significantly (300-600+ LPI) and potentially adjust the power slightly. This high-resolution pass essentially “sands” the rough surface left by the first pass. It smooths the gradients, sharpens the edges, and burns in the finest details of your image that were lost in the lower-resolution clearing pass. This two-stage process yields a final product with both impressive depth and crisp, clean surface detail.
Varying the focal point is another advanced method, often combined with multi-pass engraving. For the initial clearing pass, you might set your laser’s focus point to be slightly above the wood’s surface (a slight defocus). This creates a wider laser spot, which is excellent for clearing material smoothly and blending the carved areas. For the second detailing pass, you would re-set the focus to be perfectly sharp on the wood’s surface. This ensures the smaller, high-resolution details are etched with maximum precision.
Hybrid Engraving: Using Dithering for Surface Texture
Paradoxically, after spending so much time avoiding dithering, its strategic re-introduction can be the final touch for photorealism. This is a hybrid technique performed after your 3D carving is complete. The 3D engraving pass creates the physical shape, but a final, separate pass can add the surface “skin” or texture. For instance, after completing a multi-pass 3D engraving of a crocodile, you would have the shape of its head and snout. You could then run a second job using a standard dithered (e.g., Jarvis) raster engraving of the original photo. This pass should be run at a very high speed and low power, just enough to “stain” the wood’s surface without carving deeper. This dithered pass will add the intricate pattern of the crocodile’s scales onto the already-carved 3D form. This combination of deep carving for shape and a light dither pass for texture is the secret behind many of the most stunning and realistic 3D illusion laser engraving pieces, creating an unparalleled level of detail.
Conclusions
You’ve now learned the key techniques for creating impressive 3D illusion laser engravings. By manipulating laser settings and understanding how to create depth, you can elevate your engraving designs for wood. Experiment with these methods to develop your unique style and produce breathtaking pieces that stand out. The possibilities for creating depth in wood are endless.
FAQ
Q: What is 3D illusion laser engraving?
Interested in more 3D Illusion? Check out our 3D Illusion laser file designs: Click here!
A: 3D illusion laser engraving is a technique that sculpts a two-dimensional wooden surface to create the perception of a three-dimensional object. It achieves this by using varying depths of laser burn to mimic shadows, highlights, and physical contours, giving the piece visual and tactile depth.
Q: How does grayscale imagery translate into depth?
A: The technique relies on translating grayscale values into laser power. Pure black areas in the image instruct the laser to engrave at its highest power, creating the deepest points, while pure white areas result in zero or minimal power, leaving the wood untouched as the highest points. Shades of gray correspond to varying depths in between.
Q: What laser settings are crucial for 3D illusion engraving?
A: The most crucial settings are Power (maximum for black pixels), Speed (slower for deeper engraves), and Focus (a slight defocus can smooth transitions). It’s essential to use raster engraving with “Grayscale” or “3D” mode enabled to ensure true grayscale-to-power modulation, avoiding dithering.
Q: What kind of images are best for 3D illusion engraving?
A: Ideal images possess inherent depth and smooth tonal transitions, functioning as a “topographic map.” Good examples include portraits, intricate textures (like scales), and 3D model renders. Flat logos, cartoons, or simple line art are generally unsuitable as they lack the necessary grayscale information for a convincing illusion.
Q: What is the best wood for 3D illusion laser engraving?
A: Light-colored hardwoods like Maple, Alder, and Cherry are preferred due to their consistent density, fine grain, and predictable charring. These woods offer high contrast between engraved and untouched areas. Avoid inconsistent woods like pine or plywood, which can lead to uneven results or exposed glue layers.
Q: What are advanced techniques for achieving hyper-realistic results?
A: Advanced techniques include the multi-pass method (a rough clearing pass followed by a finer detailing pass, often with varied focus) to achieve both depth and detail. Hybrid engraving, which combines 3D carving for shape with a light, dithered raster pass for surface texture, can add unparalleled realism.
Block "subscribe-popup" not found