Projects
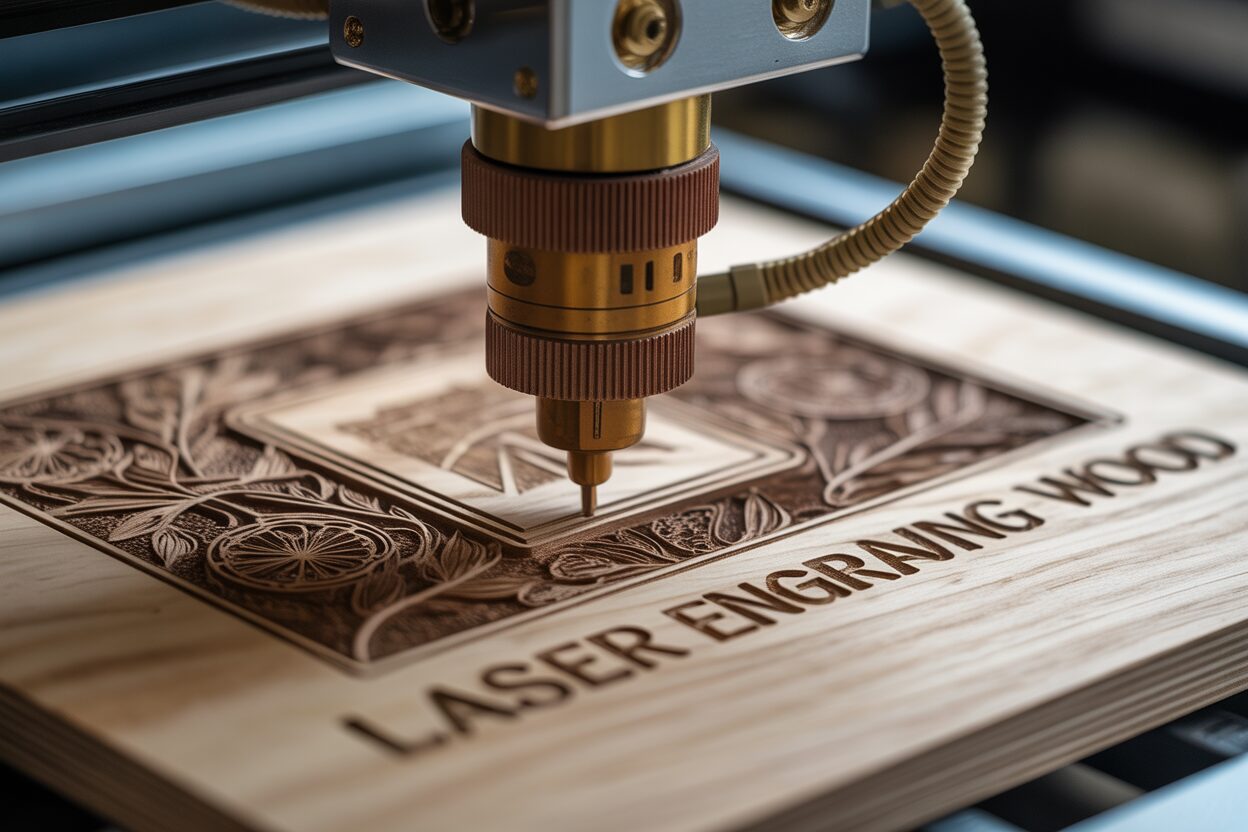
Achieving Precision in Laser Engraving Wood
Jul
Laser engraving on wood offers a fantastic way to personalize and create intricate designs. This guide delves into optimizing your laser engraving projects on wood, from understanding crucial settings to selecting the right materials and ensuring safety. Learn how to elevate your craftsmanship and achieve stunning, detailed results every time.
Estimated Reading Time
12-13 minutes
Key Takeaways
- Mastering laser engraving on wood involves optimizing power, speed, and focus. Due to wood’s natural variability, systematic testing (like the test grid method) is crucial for finding optimal settings.
- Selecting the right wood type significantly impacts engraving quality. Fine-grained, low-resin hardwoods (e.g., maple, cherry, walnut) and Baltic Birch plywood are highly recommended for achieving fine details, good contrast, and minimizing charring.
- For detailed image engraving, meticulous image preparation (high-resolution, optimal contrast, grayscale conversion) and understanding dithering methods (like Floyd-Steinberg) are essential to accurately simulate shades and achieve realistic results.
- Strict adherence to safety protocols is paramount. This includes ensuring robust external ventilation or using a certified fume extractor, wearing certified laser safety glasses, implementing diligent fire prevention measures (never leaving unattended, having an extinguisher ready, using air assist), and performing regular machine maintenance.
Table of Contents
- Understanding Laser Engraver Settings for Wood
- Selecting the Right Types of Wood for Laser Engraving
- Techniques for Laser Engraving Detailed Images on Wood
- Essential Safety Tips for Laser Engraving Wood
- Conclusions
Understanding Laser Engraver Settings for Wood
Achieving precise and consistent results when laser engraving wood hinges critically on manipulating the core laser engraver settings for wood. Unlike other materials, wood’s natural variability in density, grain, and moisture content means there’s no single “perfect” setting. Instead, mastering the interplay of power, speed, and focus allows you to control the depth, darkness, and overall quality of your engraving.
The Three Pillars: Power, Speed, and Focus
- Power (P): This setting controls the intensity of the laser beam, typically expressed as a percentage of the machine’s maximum wattage. Higher power settings deliver more energy to the wood, resulting in deeper engravings and darker burns. Too much power can lead to excessive charring, scorching, or even flame-ups, especially on softer woods or thin materials. Too little power might result in faint or inconsistent engraving. Influence on Quality: Directly affects the depth and darkness of the engraving.
- Speed (S): This setting dictates how fast the laser head moves across the material, usually measured in millimeters per second (mm/s) or inches per second (ips). Slower speeds mean the laser beam dwells longer on a given point, transferring more energy and causing a deeper or darker mark. Faster speeds reduce the laser’s dwell time, leading to shallower or lighter engravings. Influence on Quality: Affects the depth and darkness, as well as the resolution and detail; very high speeds can sometimes cause “skipping” or loss of detail.
- Focus (F): This is arguably the most fundamental setting for achieving sharp, crisp results. Focus refers to the point where the laser beam is at its absolute smallest and most intense (the focal point). For engraving, the focal point should generally be precisely on the surface of the wood. An unfocused beam will scatter, resulting in blurry, wider, and less intense engravings. Influence on Quality: Directly impacts the sharpness, detail, and overall precision of the engraving. An out-of-focus beam wastes power and produces inferior results.
Interplay of Settings and Desired Effects
The art of laser engraving wood lies in understanding the symbiotic relationship between power and speed.
- Darker/Deeper Engraving: To achieve a darker or deeper mark, you need more energy to be absorbed by the wood. This can be accomplished by increasing power, decreasing speed, or a combination of both. Be cautious of increasing power too much, as it might lead to excessive charring or burning. Decreasing speed often offers finer control over darkness without oversaturating the wood with heat. For particularly deep cuts, multiple passes with moderate settings are often preferred over a single pass with very high power to manage heat and charring.
- Lighter/More Subtle Engraving: To achieve a lighter, more subtle etch, you would decrease power and/or increase speed. This reduces the energy absorbed, creating a gentle surface mark. This is often desirable for photographic engravings where subtle tonal variations are key, or for delicate details.
- Cutting Wood: For cutting, you generally need high power and low speed. The goal is to vaporize the wood clean through in a single or multiple passes. Air assist is paramount for cutting wood to prevent flare-ups, charring, and to blow away debris, resulting in cleaner edges.
Finding Optimal Settings for Different Wood Densities and Effects
Due to wood’s natural variations, establishing optimal settings requires systematic testing.
Understanding Wood Types:
- Softwoods (e.g., Pine, Cedar): These are less dense and generally require lower power and higher speeds to prevent excessive charring and blowouts. They absorb laser energy quickly.
- Hardwoods (e.g., Maple, Cherry, Walnut): Denser woods require higher power and/or slower speeds to achieve sufficient depth and darkness. They are typically more resistant to charring, offering cleaner engravings with good contrast, especially walnut.
- Plywood/Engineered Wood: These often consist of multiple layers and adhesives. The glue layers can react differently to the laser, sometimes causing uneven engraving or more charring during cutting. Settings for plywood often require more power than solid wood of similar thickness to cut through the adhesive evenly. Different glues also produce different fume characteristics.
The Test Grid Method: This is the most effective way to find optimal settings.
- Prepare a Test File: Create a simple grid in your laser software with small squares or rectangles. Each square will be engraved using a different combination of power and speed.
- Vary Settings Systematically: For a specific wood type and desired effect (engraving or cutting), pick a starting power and speed. For instance, keep power constant and vary speed across rows, or keep speed constant and vary power across columns. For engraving, aim for increments of 5-10% for power and 50-100 mm/s for speed. For cutting, smaller increments for power (e.g., 2% at a time) and very slow speeds are typical.
- Engrave and Evaluate: Run the test. Carefully examine each square. Look for:
- Desired Darkness/Depth: Does it match your expectation?
- Charring: Is there excessive blackening around the edges or within the engraved area?
- Contrast: How well does the engraved area stand out from the unengraved wood?
- Detail Retention: Are fine lines and small details clear and crisp?
- Cutting through (if applicable): Did it cut cleanly without leaving a significant kerf (cut width) or needing multiple passes for thin material?
- Record Settings: Once you find a setting you like, record it clearly for that specific wood type and machine. Over time, you’ll build a valuable library of optimized settings.
Remember that consistent focus is paramount for all these tests. Utilize air assist consistently, especially when testing for cutting, to minimize charring and control flames. Humidity and temperature can also subtly affect wood, so minor adjustments may be necessary from time to time. Practice and meticulous record-keeping will lead to consistently excellent results in laser engraving wood.
Selecting the Right Types of Wood for Laser Engraving
The choice of wood profoundly impacts the outcome of your laser engraving projects. Not all types of wood for laser engraving are created equal, and understanding their inherent characteristics – such as grain pattern, hardness, and resin content – is essential for predicting how they will react to the laser and achieving your desired aesthetic. Selecting the appropriate wood can significantly enhance detail, control charring, and produce stunning results.
Wood Characteristics and Their Impact on Engraving
- Grain Pattern: The visible lines and textures in wood, formed by annual growth rings, directly influence the look of your engraving. Woods with a tight, fine, and consistent grain (e.g., maple, cherry) generally offer better resolution for intricate designs and small text. A pronounced, open grain (e.g., oak, ash) can cause inconsistencies in engraving, as the laser reacts differently to the harder and softer parts of the grain. Sometimes, this can be used intentionally for a rustic effect, but for precision, finer grain is preferred.
- Hardness/Density: This is a critical factor. Softer, less dense woods (e.g., pine, cedar, poplar) tend to engrave quickly and deeply with less power, but they are also more prone to excessive charring and smoke buildup. They can also splinter or blow out if too much power is applied. Harder, denser woods (e.g., maple, walnut, cherry) require more laser power and/or slower speeds to achieve comparable depth, but they typically produce cleaner, crisper engravings with less charring and excellent contrast. The resistance to charring in hardwoods makes them ideal for intricate details.
- Resin/Sap Content: Woods high in resin or sap (e.g., pine, fir, redwood) are generally more challenging to engrave. The resin can vaporize unevenly, leading to inconsistent engraving, excessive smoke, and sticky residue buildup on the laser optics. This residue can quickly foul lenses, reducing laser efficiency and potentially causing damage. Lower resin content woods are much cleaner to work with.
- Color and Contrast: The natural color of the wood influences the visual contrast of the engraving. Lighter woods (e.g., maple, birch) tend to show a very good contrast with the typically darker, burnt-in laser mark. Darker woods (e.g., walnut) can still show good contrast, often yielding a slightly lighter, golden brown engraving, but intricate details might be less discernible than on a light wood.
Best Wood Choices for Fine Details and Avoiding Charring
For critical applications demanding fine detail, minimal charring, and consistent results, certain woods stand out:
Ideal Hardwoods for Engraving:
- Maple: Arguably one of the best woods for laser engraving. It has a fine, consistent grain and uniform density, allowing for incredibly precise and detailed engravings. Its light color provides excellent contrast with the dark laser mark, making text and intricate graphics pop. It resist charring well, especially with proper air assist.
- Cherry: Another excellent choice with a fine, even grain. Cherry offers beautiful contrast and takes on a rich, slightly reddish hue when engraved, which darkens gracefully over time. Similar to maple, it provides crisp detail with minimal charring.
- Walnut: While darker than maple or cherry, walnut engraves beautifully, producing a warm, rich tone that often appears lighter than the surrounding wood, creating a unique contrast. Its fine grain ensures good detail, and it’s less prone to significant charring due to its density.
- Birch (especially Baltic Birch Plywood): For plywoods, Baltic Birch is a top recommendation. It’s known for its consistent, uniform layers with minimal voids and a fine grain. The light color provides good contrast, and it engraves and cuts cleanly with relatively little charring compared to other plywoods, making it suitable for intricate designs and cutting projects.
Considerations for Softer Woods and Plywoods:
- Pine/Poplar: While inexpensive and readily available, these often lead to more charring and less crisp details due to their softness and variable density. They are acceptable for rustic or less demanding projects but require careful power and speed management to avoid excessive burning. Air assist is paramount with these woods.
- MDF (Medium-Density Fiberboard): This engineered wood product has no grain, offering a very uniform surface for engraving. It produces a very consistent, dark mark. However, cutting MDF generates a lot of fine dust and noxious fumes due to the binders used, requiring superior ventilation. Engraving can create a strong, unpleasant odor. While good for consistent etching, it’s not a “wood” in the traditional sense and requires specific considerations for safety and air quality.
In summary, for achieving the highest precision, sharpest details, and controlling charring, prioritize fine-grained, low-resin hardwoods like maple, cherry, and walnut. For plywood applications, Baltic Birch is generally the superior choice. Always consider the material’s inherent properties when fine-tuning your laser settings and optimizing your engraving process. Experimentation with smaller pieces of your chosen wood type will always yield the best insights for optimal results.
Techniques for Laser Engraving Detailed Images on Wood
Moving beyond simple line art, the ability to engrave detailed images, particularly photographs, onto wood elevates laser engraving to an art form. Mastering laser engraving detailed images on wood involves a combination of meticulous image preparation, understanding resolution, and intelligent use of dithering methods. The goal is to translate the shades of an image into varying densities of laser marks, achieving realistic contrast and intricate designs on the inherently challenging canvas of wood.
Image Preparation for Optimal Engraving
The quality of your output is largely determined by the quality of your input image. Think of laser engraving as a specialized form of printing, where poor source material will always yield poor results.
- High-Resolution Source Images: Always start with the highest resolution image you can get. Avoid very low-resolution images, as they will appear pixelated when engraved. For best results, aim for images with a resolution of at least 300 DPI (dots per inch) at the size you intend to engrave.
- Optimal Contrast and Clarity: Laser engravers typically excel at rendering black and white or grayscale images. Enhance the contrast of your image:
- Adjust Levels/Curves: In photo editing software (e.g., Photoshop, GIMP, even LightBurn), push the white points lighter and the black points darker to maximize the tonal range. Avoid clipping too much detail in pure blacks or pure whites.
- Sharpening: Apply a subtle amount of sharpening to bring out details, but avoid over-sharpening, which can introduce artifacts.
- Remove Backgrounds: For portraits or specific objects, consider removing or simplifying busy backgrounds to make the subject stand out. A clean, uniform background often produces a more striking engraving.
- Convert to Grayscale: While some software can process color images, converting to grayscale (if not already) before processing gives you more control over the tonal conversion.
- Material-Specific Testing: Different woods react differently. A high-contrast image on maple will look unique compared to the same image on walnut. Test small sections of your image on scrap pieces of the exact same wood you plan to use for the final piece. This helps dial in the optimal image adjustments before committing to the full engrave.
Resolution and Dithering Methods
Since a laser typically either burns (ON) or doesn’t burn (OFF) at any given point, rendering shades of gray requires a technique to simulate varying tones. This is where resolution and dithering come into play.
- Lines Per Inch (LPI): This setting, found in your laser software, determines how many lines the laser will engrave per inch. A higher LPI value means the laser lines are closer together, offering finer detail and a smoother appearance. For detailed photo engraving, LPI values typically range from 200 to 300 LPI, sometimes even higher. Be aware that higher LPI also means longer engraving times.
- Dithering Methods: Dithering is a technique that distributes dots of varying size or density to simulate continuous tones. Instead of directly mapping grayscale values to laser power, which can lead to banding, dithering uses patterns of black and white dots to create the illusion of shades. Your laser software will offer various dithering options:
- Floyd-Steinberg: A popular error-diffusion algorithm that often produces very natural-looking results by spreading quantization errors to neighboring pixels, creating a smooth tonal transition. Good for general photographic engraving.
- Jarvis, Stucki, Atkinson: Other error-diffusion methods, each with slightly different visual characteristics. Experiment to see which works best for your image and wood.
- Grayscale (or Power Mapping): Instead of individual dots, this method directly translates shades of gray in your image to different laser power levels (e.g., pure black is 100% power, pure white is 0% power, gray is 50% power). This generally produces cleaner results but works best on materials that react linearly to power changes and have minimal charring, like anodized aluminum or some plastics. On wood, it can be tricky due to charring and the wood’s non-linear reaction to heat, often leading to less contrast and muddy results rather than distinct shades. However, with very precise settings and hardwood, it can yield beautiful, subtle gradiations.
- Dot Patterns (e.g., Stucki, Burkes, S-Curve): Useful for certain effects or when direct grayscale mapping is problematic. They create varying dot densities.
- Speed and Power (for Image Engraving): For detailed image engraving, you usually want a relatively high speed and moderate power. High speed helps prevent excessive burning and charring, while moderate power allows for subtle variations in dot density (for dithering) or light burning (for grayscale mapping). Too much power will burn out fine details into a solid black blob.
Creating Custom Wood Laser Engraving Designs
When creating custom wood laser engraving designs, consider how the elements will translate to the wood medium.
- Vector vs. Raster:
- Vector graphics (lines, shapes, text created in software like Illustrator, Inkscape) are infinitely scalable and produce sharp, crisp outlines or fills. Ideal for logos, text, and precise line art.
- Raster images (photographs, scanned images) are composed of pixels and are best for detailed imagery with continuous tones. When creating a design with both, you’ll engrave the raster components and then potentially outline or cut vector components.
- Simplicity and Contrast: For strong visual impact, especially on wood with prominent grain:
- Keep designs relatively simple, avoiding overly busy elements.
- Utilize good contrast within your design elements. Strong black and white elements often stand out more than subtle shades of gray, depending on the wood.
- Text and Fonts: Choose fonts that are legible when engraved. Very thin or overly intricate fonts might lose detail or become illegible. San-serif fonts often engrave cleanly. Consider filling text rather than just outlining for a bolder look.
- Negative Space: Sometimes it’s more effective to engrave the background around your design, leaving the desired image as untouched wood. This creates a powerful contrast and can be very effective visually.
- Test, Test, Test: The golden rule applies more than ever here. Small test engravings of critical design elements (e.g., faces in a portrait, intricate logos) on scrap material are essential to fine-tune settings and confirm visual appeal before committing to the final product.
By meticulously preparing your images, understanding the nuances of resolution and dithering, and carefully crafting your custom designs with the wood medium in mind, you can unlock the full potential of laser engraving to create truly stunning and detailed results.
Essential Safety Tips for Laser Engraving Wood
While laser engraving offers incredible creative possibilities, it involves powerful concentrated energy and the creation of fumes and particulate. Adhering to stringent safety tips for laser engraving wood is not just a recommendation; it is an absolute necessity to protect yourself, your workspace, and your equipment. Neglecting proper safety protocols can lead to serious injury, fire, and damage to your machine.
Ventilation Requirements: Clearing the Air
The process of laser engraving wood vaporizes material, generating smoke, fumes, and microscopic particles. These byproducts range from irritating to highly toxic and cancerous. Proper ventilation is paramount.
- Direct External Exhaust: The ideal solution is a powerful exhaust fan system that directly vents all fumes outdoors, away from any windows or air intakes. Ensure the ducting is short, straight, and airtight to maximize efficiency. Flexible foil ducting, while common, is prone to kinks and tears; rigid metal ducting is superior for long-term safety and performance.
- Fume Extractors/Air Filters: If external venting is not possible, a dedicated fume extractor system with multi-stage filtration (pre-filter, HEPA filter, activated carbon filter) is required. While these systems filter harmful particles and absorb odors, they require regular filter replacement, which can be costly. Never rely on a simple room air purifier; these are insufficient for laser fumes.
- Good Airflow in Workspace: Regardless of your primary ventilation, ensure your overall workspace has good air circulation. Avoid engraving in small, unventilated rooms. Keeping a window slightly ajar on the opposite side of the exhaust can aid in cross-ventilation.
- Know Your Materials: Different woods and especially engineered woods (like MDF or plywood with certain glues) produce varying levels and types of fumes. Some plastics (like PVC) can release extremely toxic chlorine gas when exposed to a laser and should NEVER be engraved. Always know the material composition before beginning.
Eye Protection: Safeguarding Your Sight
The laser beam, even when reflected, can cause permanent eye damage. The infrared wavelengths used by CO2 and fiber lasers are invisible, making them even more hazardous. Diode lasers, often blue or green, are visible but equally dangerous.
- Certified Laser Safety Glasses: You must wear laser safety glasses specifically rated for the wavelength and power of your laser. These are not merely tinted glasses or sunglasses. Ensure they meet international safety standards (e.g., CE, ANSI Z136.1) and have an appropriate Optical Density (OD) rating for your machine. This information should be provided by your laser manufacturer.
- Enclosed Systems and Interlocks: Many professional-grade and some hobbyist machines come with enclosed chambers and safety interlocks that automatically shut off the laser if the lid is opened. While these provide a significant layer of protection, wearing safety glasses is still recommended as a redundant safety measure.
- Never Look Directly at the Beam: Even with glasses on, never intentionally look at the laser striking the material. The bright flash can still cause discomfort or temporary vision impairment.
Fire Prevention: Mitigating the Risk
Wood is a combustible material, and combining it with a concentrated heat source like a laser beam presents a significant fire risk.
- Never Leave Unattended: This is the golden rule. A laser engraver should never be left operating unattended. Fires can ignite quickly and spread rapidly.
- Keep a Fire Extinguisher Handy: Have a Class ABC dry chemical fire extinguisher readily accessible and know how to use it. A spray bottle with water can help with minor flare-ups, but it’s not a substitute for a proper extinguisher for a significant fire.
- Air Assist is Crucial: For cutting and often for engraving, air assist not only improves cut quality but also helps prevent fires by blowing away debris and cooling the immediate area around the laser point, reducing the chance of igniting embers or flames.
- Cleanliness is Key: Regularly clean the honeycomb bed, focal lens, and machine interior to remove combustible dust, char, and small scraps of wood. These can easily ignite.
- Secure Material: Ensure your material is flat and securely held down. Warped wood can cause the laser to go out of focus, potentially creating hotspots. If the material warps during engraving, it can lift into the beam path, increasing fire risk.
- Power and Speed Settings: Use appropriate power and speed settings for your material. Too much power or too slow a speed can lead to excessive heat buildup and charring, increasing fire risk. Always test on scrap material first.
Proper Machine Maintenance
Regular maintenance ensures your machine operates safely and efficiently, and prolongs its lifespan.
- Lens and Mirror Cleaning: The optics (lenses and mirrors in CO2, focus lenses in diode/fiber) must be kept spotless. Contaminants can absorb laser energy, leading to overheating, reduced power, and potential cracking. Use only specified lens cleaning solutions and lint-free wipes.
- Lubricate Moving Parts: Regularly lubricate linear rails and lead screws as per your manufacturer’s recommendations to ensure smooth operation and prevent wear. This also helps maintain engraving precision.
- Check Water Cooling (CO2): For CO2 lasers, regularly check the water level in your chiller (if applicable) and ensure water temperature is within the manufacturer’s specified range. Use distilled water and consider algaecide to prevent buildup.
- Electrical Inspections: Periodically check all electrical connections and cables for frays or damage. Ensure the machine is properly grounded.
By diligently following these safety tips and maintaining your equipment, you can enjoy the rewarding process of laser engraving wood with peace of mind. Prioritize safety above all else.
Conclusions
Mastering laser engraving on wood is an ongoing journey of learning and refinement. By focusing on appropriate settings, material selection, and safety, you can consistently produce high-quality, customized creations. Continue experimenting with various wood types and designs to unlock the full potential of your laser engraving capabilities.
FAQ
Q: What are the three core settings for optimizing laser engraving on wood?
A: The three core settings are Power, Speed, and Focus. Manipulating their interplay is crucial for controlling engraving depth, darkness, and overall quality due to wood’s natural variability.
Q: Which types of wood are best for achieving fine details and avoiding charring in laser engraving?
A: Fine-grained, low-resin hardwoods like Maple, Cherry, and Walnut are ideal for crisp details and good contrast with minimal charring. For plywoods, Baltic Birch is highly recommended for its consistent layers and clean results.
Q: Why is meticulous image preparation important for engraving detailed images like photographs on wood?
A: High-resolution source images with optimal contrast and clarity are essential. Enhancing contrast, sharpening subtly, and converting to grayscale before processing helps prevent pixelation and ensures details translate effectively onto the wood, yielding more realistic and striking results.
Q: What are the most critical safety measures to take when laser engraving wood?
A: Key safety measures include ensuring proper ventilation (direct external exhaust or certified fume extractor), wearing certified laser safety glasses specifically rated for your laser, strict fire prevention (never leaving the machine unattended, having a fire extinguisher, using air assist), and regular machine maintenance (cleaning optics, lubricating parts, checking electrical connections).
Block "subscribe-popup" not found