Tutorials
A Step-by-Step Guide to Making Custom Slate Coasters
Oct
Estimated reading time: 9 minutes
Key Takeaways
- Material Matters: Slate is an ideal material for laser engraving because the laser ablates (bleaches) the surface minerals, creating a permanent, high-contrast white mark rather than a burn. Choosing slate coasters with a uniform, flat surface is critical for consistent results.
- Preparation is Crucial: Proper design preparation is key. Use vector files (like SVG) for crisp text and logos, and for photos, convert them to grayscale, significantly boost the contrast, and apply a dithering algorithm (e.g., Jarvis) in your software.
- Test Your Settings: There are no universal laser settings for slate. Always perform a material test grid on a spare piece to find the optimal balance of low power and moderate speed for your specific machine (diode or CO2) to achieve the brightest white mark without melting the stone.
- Finishing is Transformative: The final step of cleaning the engraved slate and applying food-safe mineral oil is essential. This dramatically deepens the slate’s dark color, making the light-colored engraving “pop” with brilliant contrast and giving the coaster a professional, finished look.
Table of Contents
- Choosing the Right Slate and Tools
- Design Preparation and Software Setup
- Dialing in the Perfect Laser Engraving Settings
- The Engraving and Finishing Process
- Conclusions
- Frequently Asked Questions
Discover the art of laser engraving on slate, a material that yields beautiful, high-contrast results with remarkable ease. This tutorial will walk you through the entire process of creating your own custom slate coaster, perfect for personalized gifts or adding a unique touch to your home decor. Let’s get started on this exciting and rewarding project.
Interested in more Slate Coaster? Check out our Slate Coaster laser file designs: Click here!
Choosing the Right Slate and Tools
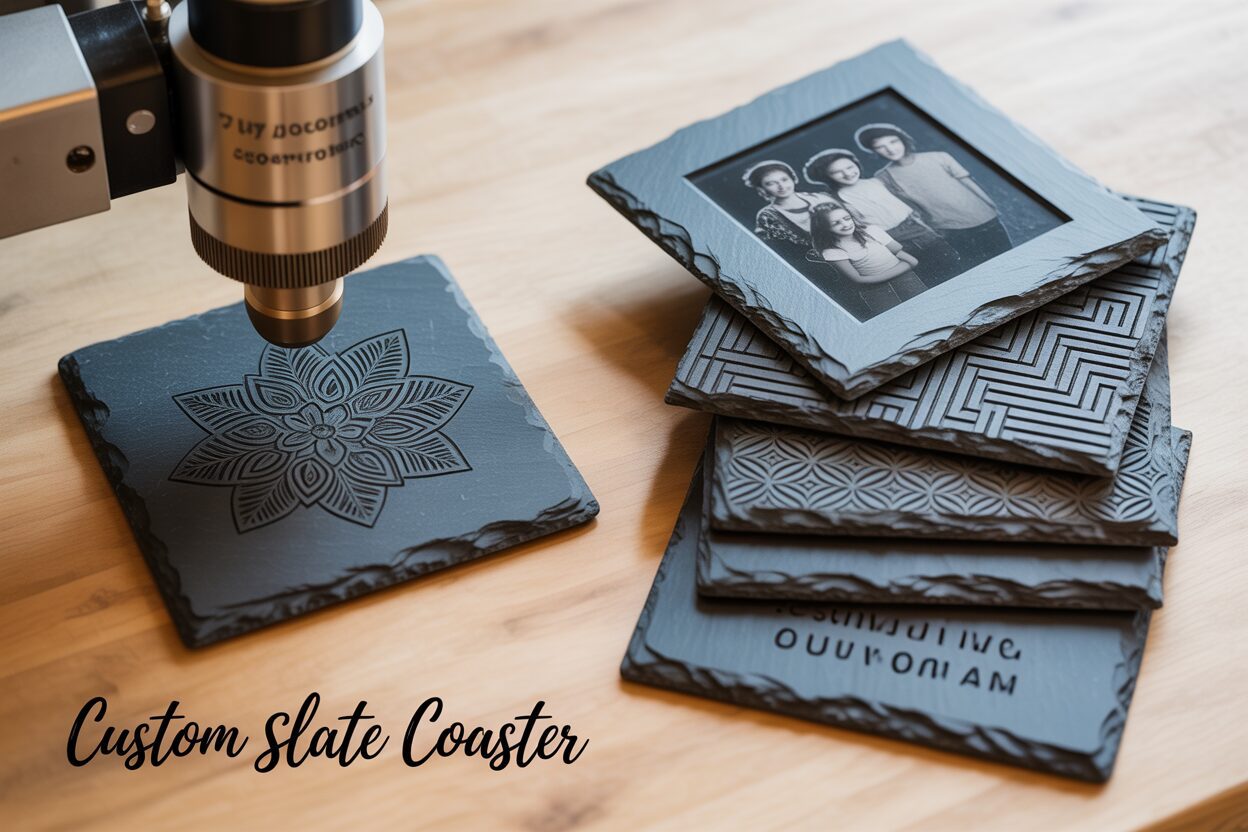
The foundation of a stunning custom coaster lies in the quality of your materials and the precision of your tools. Making the right choices at this stage sets you up for success, ensuring a smooth process from digital design to finished product. Natural slate is a uniquely suitable medium for laser engraving due to its mineral composition. Slate is a fine-grained metamorphic rock formed from layers of clay or volcanic ash. When a laser beam hits its surface, the intense heat doesn’t simply burn it; instead, it causes a chemical and physical change in the minerals. This process, known as ablation or bleaching, vaporizes a microscopic top layer, exposing the lighter-colored material underneath. The result is a permanent, crisp, and beautifully contrasted mark that appears almost white or light gray against the dark, natural slate. Unlike paint or ink, this engraved design won’t peel, fade, or wash away, making it incredibly durable for everyday use.
Selecting Your Blank Slate Coasters
When sourcing your blank coasters, not all slate is created equal. The first and most critical characteristic to look for is surface uniformity. A relatively flat and smooth surface is essential for a consistent engraving. Slate with significant peaks, valleys, or a heavily riven texture can cause issues with the laser’s focal point. If the surface height varies across the design area, parts of your engraving may appear blurry or less intense than others. While a perfectly smooth surface is rare with natural stone, aim for coasters that are as level as possible. Secondly, consider the thickness. A good coaster should feel substantial and durable, typically between 4mm and 7mm thick. Thinner slates are more prone to chipping and breaking. Equally important is consistent thickness across a set. If you are producing multiple coasters, having them all be the same thickness means you won’t have to constantly refocus your laser for each piece, saving you considerable time and guaranteeing a uniform look for the entire batch. Finally, check the coaster edges—some have a rustic, hand-chipped look, while others are saw-cut for a clean, modern finish. This is purely a stylistic choice, but one that should align with your desired aesthetic.
Gathering Your Essential Tools
With your slate selected, the next step is to assemble your toolkit. The centerpiece of this operation is, of course, the laser engraver. The good news is that slate is a very forgiving material, and excellent results can be achieved with both major types of desktop lasers. A CO2 laser is often faster and more powerful, making it a great choice for higher volume work. However, a diode laser engraving slate machine is more than capable of producing incredibly detailed, high-contrast results and is often a more affordable and accessible option for hobbyists and small businesses. The key is not the type of laser but dialing in the correct settings for your specific machine. Beyond the engraver itself, several other items are essential for achieving a professional finish:
- Design Software: This is where your creative vision takes shape. Programs like LightBurn are extremely popular as they combine design features with direct control over most laser engravers. Alternatively, you can create your designs in vector-based software like Adobe Illustrator or the free alternative Inkscape and import them into your laser’s control software.
- Digital Calipers: Precision is key in laser engraving. Calipers are a non-negotiable tool for accurately measuring the exact thickness of your slate coaster. This measurement is critical for setting the perfect focal height of your laser, which directly impacts the sharpness and clarity of the final engraving.
- Rubbing Alcohol: Before engraving, it’s vital to clean the slate surface. A wipe with a lint-free cloth and some isopropyl alcohol will remove any dust, fingerprints, or natural oils that could interfere with the laser.
- Food-Safe Mineral Oil: This is the secret ingredient for a stunning final product. After the engraving is complete and the dust has been cleaned off, applying a thin coat of food-safe mineral oil dramatically enhances the final look. It deepens the natural dark gray or black of the slate, which makes the light-colored engraved areas pop with brilliant contrast. It also helps to seal the porous stone surface.
Design Preparation and Software Setup
Once you have your slate and tools ready, the next crucial step is preparing your digital design. The quality of your artwork directly translates to the quality of the final engraving. There are two primary types of digital files used for laser engraving, each suited for different kinds of designs: vector graphics and raster images. Vector graphics are made of mathematical paths, lines, and curves. This makes them infinitely scalable without any loss of quality. They are perfect for logos, text, and line art, as the laser follows these paths precisely, resulting in exceptionally crisp and clean edges. The most common and versatile format for this is the slate engraving svg (Scalable Vector Graphic) file. You can create your own SVG files in software like Adobe Illustrator or Inkscape, or find pre-made designs on various online marketplaces. When creating text, it’s vital to convert it to paths or curves before exporting to ensure the laser software interprets it as a shape to be filled, rather than a font it may not recognize.
Preparing Photographic Images for Engraving
Engraving photographs onto slate presents a different challenge and requires careful preparation to achieve a good result. A photograph is a raster image, made up of a grid of pixels. Unlike the simple on/off nature of a vector line, a photo contains thousands of shades and colors. Since a laser essentially has two states on slate—engraving (light mark) or not engraving (dark slate)—we must process the image to simulate these shades. This process can make or break a photo engraved slate project.
- Convert to Grayscale: The first step is to remove all color information from your image, converting it to grayscale (black and white). The laser doesn’t interpret color, only shades of gray, which it translates into power levels or dot density.
- Adjust Brightness and Contrast: Slate has a very low dynamic range. To get a clear image, you need to exaggerate the light and dark areas. Increase the contrast significantly to make the whites brighter and the blacks darker. You may also need to slightly increase the brightness to bring out details in shadowy areas. Don’t be afraid to push these levels further than you would for a screen or print image; a high-contrast image engraves best on slate.
- Apply Dithering: This is the most critical step. Dithering is a process that uses patterns of tiny dots to simulate shades of gray. Your laser software will have several dithering algorithms to choose from. For photographs on slate, methods like Jarvis or Stucki are often excellent choices. They do a great job of preserving detail and creating smooth-looking gradients without harsh banding. It’s worth experimenting with different dithering methods on a test piece, as some work better for portraits while others excel with landscapes.
Finalizing in the Laser Software
With your vector or raster file prepared, the final step is to import it into your laser control software, such as LightBurn. Begin by creating a template for your coaster on the digital canvas—for example, a 100mm by 100mm square if you are using 4×4 inch coasters. Import your prepared design and position it within this template. You can resize it, rotate it, and add any additional elements like text. Before sending the job to the engraver, use the software’s “Frame” or “Preview” function. This feature will move the laser head to trace the outer boundary of your design on the slate without firing the laser. This is an indispensable step to verify that your design is centered, correctly sized, and positioned exactly where you want it on the coaster, preventing costly mistakes and wasted material.
Dialing in the Perfect Laser Engraving Settings
With your design finalized and loaded, you are now at the most critical technical stage: determining the correct parameters for your laser. There is no universal answer for the perfect slate laser engraving settings, as they depend on the specific power of your laser, the type of slate you are using, and even ambient conditions. The mineral composition can vary slightly from one batch of slate to another, meaning settings that worked perfectly last month might need a small tweak today. For this reason, the golden rule is to always run a test. Use a spare coaster or the back of one of your pieces to conduct a small test burn before committing to your final design. This small step is the single most important thing you can do to prevent wasting materials and ensure a flawless result.
Understanding the Core Engraving Parameters
To intelligently test, you must understand how each setting affects the outcome. The three primary parameters you will control are power, speed, and resolution. They work in tandem to create the final mark, and adjusting one often requires an adjustment to another.
- Power: This setting, usually expressed as a percentage, dictates the energy output of your laser beam. For slate, the goal is not to burn deep but to ablate or “bleach” the top surface. This requires surprisingly low power. If you use too much power, you will overheat the minerals in the slate, causing them to melt and form a glassy, dark gray texture instead of the desired light, almost white, mark. Excessive power can also cause the material around the engraving to flake or chip. You are looking for the sweet spot that provides the brightest white mark with the least amount of energy.
- Speed: This determines how fast the laser head moves across the material. Speed and power have an inverse relationship; a slower speed allows the laser beam to dwell on one spot for longer, delivering more energy, effectively acting like a higher power setting. For slate, a moderate speed is typically best. If the speed is too high, the laser may not have enough time to properly mark the surface, resulting in a faint or incomplete engraving. If it’s too slow, you run into the same overheating issues as using too much power.
- Resolution (DPI/LPI): Resolution, measured in Dots Per Inch (DPI) or Lines Per Inch (LPI), controls the spacing between engraved lines. A higher DPI means the lines are closer together, creating more overlap. For detailed photographic engravings, a higher resolution (e.g., 300 DPI or more) is essential to accurately reproduce shading and fine details. For simple vector logos or text, a slightly lower resolution (around 250-285 DPI) is often sufficient and will complete the job faster.
Finding Your Starting Point and the Material Test Grid
While you must test, you need a place to start. For a 10W diode laser, a good initial test range is often around 2000-3000 mm/min at 60-80% power. For a more powerful 40W CO2 laser, the settings will be very different; try starting at 300 mm/s at 15-25% power. These are merely starting points. The most efficient way to find your machine’s optimal settings is by creating a material test grid, a feature built into most laser software like LightBurn. This function automatically creates a grid of small squares on your test piece, with each square engraved at a different combination of speed and power. Once the grid is complete, you can examine the results and instantly see which combination produced the brightest, cleanest mark without any melting or flaking. Choose those settings, set your resolution, and you are ready to engrave your masterpiece with confidence.
The Engraving and Finishing Process
With your design ready and your laser settings calibrated, you are prepared for the final and most exciting part of the process: bringing your creation to life. Executing these last few steps with care and precision will transform your prepared slate tile into a finished, professional-quality piece. Before you press the start button, a couple of final checks are essential. First, ensure the surface of your coaster is perfectly clean. Give it one last wipe with a lint-free cloth and rubbing alcohol to remove any dust or oils that may have settled on it. Second, and most critically, is setting the laser’s focus. A sharp, crisp engraving is entirely dependent on a perfect focal distance. Use your digital calipers to get a final, precise measurement of your coaster’s thickness and adjust your laser head’s Z-axis accordingly. Once the slate is clean and the laser is focused, position the coaster securely on the machine’s bed and run the “Frame” command one last time to confirm the design is perfectly aligned.
From Digital to Physical: The Engraving and Cleanup
Now, it’s time to engrave. Press start and watch as the laser begins to trace your design onto the stone. While it’s tempting to walk away, it’s always good practice to monitor the machine during the first few minutes of operation to ensure everything is running as expected. You’ll see the laser beam creating the light-colored mark and a small amount of fine dust being generated. Once the engraving is complete, the coaster will likely look dusty and a bit underwhelming—this is completely normal. The magic happens in the cleanup and finishing. Carefully remove the coaster from the laser bed. Your first step is to remove the loose debris. Use a soft-bristled brush (an old toothbrush works wonderfully) to gently brush away all the engraving dust from the surface. Be thorough and get into all the small crevices of your design. After the dry brushing, take a clean, soft cloth lightly dampened with either water or more rubbing alcohol and wipe down the entire surface. This will pick up any remaining fine residue, leaving you with a clean but still muted-looking engraved slate coaster.
The Final Touch: Enhancing and Sealing
This last step is what elevates your project from a simple engraved stone to a stunning finished product. The application of a finishing agent dramatically boosts the contrast and protects the slate. The most popular choice for this is food-safe mineral oil. Apply a small amount of oil to a clean cloth and rub a thin, even coat over the entire surface of the coaster, including the engraved areas and the edges. You will immediately see a remarkable transformation. The oil penetrates the porous stone, deepening its natural dark gray color to a rich, almost-black luster. This darkening of the background makes the light gray engraved design “pop” with incredible contrast and clarity. Let the oil soak in for a few minutes, then use a separate clean, dry cloth to buff off any excess. As an alternative to oil, you can use a clear matte or satin sealant spray, which provides a more permanent protective layer. Applying this finishing coat is the essential final action that gives your custom slate coaster a truly professional and polished appearance.
Conclusions
You now have the knowledge to create stunning engraved slate coasters. By preparing your designs, dialing in the correct settings, and applying a proper finish, you can produce professional-quality results every time. Don’t be afraid to experiment with different designs and techniques to develop your unique style. Happy engraving and enjoy your beautiful, handcrafted coasters!
Frequently Asked Questions
Q: What type of laser is best for engraving slate?
A: Both diode and CO2 lasers produce excellent results on slate. Diode lasers are a very capable and affordable option for hobbyists and small businesses, while CO2 lasers are typically faster and more powerful, making them better suited for high-volume production.
Q: Why does my slate engraving look dark gray and melted instead of bright white?
A: This is a classic sign of using too much power or too slow of a speed. Instead of ablating the surface minerals, the laser is overheating and melting them into a glassy texture. Reduce your power percentage or increase the speed of the laser head to achieve a cleaner, whiter mark.
Q: How do I prepare a photograph for engraving on slate?
A: To engrave a photo, you must first convert the image to grayscale. Then, significantly increase the contrast to make the light areas very bright and dark areas very dark. Finally, use a dithering algorithm in your laser software (like Jarvis or Stucki) to translate the shades of gray into a dot pattern the laser can engrave.
Q: Is it necessary to seal an engraved slate coaster?
A: While the engraving itself is permanent, applying a finish is a crucial final step. Using food-safe mineral oil or a clear sealant doesn’t just protect the slate; it dramatically enhances the final look by deepening the slate’s color to a rich black, which makes the light-colored engraving stand out with maximum contrast.
Block "subscribe-popup" not found