Projects
A Step-by-Step Guide to Crafting Engraved Slate Coasters
Aug
Estimated reading time: 6 minutes
Key Takeaways
- Material is Paramount: For sharp, high-contrast results, choose treated slate coasters over natural slate. Always use high-quality vector files (SVG, AI, EPS) instead of pixel-based images like JPGs to ensure clean lines.
- Preparation Prevents Poor Results: Thoroughly clean each coaster with isopropyl alcohol. For a significantly brighter engraving, apply a very thin, even layer of dish soap to the surface and let it dry completely before engraving.
- Test, Don’t Guess: Never engrave your final product without first running a material test grid on a scrap piece. This is the only way to find the perfect power and speed settings for your specific laser and slate batch.
- Finish for a Professional Look: After engraving, wash the coaster with water and a soft brush to remove residue. Enhance the final product by applying food-safe mineral oil, which dramatically deepens the color of the slate and makes the white engraving pop.
Table of Contents
- Selecting the Perfect Slate and Designs
- Preparing Your Coasters and Laser Cutter
- Mastering the Engraving for a Flawless Finish
- Conclusions
- Frequently Asked Questions
Engraved slate coasters offer a unique blend of rustic charm and personal expression, making them perfect for gifts or home decor. This article provides a comprehensive walkthrough of the entire process, empowering you to create stunning, professional-quality coasters with your laser engraver. Let’s get started on your next creative project.
Selecting the Perfect Slate and Designs
The foundation of a stunning engraved coaster lies not in the laser itself, but in the quality of your materials and the precision of your design. A flawless engraving on poor-quality slate will look mediocre, just as a magnificent piece of slate can be wasted on a poorly optimized design file. This chapter is dedicated to making these two foundational choices correctly, setting you up for a result that looks professional and personalized.
Choosing Your Slate Canvas
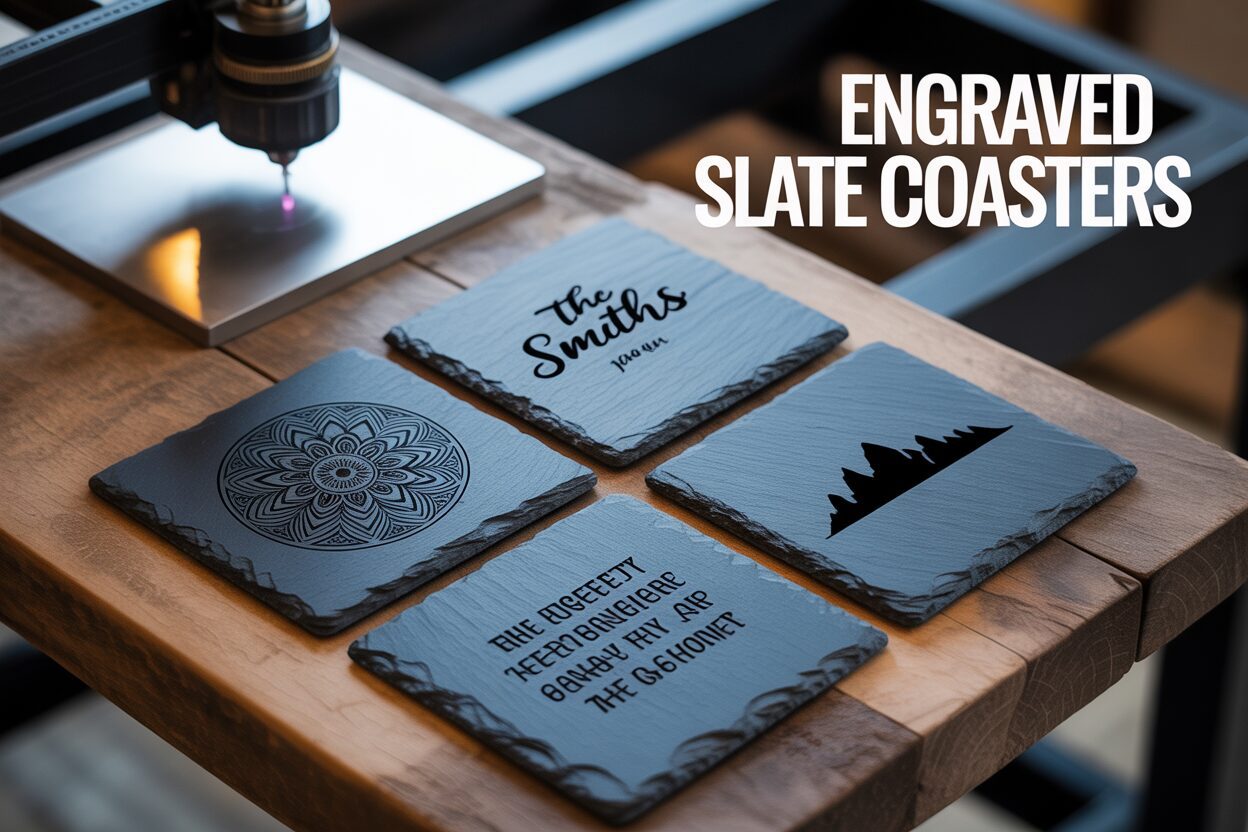
When you begin shopping for slate coasters, you will encounter two main types: natural and treated. While they may look similar at first glance, their reaction to a laser beam is vastly different. Natural slate is raw stone, cut to shape, with a porous and often slightly uneven surface. It has a rustic charm, but this texture can be a challenge for engraving. The laser’s focus can vary across the uneven surface, leading to inconsistent line depth and clarity. Furthermore, natural slate often contains mineral deposits like pyrite (fool’s gold), which do not engrave and can appear as unappealing blank spots in your final design. For these reasons, natural slate is better suited for simpler, bolder designs where perfect uniformity isn’t the primary goal. Treated slate, on the other hand, is the ideal choice for detailed laser work. These coasters are typically coated with a very thin, food-safe sealant or oil. This coating serves a crucial purpose: when the laser hits it, the heat vaporizes the dark coating to reveal the lighter gray slate underneath. This process creates a brilliant, high-contrast mark that is sharp and clean. The coating also provides a more uniform and flat surface, ensuring the laser remains perfectly in focus across the entire design, which is essential for intricate patterns and fine text. When selecting your slate, also pay close attention to its physical properties. Aim for a thickness of at least 4mm to 6mm for a durable, hefty feel. Lay the coaster on a flat surface to check for wobbles, and run your finger across it to feel for any significant dips or bumps that could disrupt the engraving process.
Finding the Perfect Design Blueprint
With your ideal slate selected, the next step is to find a design that will translate beautifully into an engraving. The single most important factor here is the file type. For clean, sharp results, you must use a vector file. Unlike pixel-based raster images (like JPG or PNG) that become blurry and jagged when resized, vector files (such as SVG, AI, DXF, or EPS) are built from mathematical paths. This means they can be scaled to any size without losing a shred of quality, providing the laser with a perfectly crisp line to follow. To find the right files, use targeted search terms. Instead of just searching for “cool coaster designs,” use phrases like ‘slate coaster vector cnc laser’ file, ‘mandala SVG for laser engraving,’ or ‘geometric vector pattern.’ This specificity will lead you to files optimized for laser cutters. Great sources for these files include:
Interested in more Slate Coaster? Check out our Slate Coaster laser file designs: Click here!
- Online Marketplaces: Websites like Etsy and Creative Fabrica are treasure troves of designs created by professionals specifically for laser engraving. Investing a few dollars in a well-made file can save you hours of troubleshooting.
- Design Software: For the ultimate custom slate coaster, consider creating your own design. Free software like Inkscape or professional programs like Adobe Illustrator allow you to create unique text, logos, and patterns from scratch.
- Free Vector Sites: Some websites offer free vector files, but proceed with caution. Always inspect the file closely to ensure the lines are clean, closed paths and that there are no hidden complexities that might confuse your laser software.
A great design is more than just a pretty picture; it’s a well-constructed blueprint. Before you engrave, check that the design has no lines that are too thin or intricate, as these can get lost or appear muddy on slate. Your design is the soul of your project, and pairing a high-quality vector file with a perfectly treated slate surface is the key to transforming a simple stone into a piece of personalized art.
Preparing Your Coasters and Laser Cutter
With your premium slate and vector design file in hand, the next critical phase is the physical preparation of both your material and your machine. This stage is where meticulousness pays dividends, transforming a good potential outcome into a great one. Skipping these steps is a common mistake that often leads to faded engravings, inconsistent results, and wasted materials.
Prepping the Slate for a Flawless Mark
Before a coaster ever touches the laser bed, it needs to be properly prepared. Slate coasters, even those that look clean, are often covered in a fine layer of slate dust from the cutting process, as well as oils from handling. These contaminants are the enemy of a crisp engraving. Dust can cause the laser to lose focus or create microscopic pits, while oils can cause the laser to react unevenly, resulting in splotchy or discolored marks. The cleaning process is simple but essential. Take a clean, lint-free microfiber cloth and dampen it with isopropyl alcohol. Thoroughly wipe down the surface of the coaster you intend to engrave. The alcohol will cut through any oils and evaporate quickly without leaving a residue. Once the coaster is clean and dry, you can move on to a trick used by seasoned professionals to achieve a dramatically brighter, higher-contrast engraving: applying a masking agent. The most accessible and surprisingly effective agent is standard dish soap. Apply a few drops to the coaster and, using a paper towel or your finger, spread it into a very thin, even layer across the entire surface. Allow it to dry completely until it’s no longer tacky. This thin film serves a specific purpose; when the laser vaporizes the material, the heat interacts with the soap, which helps to bleach the underlying slate, resulting in a brilliant white mark rather than a standard light gray. For commercial-grade results, you could also use a specialized laser-marking spray, but for most projects, the dish soap method yields fantastic results.
Configuring Your Laser for Precision
Properly setting up your laser is just as important as preparing the slate. First, you must ensure the coaster is completely immobile on the machine bed. Even the slightest movement from the laser head’s motion or the machine’s vibrations can cause ghosting or misaligned lines, ruining your project. The best method is to use a jig—a piece of wood or acrylic with a cutout perfectly sized for your coaster. This not only holds the coaster securely but also allows you to place subsequent coasters in the exact same position for perfect repeatability in a set. If you don’t have a jig, use hold-down pins or ensure the coaster is placed firmly in the corner of your machine’s workspace. Next, and most critically, is focusing the laser. An out-of-focus laser beam is wider and less powerful, leading to a blurry, weak engraving. Use your machine’s focusing tool—whether it’s an auto-focus probe or a manual acrylic block—to set the correct distance between the laser lens and the surface of the slate. Finally, you need to determine your power and speed settings. These will vary depending on your laser’s wattage. For slate, the goal is not to cut deep but to cleanly ablate the surface. A good starting point for many diode and CO2 lasers is relatively low power (e.g., 15-30%) and moderate speed (e.g., 2000-3000 mm/min). However, the golden rule is to always run a material test on a spare coaster or a piece of scrap slate first. Most laser software includes a material test grid function that engraves a matrix of squares at different power and speed combinations. This allows you to visually identify the exact settings that produce the brightest, sharpest results for your specific machine and slate, guaranteeing your laser engraved coasters come out perfectly every time.
Mastering the Engraving for a Flawless Finish
This is the moment of truth, where your careful preparation materializes into a tangible piece of art. The actual engraving process is relatively quick, but the settings you use will make all the difference between a mediocre result and a stunning, professional-quality personalized slate coaster. Don’t rush this final stage; precision here is paramount.
The Crucial Test Run
Before you commit your best coaster to the laser, you must perform a test run. As mentioned previously, using a scrap piece of slate or the back of a spare coaster is ideal. Use your laser software’s material test grid function to engrave a series of small squares at varying power and speed settings. This test is not just about finding what works; it’s about understanding the relationship between your machine’s settings and the material. When you examine the test grid, look for the square that exhibits the brightest white color with the sharpest, most defined edges.
- Too much power or too little speed: You will notice the engraved area looks chunky or has a slightly melted appearance. The edges may be chipped or fuzzy because the intense energy has fractured the slate instead of cleanly ablating the surface.
- Too little power or too much speed: The engraving will be faint, ghostly, and light gray. It will lack the dramatic contrast that makes an engraved slate coaster so appealing.
The ideal setting is the sweet spot that provides just enough energy to vaporize the dark surface layer, revealing the bright white stone beneath without causing any collateral damage to the surrounding material. Once you identify the best-looking square on your test grid, note its power and speed settings. These are your golden numbers for this batch of slate.
Engraving and Final Touches
With your settings dialed in, place your primary coaster securely in the jig, double-check your focus, frame the job to ensure the design is perfectly centered, and start the engraving. Once the laser has finished its work, let the coaster cool down for a minute or two before handling. It will be covered in fine dust and, if you used the dish soap method, a hazy residue. The big reveal happens now. Take the coaster to a sink and wash it under cool running water using a soft-bristle brush (an old toothbrush is perfect for this). Gently scrub the engraved area to remove all the dust and soap film. Do not use an abrasive sponge, as it could scratch the slate. Pat the coaster completely dry with a lint-free cloth. At this point, it will look good, but one final step will make it look exceptional. The final touch is to apply a finish. This enhances the contrast and protects the slate. For a beautiful, deep finish, apply a few drops of food-safe mineral oil. Rub it into the entire surface with a clean cloth. You will see the dark gray or black of the slate instantly deepen, making the white engraved design pop with incredible contrast. Let the oil soak in for a few minutes, then buff off any excess with another clean cloth. Alternatively, you can use a dedicated food-safe stone or slate sealant for a more permanent, less oily finish. This final step not only elevates the aesthetic but also helps to protect your creation from fingerprints and moisture, completing its transformation from a simple stone into a durable, personalized piece of functional art.
Conclusions
You now have the knowledge to create beautiful, engraved slate coasters from start to finish. This rewarding project allows for endless creativity, from intricate designs to simple, elegant monograms. By following these steps, you can consistently produce high-quality, personalized slate coasters that are sure to impress family, friends, or customers.
Frequently Asked Questions
Q: What’s the best type of slate for laser engraving?
A: Treated slate is the ideal choice for detailed laser work. The thin, food-safe coating vaporizes when hit by the laser, creating a brilliant, high-contrast mark that is much sharper and cleaner than engravings on porous, uneven natural slate.
Q: Why do I need to use a vector file (SVG, AI) instead of a JPG?
A: Vector files are made of mathematical paths, not pixels. This means they can be scaled to any size without losing quality, providing the laser with a perfectly crisp and clean line to follow. A JPG will result in blurry or jagged edges when engraved.
Q: What is the purpose of the dish soap trick?
A: Spreading a very thin layer of dish soap on the slate before engraving acts as a masking agent. The heat from the laser interacts with the soap, which helps to bleach the underlying slate. This results in a much brighter, whiter engraved mark compared to the standard light gray.
Q: How do I find the correct power and speed settings for my laser?
A: The only reliable method is to perform a material test. Use a scrap piece of slate to engrave a test grid with different power and speed combinations. Visually inspect the grid to find the square with the brightest, sharpest mark, and use those settings for your project.
Block "subscribe-popup" not found