Tips and Tricks
A Practical Guide to Creating Living Hinge Designs for Laser Cutting
Apr
Estimated reading time: 7 minutes
Key Takeaways
- A living hinge is a laser-cut pattern of precision cuts that allows rigid materials like wood or acrylic to bend and flex without breaking.
- The effectiveness of a living hinge depends on the design pattern, with factors like cut spacing, length, and density determining the balance between flexibility and strength.
- Material selection is critical; manufactured woods like Baltic Birch plywood and MDF are ideal due to their uniform density and lack of natural grain, which prevents splitting.
- Successful cutting requires calibrated laser settings (power, speed) and high-pressure air assist, with testing on small swatches being essential to prevent material waste and ensure functionality.
In This Guide
This guide explores the innovative world of living hinges, a design technique that allows you to make wood and other rigid materials flexible. We will delve into how to create and apply these intricate laser cut patterns, opening up a new realm of possibilities for your laser cut wood projects, from decorative items to functional enclosures without traditional joinery.
Understanding the Magic of Living Hinges
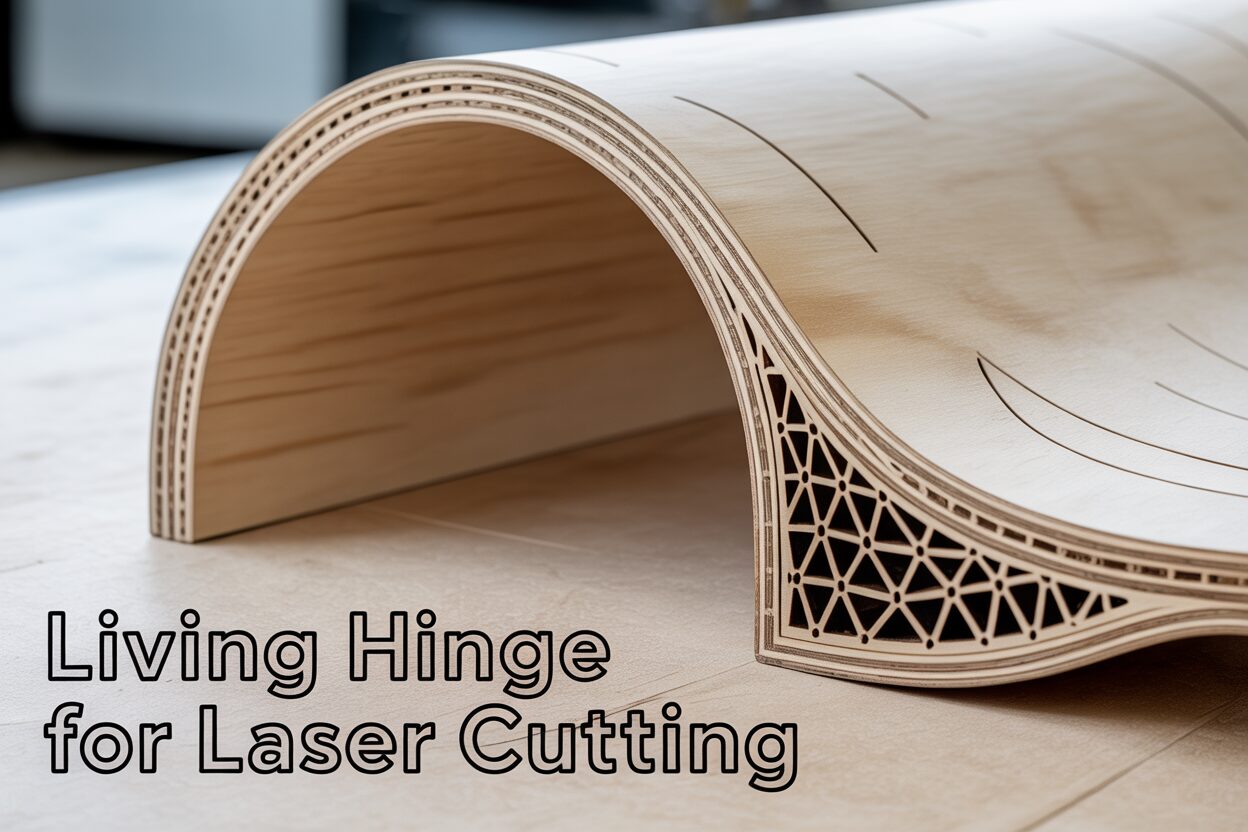
A living hinge is a pattern of precision cuts made into a rigid sheet material, like wood or acrylic, that allows it to bend and flex as if it were a pliable fabric. Unlike a traditional hinge made of metal or plastic, which is a separate component used to join two parts, a living hinge is an integral feature of the material itself. It is not something you add, but rather something you create by selectively removing material. This remarkable technique, made accessible and precise by laser cutters, effectively transforms a solid plane into a flexible surface, opening up a world of design possibilities that would otherwise be impossible with a single, continuous piece of wood. The magic lies in a carefully designed geometric pattern that distributes stress and allows for movement where none existed before.
The Mechanics of Kerf Bending
The principle behind a living hinge is elegantly simple: flexibility is achieved through a series of strategically placed cuts, often referred to as kerf cuts. A laser cutter works by vaporizing material along a path, leaving a narrow gap called the kerf. A living hinge design is essentially a dense array of these kerfs. The patterns typically consist of long, parallel cuts with small, alternating gaps or intricate latticeworks that leave a network of tiny, interconnected material “springs” or “bridges”. When force is applied to bend the sheet, this force is not acting on the solid wood but is instead distributed across these hundreds of tiny, flexible bridges. Each individual bridge flexes only slightly, but their collective movement allows the entire section to curve smoothly and dramatically. The empty space created by the laser cuts gives the remaining wood fibers room to move, compress, and stretch without snapping. The result is a section of wood that can be bent, often to a surprisingly tight radius, while the rest of the sheet remains perfectly rigid.
The advantages of integrating an living hinge into your laser cut wood projects are numerous and transformative, fundamentally changing how you can approach 3D design with 2D materials.
- Seamless Curved Surfaces: The most significant benefit is the ability to create complex curves and cylindrical shapes from a single piece of wood. Imagine crafting a lampshade, a book cover that wraps around the spine, or an articulated box where the lid and body are one continuous piece. This monolithic approach eliminates the need for gluing together multiple faceted parts to approximate a curve, resulting in a cleaner, more professional, and structurally sound object.
- Reduced Assembly Time: Living hinges can drastically simplify the construction process. Designs become a “cut-and-fold” assembly, akin to papercraft or origami. This minimizes the need for complex joinery, fasteners, and extensive gluing and clamping. By integrating the bend directly into the part, you reduce the component count and streamline the entire workflow from digital design to finished product.
- Unique and Intricate Aesthetics: Far from being purely functional, the cut pattern of a living hinge is a powerful design element. The intricate, repeating geometry of the cuts adds texture, visual interest, and a distinctly modern, high-tech feel to a project. The pattern itself can be customized to complement the overall design, making the mechanism of the bend a celebrated feature rather than something to be hidden.
This method stands out as one of the most innovative wood bending techniques available to modern makers. While traditional methods like steam bending or lamination require specialized equipment, significant time, and a high level of skill, the living hinge makes creating flexible wood components precise, repeatable, and accessible to anyone with a laser cutter.
Designing Effective Living Hinge Patterns
Creating an effective living hinge is a balancing act between flexibility and strength, and the design of your cut pattern is where this balance is struck. Three primary parameters govern the behavior of any hinge: the spacing of the cuts, the length of the hinge lines, and the overall density of the pattern. Spacing refers to the distance between each parallel cut; the closer the cuts, the more flexible the hinge will be, but also the more fragile, as less material remains. The length of each individual cut line also plays a vital role. Longer lines generally allow for a tighter bend radius along the axis perpendicular to them. Finally, density—the number of cuts within a given area—is the cumulative result of spacing and length. A dense pattern will be highly flexible but will have significantly less structural integrity perpendicular to the bend. Mastering these parameters requires experimentation, as the ideal combination will change based on your material, its thickness, and the desired curvature. The fundamental goal is always the same: remove just enough material to allow for bending, but leave enough to ensure the final product is durable.
Exploring Common Living Hinge Patterns
While countless variations exist, most laser cut patterns for living hinges fall into a few key categories, each with distinct characteristics. The most common and straightforward design is the straight-line or comb pattern. It consists of long, parallel cuts with small, alternating solid sections connecting them. This pattern is excellent for creating simple, single-axis bends, like wrapping a sheet of wood into a cylinder. Its strength lies in its simplicity and predictability. For more complex curves or a different aesthetic, you might explore a cross-hatch or grid pattern. This design introduces cuts in a second direction, creating a lattice that can offer some flexibility in multiple directions, though it is often less flexible overall than a straight-line pattern of similar density. More organic designs, featuring wavy lines, tessellating shapes like hexagons, or cellular structures, can distribute stress more evenly and produce a more fluid bend. These complex patterns are not only functional but can also become a beautiful decorative element of the final piece. Each pattern type directly impacts the final flexible wood laser cut piece:
- Straight-Line Pattern: Maximum flexibility in one direction. Ideal for simple curves and cylinders.
- Cross-Hatch Pattern: Offers some multi-directional flex and increased torsional rigidity. A good choice for surfaces with compound curves.
- Wavy/Organic Patterns: Distribute stress well and offer a unique visual appeal. Can be very strong if designed correctly.
Creating these patterns in vector design software like Adobe Illustrator or Inkscape is typically done using array or pattern replication tools. You would design a single “unit” of the pattern—one cut line and one connecting bridge—and then duplicate it hundreds of times to fill the desired area. This process can be tedious, which is why many designers rely on pre-made patterns. A quick online search will yield countless free dxf files of tested and proven living hinge designs. These are an excellent starting point for beginners, allowing you to test how different patterns behave with your specific material and laser cutter settings. Before committing to cutting a large final piece, always create a small test swatch. This simple step will save you time, material, and frustration by confirming that your chosen pattern provides the right amount of flexibility without breaking.
Laser Cutting Your Living Hinge and Material Considerations
The success of your living hinge is as dependent on the material you choose as it is on the design. Not all woods are created equal when it comes to this technique. The ideal material is uniform, free of knots, and has a consistent density. For these reasons, manufactured wood products are often the superior choice. High-quality Baltic Birch plywood is a perennial favorite among makers. Its cross-laminated layers provide strength and prevent the wood from splitting along a natural grain line when bent. Light-colored plywoods like poplar also perform well. MDF (Medium-Density Fiberboard) is another excellent option because it has no grain at all; it’s a completely homogenous material made of wood fibers and resin, which allows for incredibly smooth and predictable bending. Solid woods can be used, but they are far more challenging. You must pay careful attention to the grain direction—the hinge cuts should run parallel to the grain—and even then, variations in the wood can create weak points that are prone to snapping. For a reliable and repeatable flexible wood laser cut, sticking with plywood or MDF, typically in thicknesses of 3mm (1/8″) to 6mm (1/4″), will yield the best results.
Calibrating Your Laser for a Clean Cut
Dialing in the correct laser cutter settings is the next critical step. The goal is to achieve a clean cut that goes all the way through the material in a single pass without excessive charring or scorching. An incomplete cut will prevent the hinge from flexing, while too much power will burn away excess material, weakening the delicate “bridges” of the hinge. As a starting point, use your laser cutter’s recommended settings for cutting your chosen material and thickness. From there, you will likely need to make small adjustments. A good strategy is to slightly increase the speed or slightly decrease the power from the standard cutting setting. This minimizes the laser’s dwell time on the wood, reducing the heat-affected zone and resulting in a cleaner cut with less residue. High-pressure air assist is absolutely essential when cutting a living hinge. It helps to cleanly eject vaporized material from the kerf, prevents flare-ups, and dramatically reduces surface scorching, which can be a major issue given the density of the laser cut pattern.
Even with the right material and settings, you may encounter issues. Here are some common problems and how to troubleshoot them:
- Excessive Scorching or Resin Buildup: This is often caused by settings that are too slow or powerful, or by using a resinous wood. To mitigate this, cover the surface of your laser cut wood with a layer of low-tack masking tape before cutting. The tape will absorb the worst of the smoke and residue and can be peeled away after the job is complete, revealing a clean surface underneath.
- Hinge Breaks When Bending: If the hinge snaps, it could be due to several factors. The material might be too dry and brittle; lightly misting the wood with water can sometimes help make the fibers more pliable. Alternatively, your pattern may not be dense enough for the material thickness, or you may be trying to bend it beyond its designed radius.
To avoid wasting a large piece of material, always cut a small test piece first. Create a small swatch of your living hinge pattern, perhaps 5cm by 10cm, in the corner of your material sheet. Run the cut, remove the test piece, and carefully flex it. Does it bend smoothly to the radius you need? Does it feel strong or fragile? This small, two-minute test will tell you everything you need to know about your material, pattern, and laser settings, allowing you to make adjustments before committing to the final, full-sized cut.
Conclusions
Mastering the living hinge technique can elevate your laser cutting projects from simple flat shapes to complex, curved forms. By experimenting with different laser cut patterns and materials, you can create truly unique and functional items. Start incorporating these flexible wood laser cut designs into your work and watch your creative potential expand exponentially.
Frequently Asked Questions (FAQ)
Q: What exactly is a living hinge?
A: A living hinge is not a separate part but an integral feature created by making a pattern of precision laser cuts into a rigid material like wood or acrylic. This pattern of kerfs allows the solid material to bend and flex as if it were pliable.
Q: What are the best materials to use for creating a laser-cut living hinge?
A: Manufactured wood products are ideal due to their uniformity. High-quality Baltic Birch plywood and MDF (Medium-Density Fiberboard) are the top choices because they lack a natural grain that can cause splitting. Solid woods can be used but are much more challenging and prone to breaking.
Q: My living hinge snapped when I tried to bend it. What went wrong?
A: A hinge breaking can be caused by several factors: the material may be too dry and brittle, the cut pattern might not be dense enough for the material’s thickness, or you might be trying to bend it past its maximum radius. Always cut a small test piece first to check flexibility and strength.
Q: How can I prevent scorching and burn marks on my wood?
A: To prevent scorching, ensure your laser settings (speed and power) are optimized, use high-pressure air assist, and apply a layer of low-tack masking tape to the surface of the wood before cutting. The tape absorbs the smoke and residue and can be peeled off afterward for a clean finish.
Block "subscribe-popup" not found