Tutorials
A Guide to Creating the Perfect Personalized Charcuterie Board
Feb
Estimated reading time: 9 minutes
Key Takeaways
- Select the Right Wood: Always choose a hard, closed-grain wood like maple, walnut, or cherry for charcuterie boards. These woods are durable, hygienic, and engrave beautifully.
- Prepare Your Design File: Use vector files (SVG, AI) for crisp lines and text, and ensure you convert any text to outlines. For images, use high-resolution (300+ DPI) raster files.
- Always Run a Test: Never engrave your final piece without first testing your laser’s power and speed settings on a scrap piece of the same wood to achieve the perfect look.
- Finish with Food-Safe Oil: After engraving and cleaning, apply a food-grade mineral oil or board conditioner to protect the wood, prevent cracking, and make the engraved design pop.
- Proper Care is Essential: To ensure longevity, always hand-wash a wooden charcuterie board. Never put it in the dishwasher, and re-oil it monthly or whenever it looks dry.
Table of Contents
- Selecting the Ideal Wood for Your Project
- Preparing Your Design for Engraving
- The Laser Engraving Process Step-by-Step
- Finishing and Caring for Your Engraved Board
- Conclusions
- Frequently Asked Questions
Discover the art of creating a personalized charcuterie board, a unique and thoughtful gift for any occasion. This guide will walk you through the entire process, from selecting the right wood to the final touches of finishing. Whether for a wedding, housewarming, or your own kitchen, a custom board is one of the most rewarding laser engraving projects.
Interested in more Charcuterie Board? Check out our Charcuterie Board laser file designs: Click here!
Selecting the Ideal Wood for Your Project
The foundation of a stunning personalized charcuterie board is, quite literally, the wood itself. Your choice will affect not only the board’s appearance and longevity but also how beautifully your laser-engraved design comes to life. The most critical factor for any board intended for food is selecting a hard, closed-grain wood. Closed-grain woods, like maple, cherry, and walnut, have very small, dense pores. This is paramount for hygiene, as it prevents food particles, bacteria, and moisture from becoming trapped within the wood. It also makes the surface smoother and easier to clean. Conversely, open-grain woods such as oak and ash have large, porous structures that can harbor germs and are not recommended for direct food contact surfaces like a custom cutting board. Durability is another benefit of these hardwoods; they can withstand knife marks and regular use far better than softwoods like pine, which would dent and scratch too easily.
Popular Wood Choices and Their Engraving Characteristics
Each food-safe hardwood offers a unique canvas for your laser engraving, yielding different aesthetic results. Understanding their properties will help you match the wood to your desired outcome.
- Maple (Hard Maple): A classic and popular choice for a reason. Maple is incredibly dense and durable, with a creamy, light color. Its subtle grain pattern provides a clean, bright surface that makes it the perfect backdrop for laser engraving. The laser burns the wood to a dark, rich brown or near-black, creating a sharp, high-contrast design that stands out vividly. This is ideal for intricate patterns, detailed logos, or fine text. The primary drawback is that its light color can be more prone to showing stains from colorful foods if not properly oiled and maintained.
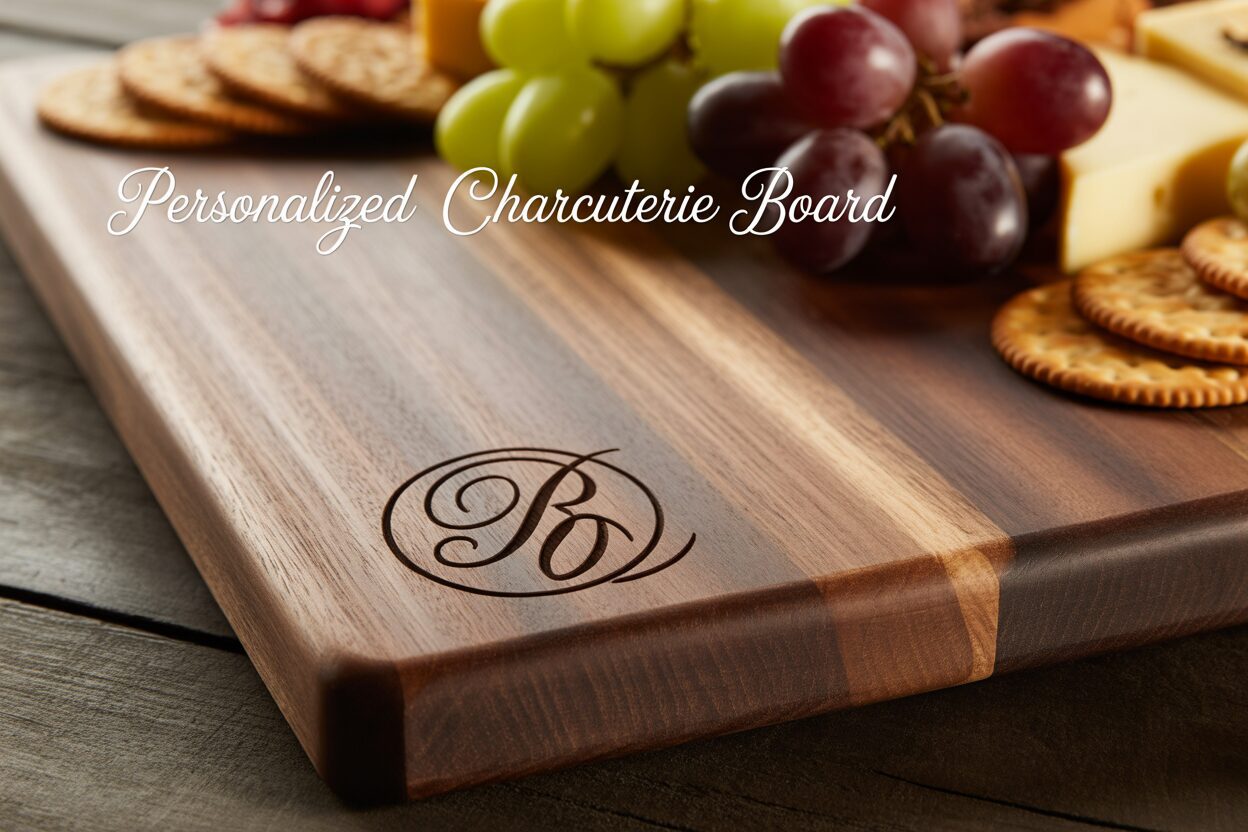
- Walnut: For a more luxurious and dramatic look, walnut is an excellent option. Its deep, rich chocolate-brown tones and beautiful grain patterns create a premium feel. When laser engraved, walnut produces a subtle, tone-on-tone effect. The engraved area becomes a slightly darker shade of brown, resulting in an elegant, understated personalization rather than a high-contrast statement. This sophisticated look is perfect for monograms or minimalist designs. While walnut is slightly softer than maple, making it a bit gentler on knives, its dark color naturally conceals stains well.
- Cherry: Offering a beautiful middle ground, cherry wood has warm, reddish-brown hues that darken over time to a rich patina. It’s durable enough for a charcuterie board and is known for its smooth, satiny finish. Laser engraving on cherry produces a lovely, dark burn that provides good contrast—not as stark as on maple, but significantly more pronounced than on walnut. This makes it a versatile choice that complements a wide range of designs, balancing readability with the wood’s natural warmth and character.
Sourcing Your Board
Once you’ve decided on a wood type, you need to source your board. You have two main options: purchasing a pre-made board or starting with raw lumber. For beginners, a pre-made blank is the most straightforward path. You can find these at kitchen supply stores, craft stores, or online suppliers specializing in wood blanks for laser engraving. When choosing a pre-made board, ensure it is solid wood and, crucially, that it is unfinished or finished only with a simple food-safe mineral oil. Avoid boards with lacquers, varnishes, or thick polyurethane coatings, as these can produce harmful fumes when lasered and will interfere with the engraving quality. If you have woodworking experience and tools, starting with raw lumber from a local hardwood supplier gives you complete creative control over the board’s shape and size. When selecting a piece of lumber, inspect it for flatness and choose a section with minimal knots or dramatic grain shifts in the area you plan to engrave, as these can disrupt the consistency of the final design.
Preparing Your Design for Engraving
With your perfect piece of wood selected, the next step is to prepare the digital artwork that will guide the laser. A well-crafted design file is the blueprint for your final piece and is one of the most crucial steps in all laser engraving projects. Whether you create a design from scratch or use a pre-made file, careful preparation is key to achieving a crisp, professional result on your engraved charcuterie board. The most popular designs often include personal touches like family names, monograms, established dates, or meaningful quotes. You can also incorporate graphics like wreaths, kitchen utensils, or custom logos. For those who aren’t graphic designers, a wealth of resources exists online. Marketplaces like Etsy are filled with artists selling high-quality, ready-to-use cutting board engraving files specifically formatted for laser cutting and engraving, which can save you significant time and effort.
Vector vs. Raster: Choosing the Right File Type
Understanding the difference between vector and raster files is fundamental to preparing your design. Each type interacts with the laser software differently and is suited for different kinds of artwork.
- Vector Files (SVG, DXF, AI): These are the preferred format for most engraving work involving text, logos, and line art. A vector file is not made of pixels; instead, it uses mathematical equations to create lines, points, and curves. The primary advantage is infinite scalability—you can resize a vector design to be as large or small as you want without any loss of quality. This ensures that the edges of your text and graphics will be perfectly sharp and clean when engraved.
- Raster Files (PNG, JPG, BMP): These are pixel-based images, like a photograph. They are ideal for engraving highly detailed images with shading or complex textures. When preparing a raster file, image resolution is critical. A low-resolution image will result in a blurry, pixelated engraving. For high-quality wood laser engraving, you should always aim for a resolution of at least 300 DPI (dots per inch). For simple, high-contrast graphics, a PNG with a transparent background is often the best choice.
Finalizing Your Design in Software
Once you have your design concept, you’ll need to format it using software like Adobe Illustrator, Inkscape (a free alternative), or directly within your laser control software, such as LightBurn. First, measure your physical charcuterie board precisely and create a digital workspace or artboard of the exact same dimensions. This allows you to place your design with confidence, knowing it will be positioned correctly on the final product. If your design includes text, you must perform a crucial step: convert the text to outlines or paths. This turns the letters into vector shapes, ensuring the font appears exactly as you intended, even if the laser control computer doesn’t have that specific font installed. For raster images, it’s often best to convert them to a pure black-and-white format. The laser interprets black as the area to engrave, providing the cleanest possible result. Before exporting your final file, double-check that all design elements are set to “fill” rather than “stroke” to ensure the laser engraves the interior of your shapes and letters, not just their outlines.
The Laser Engraving Process Step-by-Step
Now that your wood is chosen and your design is perfected, it’s time for the most exciting part: bringing your vision to life with the laser. This stage requires precision and attention to detail. Follow these steps carefully to ensure a safe and successful engraving on your personalized charcuterie board. The first action inside the laser cutter is to securely place your board on the machine’s bed. It must be perfectly flat and immobile. Any slight movement during the engraving process will cause misalignments and ruin the design. Use honeycomb pins, small clamps, or heavy weights around the edges (well clear of the laser head’s path) to hold it firmly in place. Next, you must set the correct focal distance—the precise distance between the laser lens and the surface of the wood. This is arguably the most critical step for achieving a sharp, clean engraving. If the laser is out of focus, your design will appear blurry and lack definition. Most machines come with a focusing tool or have an auto-focus feature; consult your laser cutter’s manual and follow its specific procedure diligently.
Calibrating Settings and Running a Test
There is no universal “magic number” for laser settings; the ideal combination of power, speed, and resolution (DPI or LPI) depends on your specific machine’s wattage and the type of wood you are using. A dense wood like maple requires more power or a slower speed than a slightly softer wood like cherry to achieve the same depth of burn. To avoid ruining your project, always run a test on a scrap piece of the exact same wood. A great method is to create a small “test matrix” file with a series of small squares, each with different power and speed settings. Engrave this matrix on your scrap piece to see firsthand how the combinations look. For example, for a 60W CO2 laser on walnut, you might test power settings from 15-25% and speeds from 250-400 mm/s. This test will reveal the setting that gives you the desired color and depth without excessive charring. Once you have identified your optimal settings, enter them into the laser software for your main design.
With your board secure, focus set, and settings dialed in, you are ready to engrave. Send your finalized cutting board engraving files from your computer to the laser cutter. Position the starting point of the laser (the “origin”) in your software to match where you want the design to begin on the physical board. Many users find it helpful to run the laser’s “frame” function first. This moves the laser head around the outer boundary of your design without firing the laser, allowing you to visually confirm that the placement and size are perfect before you commit. Once you are confident, close the machine’s lid, turn on the ventilation system, and start the job. It is imperative that you never leave a laser cutter unattended while it is operating. Stay and monitor the process to ensure everything is running smoothly and to be able to react immediately in the rare event of a small flare-up. When the engraving is complete, wait for the machine’s exhaust fan to clear all smoke and fumes from the chamber before opening the lid. Once clear, you can carefully remove your new custom cutting board.
Finishing and Caring for Your Engraved Board
The laser has finished its work, but your project isn’t quite complete. The final steps of cleaning, finishing, and conditioning are what will transform your freshly engraved piece into a durable, food-safe, and visually stunning work of art. This post-engraving process not only protects the wood but also dramatically enhances the appearance of the engraved design, making the details pop with rich contrast. The first task is to clean up the residue left by the wood laser engraving process. As the laser vaporizes the wood, it leaves behind a fine layer of soot and resin around the engraved area. Cleaning this off properly is crucial for a clean look and for ensuring the finish will absorb evenly. Start by using a soft-bristled brush, like a clean toothbrush, to gently scrub inside the engraved lines and remove any loose debris. Afterwards, take a clean cloth lightly dampened with water and wipe down the entire surface. For more stubborn resin residue, particularly on lighter woods, a cloth with a small amount of denatured alcohol can be very effective. Rub gently, and be sure to let the alcohol fully evaporate before proceeding. Avoid using harsh soaps at this stage and never saturate the wood with water, as this can cause the grain to raise or the board to warp.
Applying a Food-Safe Finish
Once your board is clean and completely dry, it’s time to apply a protective, food-safe finish. This is the most rewarding step, as the oil will deepen the color of the wood and make your engraving stand out beautifully. It is absolutely essential to use a finish that is non-toxic and safe for food contact.
- Food-Grade Mineral Oil: This is the most common and highly recommended finish for any engraved charcuterie board or cutting board. It is inexpensive, readily available, and works by penetrating deep into the wood fibers to hydrate them, which prevents drying, cracking, and warping.
- Board Cream/Conditioner: These products typically contain a blend of mineral oil and a natural wax, such as beeswax or carnauba wax. The oil component moisturizes the wood, while the wax creates a protective barrier on the surface, helping to repel water and food stains more effectively.
To apply the finish, pour a generous amount of oil directly onto the board. Using a clean, lint-free cloth, spread the oil evenly across the entire surface, including the edges and the back. Make sure to work the oil thoroughly into the engraved portions of your design. You will immediately see the burn darken and the contrast increase. Let the board sit and absorb the oil for at least four hours, but for the best results, leave it overnight. The wood will soak up the oil it needs. The next day, use another clean cloth to buff the surface and wipe away any excess oil that hasn’t been absorbed.
Long-Term Care and Maintenance
With proper care, your personalized board will last for years. Instruct the recipient (or yourself) to always hand-wash the board with mild soap and warm water—never put a wooden board in the dishwasher. The intense heat and prolonged exposure to water will cause it to warp and crack. After washing, dry it immediately with a towel and allow it to air dry completely, preferably by standing it on its edge so air can circulate on all sides. Over time and with use, the wood will begin to look dry or faded. This is a sign that it needs to be reconditioned. Simply repeat the oiling process described above every month or whenever the board looks thirsty to keep it hydrated, protected, and looking its best.
Conclusions
You now have the knowledge to create a beautiful and functional engraved charcuterie board. This project not only enhances your home entertaining but also makes for a heartfelt, customized gift. With the right materials, a quality design file, and careful execution, you can produce professional-level results that are sure to impress your friends and family.
Frequently Asked Questions
Q: What is the best type of wood for a charcuterie board?
A: The best woods are hard, closed-grain hardwoods because they are durable and hygienic. The top choices are Maple for high-contrast engravings, Walnut for a luxurious, tone-on-tone look, and Cherry for a warm, versatile middle ground.
Q: Do I need a special file type for laser engraving?
A: Yes. For text, logos, and line art, a vector file (like SVG or AI) is best because it creates perfectly sharp edges. For photos or complex shaded images, a high-resolution (300+ DPI) raster file (like PNG or JPG) is required.
Q: How do I clean and care for my engraved charcuterie board?
A: Always hand-wash your board with mild soap and warm water, and dry it immediately. Never put it in the dishwasher. To maintain its condition and protect the wood, re-apply a food-grade mineral oil or board cream every month or so.
Q: Is it safe to leave a laser engraver running unattended?
A: No, you should never leave a laser cutter unattended while it is operating. Although rare, small flare-ups can occur, and you must be present to monitor the process and react immediately if an issue arises.
Block "subscribe-popup" not found