Tutorials
A Guide to Creating a Custom Engraved Charcuterie Board
Feb
Estimated reading time: 7 minutes
Key Takeaways
- Wood Selection is Crucial: The foundation of a great engraved board is choosing a food-safe, closed-grain hardwood like Maple, Walnut, or Cherry, as it directly impacts engraving quality, durability, and safety.
- Vector Designs are Superior: For crisp, clean lines and text, always use high-quality vector file formats like SVG or AI. These can be scaled to any size without losing sharpness, unlike pixel-based files like JPGs.
- Always Test First: Before engraving your final board, always run a test on a scrap piece of the same wood to find the “sweet spot” for your laser’s power, speed, and focus settings to avoid costly mistakes.
- Finishing is Non-Negotiable: Proper post-engraving cleanup to remove residue, followed by a light sanding and sealing with food-grade mineral oil, is essential for a professional, durable, and beautiful finish.
Table of Contents
- Choosing the Perfect Wood for Your Charcuterie Board
- Preparing Your Design and Laser Cutter
- The Engraving Process and Finishing Touches
- Conclusions
- Frequently Asked Questions
Discover the art of creating a beautiful engraved charcuterie board. This guide will walk you through everything from selecting the right wood to the final touches of the laser engraving process. Whether you’re a hobbyist or looking to create a unique, personalized charcuterie board, you’ll find all the essential tips and techniques to get started on your next project.
Choosing the Perfect Wood for Your Charcuterie Board
The foundation of any stunning engraved charcuterie board is the wood itself. Your choice of material acts as the canvas for your design, influencing not only the final aesthetic but also the board’s durability, food safety, and the quality of the engraving. Selecting the right wood is a critical first step that balances visual appeal with practical function. Different woods react uniquely to the laser, and their natural characteristics will either enhance or detract from your artwork.
Popular Food-Safe Woods for Engraving
When creating a board intended for serving food, selecting a food-safe, closed-grain hardwood is non-negotiable. These woods are less porous, preventing bacteria from seeping in and making them easier to clean. Here are some of the best options:
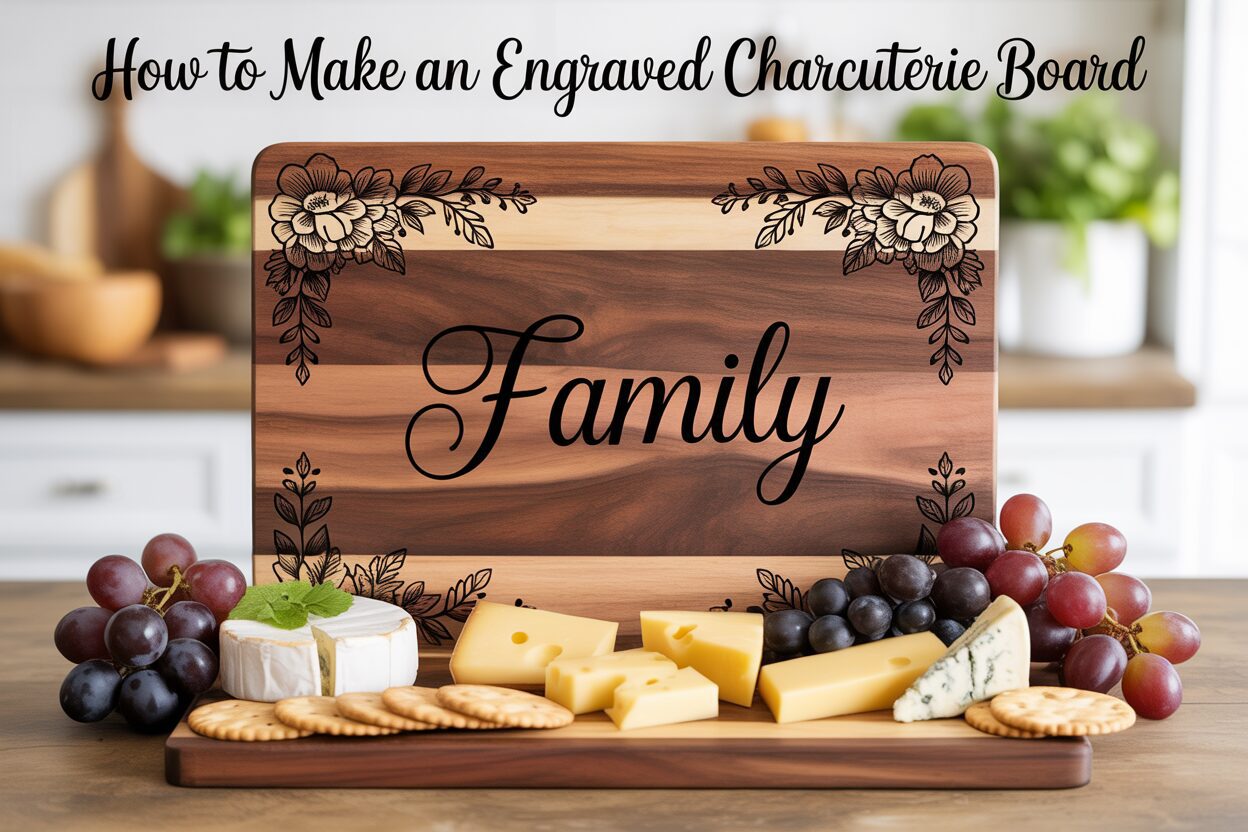
- Maple: Often considered the gold standard for cutting boards, maple is a hard, dense wood with a fine, uniform grain. Its light, creamy color creates a high-contrast background, making laser engravings appear sharp, dark, and exceptionally clear. It is highly durable and resists knife scarring well. The only potential downside is that its subtle grain can be considered plain by those seeking a more dramatic look.
- Walnut: For a more luxurious and sophisticated feel, walnut is an excellent choice. Its rich, dark chocolate-brown colors provide a beautiful, elegant base. However, the dark surface means your engraving will be more subtle—a dark-on-dark, tone-on-tone effect that looks incredibly refined. It’s a slightly softer wood than maple, but still durable enough for a quality custom cutting board.
- Cherry: Known for its beautiful, warm reddish-brown hue that gracefully darkens with age, cherry offers a perfect middle ground. It provides good contrast for engravings—not as stark as maple, but clearer than walnut. Its smooth, straight grain makes for a clean and consistent engraving surface. Cherry is slightly softer than maple, so it may show wear more readily over time.
- Acacia: Valued for its striking and often varied grain patterns and rich color variations within a single board, acacia is a very hard and durable wood. It is also often a more budget-friendly option. The primary consideration for wood laser engraving on acacia is its inconsistency; the laser may react differently to the lighter and darker bands of wood, which can sometimes make intricate designs appear less uniform.
How Wood Properties Affect Your Engraving
Understanding the mechanics of wood will help you predict the outcome of your engraving. Three key factors come into play: grain, hardness, and color. Hardness and density are crucial for achieving crisp detail. Harder woods like maple resist the laser’s heat just enough to allow for a clean vaporization of the material, resulting in sharp lines. Softer woods may char or “fuzz” around the edges of the design. The wood grain itself is the texture of your canvas. A tight, closed grain, as seen in maple and cherry, provides a smooth, uninterrupted surface ideal for detailed designs. An open-grained wood, like oak, has pores and inconsistencies that can disrupt the laser path, making fine text or intricate lines appear broken. Finally, color dictates contrast. Lighter woods create a bold, high-contrast look, while darker woods produce a subtle, elegant engraving.
Sourcing a High-Quality, Food-Safe Board
When purchasing a board for your project, your primary concern must be safety. Always look for boards explicitly labeled as “food-safe” or made from 100% natural, untreated hardwood. It is crucial to select an unfinished board or one finished only with food-grade mineral oil or a beeswax blend. Avoid any boards with varnish, lacquer, or polyurethane finishes, as these chemical sealants are not safe for food contact and will release toxic fumes when engraved with a laser. Check the construction; boards made from a single solid piece of wood are ideal, but those glued together are also excellent, provided a food-safe, waterproof glue (like Titebond III) was used. You can find suitable boards at specialty woodworking stores, kitchen supply shops, and online retailers that specialize in culinary wood products. Always verify the materials and finish before you buy to ensure your creation is both beautiful and safe.
Preparing Your Design and Laser Cutter
With your perfect wooden board selected, the next phase involves translating your creative vision into a digital file and preparing the laser cutter for the engraving process. This meticulous preparation is the bridge between concept and creation, ensuring the final result is as flawless as you imagined. Proper design setup and machine calibration are essential to achieving a clean, professional-looking laser engraved cutting board.
Creating and Formatting Your Design
The design is the heart of your personalized charcuterie board. Whether it’s a family name, a significant date, a complex geometric pattern, or a custom logo, the key is to start with a high-quality digital file. For designs composed of lines, shapes, and text, vector files are vastly superior to other formats. Vector files, such as a charcuterie board svg (Scalable Vector Graphics), AI (Adobe Illustrator), or DXF, define images using mathematical paths rather than pixels. This means you can scale them to any size without any loss of quality or sharpness—a critical feature for ensuring crisp, clean lines. Raster files like JPG or PNG are made of pixels and are better suited for engraving photographic images, but they can result in jagged edges on line art or text when scaled. You can create your own vector design using software like Adobe Illustrator, Inkscape (a free alternative), or CorelDRAW, or purchase pre-made designs from online marketplaces. When designing, consider the placement on the board. A common practice is to place the design in a corner or along an edge to leave ample space for food presentation.
Calibrating the Laser Cutter for Wood
Once your design is ready, you must configure the laser cutter’s settings. These settings will vary depending on your specific laser machine and, crucially, the type of wood you chose in the previous step. The three primary settings to master are power, speed, and focus.
- Power: This determines the intensity of the laser beam. Higher power results in a deeper, darker engraving. Hard, dense woods like maple typically require more power to mark than softer woods like cherry.
- Speed: This is how fast the laser head moves across the material. Slower speeds allow the laser to dwell on one spot longer, resulting in a deeper and darker burn, similar to increasing power. Finding the right balance between power and speed is key to avoiding excessive charring.
- Focus: For the laser to engrave a sharp line, its beam must be perfectly focused on the surface of the wood. Most laser cutters have a manual or automatic focusing procedure. An out-of-focus laser will produce a wider, fuzzier line and a much less detailed engraving.
The most critical step in this entire process is to perform a test run. Never engrave your final workpiece without first testing your settings on a scrap piece of the exact same wood. An ideal test involves creating a small grid or matrix of squares, each engraved with a different combination of power and speed settings. This allows you to visually compare the results and find the “sweet spot” that gives you the desired depth and color without scorching the wood. For example, you might find that on walnut, a lower power setting creates a subtle, elegant mark, while on maple, you need higher power to achieve a rich, dark contrast. This small investment of time and material will save you from the costly mistake of ruining your beautiful charcuterie board.
The Engraving Process and Finishing Touches
With your design finalized and laser settings dialed in from your test piece, you are ready for the most exciting step: the actual engraving. This is where your digital creation is permanently etched into the wood, transforming the board into a personalized work of art. Careful execution during and after the engraving process is what separates a good project from a great one, ensuring a clean, beautiful, and long-lasting finish.
Executing the Engraving
First, securely position your charcuterie board on the laser cutter’s bed. Warped boards can be a common issue; ensure the board lies perfectly flat to maintain consistent focus across the entire design. If it’s not flat, the laser may engrave too deeply in some areas and too lightly in others. Use the laser’s origin or home position, often in a top corner, as a reference point. Place the corner of your board at this origin and use your laser software’s preview or framing function, which often uses a harmless red dot pointer, to trace the outline of your design on the board. This allows you to check the size and placement visually before committing. Once you are satisfied with the alignment, secure the board with hold-down pins or heavy weights on the unused areas to prevent any shifting during the engraving process. With the lid closed and the ventilation system running, begin the job. Never leave the laser cutter unattended while it is operating. Keep a watchful eye on the process, monitoring for any excessive flaming or flare-ups, which can be quickly extinguished with a spray of water. The smell of burning wood is normal, but attentive monitoring is a critical safety practice.
Post-Engraving Cleanup and Finishing
Once the laser has finished its work, a layer of smoke and resin residue will cover the engraved area. This needs to be cleaned to reveal the crisp details beneath. The best method for cleaning depends on the wood and the depth of the engraving.
- Start with the gentlest method: use a soft-bristled brush or a blast of compressed air to remove loose debris.
- For more stubborn residue, lightly dampen a clean, lint-free cloth with water or isopropyl alcohol and gently wipe the engraved area. Be careful not to use too much liquid, which could raise the grain of the wood.
After cleaning, the surface of the board may feel slightly rough to the touch. For a silky, professional finish, a light sanding is in order. Using a high-grit sandpaper (220-grit or higher), gently sand the entire surface of the board, always moving with the grain of the wood. Be very careful around the engraved area, as aggressive sanding can soften the sharp edges of your design. The goal is simply to smooth the surface, not to remove material.
The final and most crucial step is to apply a food-safe finish. This not only protects the wood but also deeply enriches its color, making the engraved design pop with stunning contrast. Generously apply a coat of food-grade mineral oil or a high-quality board conditioner (often a mix of mineral oil and beeswax). Let the oil soak into the wood for at least 20-30 minutes, or even overnight for a deeper penetration. The wood will drink up the oil, restoring moisture and conditioning the fibers. Afterward, use a clean, dry cloth to buff the surface and wipe away any excess oil. This final touch seals your masterpiece, ensuring it is beautiful, durable, and ready for its first spread of cheeses and cured meats.
Conclusions
You now have the knowledge to create a stunning engraved charcuterie board that is both functional and decorative. By following these steps, you can confidently take on any wood laser engraving project, turning ordinary cutting boards into personalized gifts. Experiment with different designs and woods to further refine your skills and create truly unique pieces for any occasion.
Frequently Asked Questions
Q: What is the best wood for a laser engraved charcuterie board?
A: The best woods are food-safe, closed-grain hardwoods. Maple is excellent for high-contrast engravings due to its light color. Walnut offers a subtle, sophisticated look on its dark surface. Cherry provides a beautiful, warm middle ground with good contrast that darkens over time.
Q: Can I engrave a cutting board that already has a finish?
A: You should never engrave a board with a chemical finish like varnish, lacquer, or polyurethane. These finishes release toxic fumes when vaporized by a laser and are not food-safe. Only use unfinished boards or those pre-treated with 100% food-grade mineral oil or a beeswax blend.
Q: What is the best file format for my engraving design?
A: Vector files (such as SVG, AI, or DXF) are vastly superior for designs with lines, shapes, and text. They use mathematical paths instead of pixels, which means you can resize them infinitely without losing any quality, ensuring your engraved lines are perfectly crisp and sharp.
Q: Why is it so important to do a test engraving?
A: Every piece of wood and every laser cutter is different. A test run on a scrap piece of the same wood allows you to find the optimal power and speed settings for your specific project. This critical step prevents you from scorching, under-powering, or otherwise ruining your final charcuterie board.
Q: How do I clean and care for my new engraved board?
A: After engraving, clean away any residue with a soft brush and a slightly damp cloth. To maintain the board, hand wash it with mild soap and water (never put it in the dishwasher). Periodically re-apply a food-grade mineral oil or board conditioner to keep the wood from drying out and to maintain its beautiful finish.
Block "subscribe-popup" not found