Tutorials
A Guide to 3D Illusion Laser Engraving on Wood
Jan
Estimated reading time: 7 minutes
Key Takeaways
- The Illusion is in the Burn: 3D illusion engraving uses a grayscale depth map to vary the laser’s power, creating shades that trick the eye into seeing depth on a flat surface, rather than physically carving the wood.
- File & Wood Quality are Paramount: Success requires high-resolution (300+ DPI) raster files (like PNG or BMP) and light-colored, fine-grained woods such as Basswood, Maple, or Cherry to ensure maximum contrast and detail.
- Calibrate Before You Create: Always run a material test grid on a scrap piece of your chosen wood to dial in the perfect power, speed, and DPI settings. This step is critical for achieving a smooth gradient from light to dark.
- Finishing is a Must: Proper post-engraving cleaning (with compressed air, a soft brush, and denatured alcohol) followed by a protective finish (like a spray clear coat or penetrating oil) is essential to remove residue and dramatically enhance the final 3D effect.
Table of Contents
- The Science Behind 3D Laser Illusions
- Selecting the Perfect Design and Wood
- Calibrating Your Laser Engraver for Depth
- Post-Engraving Finishing Techniques
- Conclusions
- Frequently Asked Questions
Dive into the fascinating world of 3D illusion laser engraving, a technique that transforms a flat wood surface into a seemingly three-dimensional piece of art. This guide will walk you through the entire process, from finding the best digital designs to fine-tuning your laser settings, enabling you to produce stunning projects with incredible depth and detail.
Interested in more 3D Illusion? Check out our 3D Illusion laser file designs: Click here!
The Science Behind 3D Laser Illusions
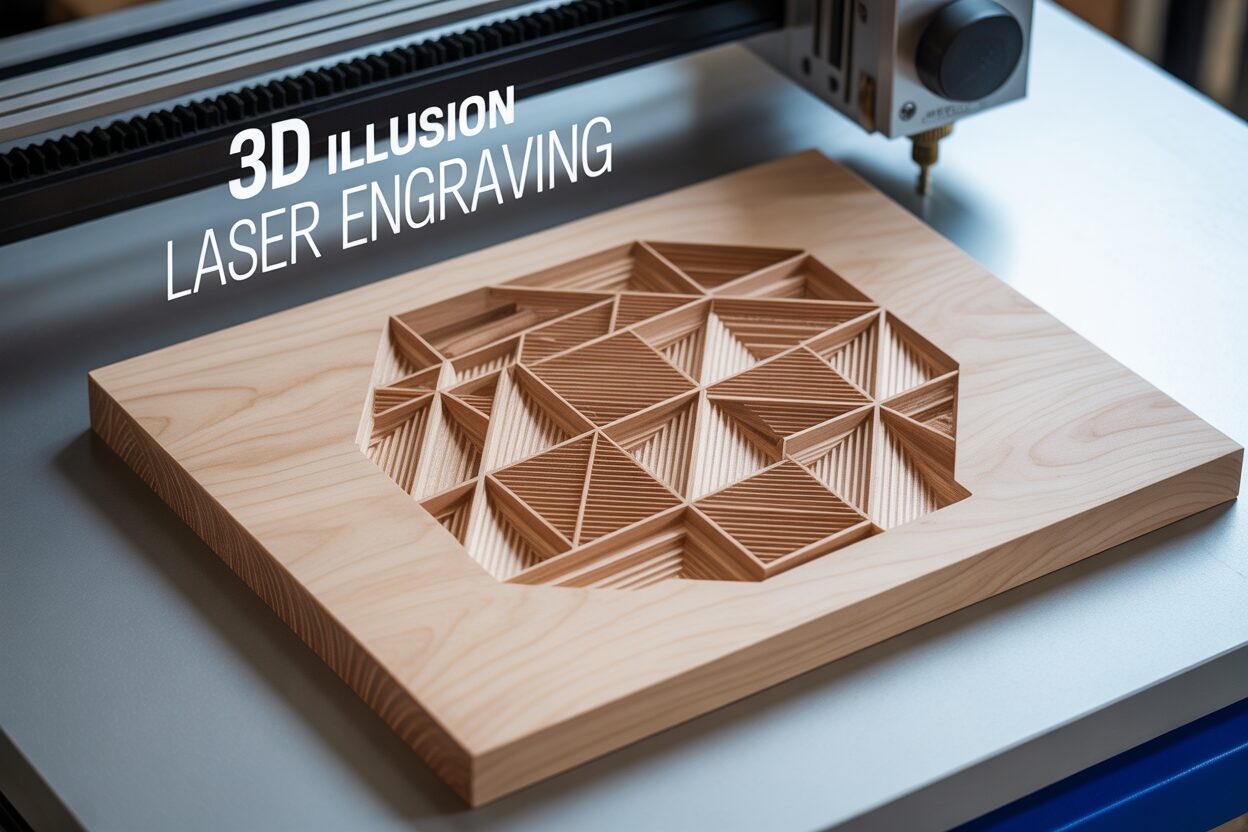
At its core, 3D illusion laser engraving is a masterful act of deception, a clever fusion of art and technology that convinces the human eye to perceive depth and volume on a perfectly flat piece of wood. Unlike true 3D carving, which physically removes material to create different height levels, this technique operates on the principles of light, shadow, and perception. It doesn’t change the wood’s topography dramatically; instead, it manipulates its color and texture with microscopic precision. The entire illusion hinges on replicating how light interacts with a real three-dimensional object. In the real world, surfaces facing a light source are bright, while those angled away fall into shadow. Our brains are hardwired to interpret these gradients of light and dark as cues for shape and depth. 3D illusion engraving hijacks this innate understanding by using a laser to “paint” these light and shadow effects directly onto the wood.
The mechanism behind this magic is the laser’s ability to vary its output with incredible control. The process begins with a special type of image file, often called a grayscale depth map. In this file, every shade of gray, from pure white to solid black, represents a different instruction for the laser.
- Pure Black: Instructs the laser to operate at its highest power setting for that design. This creates the deepest and darkest burn, simulating the darkest shadows or the most recessed parts of an object.
- Pure White: Instructs the laser to fire at its lowest power setting, or not at all. This leaves the wood’s surface untouched or very lightly marked, representing the brightest highlights where light would directly hit the object.
- Shades of Gray: The entire spectrum of grays between black and white corresponds to a proportional scale of laser power. A medium gray will result in a moderately deep burn, while a light gray will produce a very shallow one.
From Digital Gradients to Physical Depth
This translation of grayscale values into varying burn depths is what creates the illusion. The laser moves across the wood, rapidly modulating its power based on the gray value of each pixel in the source file. Where the file shows a smooth gradient from light gray to dark gray, the laser creates a corresponding physical gradient on the wood, transitioning from a shallow, light-colored burn to a deep, dark one. This smooth transition is what tricks the eye into seeing a curved or sloped surface, just as a painter uses shading to make a circle look like a sphere. This is why the quality of the design file is paramount. A simple vector file with outlines and solid fills cannot create this effect. The illusion requires the rich, continuous tonal data found in a meticulously crafted grayscale image. Starting with high-quality 3d illusion laser files is not just a recommendation; it is the fundamental requirement for success. These files are not merely images but are engineered depth maps, designed by artists who understand how each shade will translate into a physical burn on a specific material. A low-resolution file or one with poor gradients will result in a “stepped” or pixelated engraving, instantly shattering the delicate illusion of depth you are working so hard to create.
Selecting the Perfect Design and Wood
The artistry of a 3D illusion is a partnership between a high-quality design file and the right material canvas. Not all digital files or pieces of wood are created equal, and your choices here will fundamentally determine the success of the final piece. The ideal laser engraving file for wood intended for a 3D illusion is almost always a high-resolution raster image. It’s crucial to understand the distinction: vector files (like SVG, AI, or DXF) are defined by mathematical paths and are perfect for cutting sharp lines and shapes, but they lack the pixel-by-pixel grayscale information necessary for creating depth. Raster files (such as PNG, BMP, or TIFF), on the other hand, are grids of individual pixels, where each pixel can hold a specific grayscale value. This is the format that contains the “depth map” information your laser needs to modulate its power. When sourcing a design, look for files with a minimum resolution of 300 DPI (Dots Per Inch) to avoid pixelation and ensure smooth transitions. High-quality designs are readily available on online marketplaces like Etsy, where searching for terms like digital prints laser engrave file 3d ill will yield thousands of options created by artists specializing in this niche. Always scrutinize the example images and reviews; sellers who show photos of actual engraved results on wood are generally more reliable than those who only display a digital render.
Choosing Your Wooden Canvas
Once you have a pristine digital file, you must select a piece of wood that will complement, not compete with, the engraved illusion. The best wood types for this technique share a few key characteristics: a light, uniform color and a fine, closed grain. A busy or prominent grain pattern, like that found in oak or zebrawood, creates its own lines and shadows that will clash with the laser-etched details, effectively camouflaging the 3D effect. Similarly, a darker wood reduces the available dynamic range for contrast, making the illusion appear muddy and flat. For these reasons, the most recommended woods are:
- Basswood: Often considered the perfect starting point. It is very light in color, has an almost non-existent grain, and is soft enough to engrave deeply and cleanly, producing excellent contrast.
- Maple: A harder wood that offers a premium finish. Its tight grain and creamy white color provide a flawless canvas for crisp, high-detail engravings.
- Cherry: While slightly darker than maple or basswood, cherry has a fine, straight grain and a rich reddish-brown color that deepens beautifully when engraved. It provides a warm, high-contrast look that is very appealing.
Conversely, it’s best to avoid woods like pine, which contains inconsistent resin pockets that cause uneven burns, and red oak, whose large, open grain structure will disrupt the delicate shading of the illusion. Finally, many designs are enhanced when cut out from the larger piece of wood. For these projects, a good design package will often include both the raster file for the engraving and a corresponding vector file for the cutline. This allows you to create a complete 3D wood design laser cut piece, transforming a simple engraving into a standalone object of art.
Calibrating Your Laser Engraver for Depth
With a perfect design file and a choice piece of wood selected, the success of your project now rests entirely on the machine. The digital depth map is merely a set of instructions; your laser engraver is the instrument that must be finely tuned to interpret those instructions correctly. This calibration process involves dialing in the specific laser engraver settings that will translate the 256 shades of gray in your file into a corresponding range of physical depths and colors on the wood. The goal is to achieve a wide dynamic range, from the untouched surface of the wood (representing white) to a deep, dark burn (representing black), with a smooth, continuous gradient of shades in between. The primary parameters you will manipulate are Power, Speed, and DPI.
- Power: This setting controls the intensity of the laser beam. In your software, you will typically set a “Max Power” and a “Min Power”. Max Power corresponds to the black pixels in your design and should be set high enough to create a dark burn without excessive charring. Min Power corresponds to the white pixels and is often set to 0 or a very low value to leave the wood unmarked.
- Speed: This dictates how fast the laser head travels over the material. Speed and Power have an inverse relationship; a slower speed allows the laser more time to burn the wood at a given power setting, resulting in a darker mark. Finding the right balance is key to achieving smooth gradients.
- DPI (Dots Per Inch): This is the resolution of your engraving. A higher DPI means the laser makes more passes per inch, placing the burn lines closer together. For 3D illusions, a higher DPI (typically 300 or more) is essential to blend the lines and create a smooth, photorealistic shading effect, avoiding visible “banding” that can ruin the illusion.
It is also critical to ensure your software is set to the correct image mode. You must use a “Grayscale” or “Vary Power” setting. This mode directly links the laser’s power output to the grayscale value of each pixel. Avoid using “Dithering” modes (like Jarvis, Stucki, or Floyd-Steinberg), which use patterns of black dots to simulate shades of gray. While dithering is excellent for some applications, it will destroy the subtle gradients required for a convincing 3D illusion laser engraving.
Creating Your Calibration Test Grid
Never attempt a full-scale 3D engraving without first running a test grid on a scrap piece of the exact same wood you plan to use for your final project. This is the single most important step in calibration. The process involves creating a grid of squares and engraving each one with a different combination of speed and power to see how the wood reacts. Most laser software, like LightBurn, has a built-in “Material Test” generator that automates this process. To create a test, define a range of speeds (e.g., 1000 mm/min to 3000 mm/min) and a range of power levels (e.g., 20% to 100%). The software will generate a grid, engraving each square with a unique combination. Once the test is complete, examine the grid carefully. You are looking for the row or column that shows the widest range of distinct, evenly spaced shades from light tan to dark brown. The ideal setting is not necessarily the darkest one, but the one that gives you the most control and the smoothest gradient. This calibrated setting is the secret code that unlocks your laser’s ability to turn a flat image into a tangible optical illusion.
Post-Engraving Finishing Techniques
The hum of the laser fading away doesn’t signal the end of the project, but rather the beginning of the crucial final stage: finishing. A raw engraving, fresh off the machine, is often covered in a fine layer of soot and resinous residue. Left uncleaned, this residue will obscure fine details and become permanently sealed into the wood by any finish you apply. The post-engraving process can be broken down into two essential steps: a meticulous cleaning followed by a thoughtful application of a protective finish. This final 10% of the effort is what elevates a good engraving into a stunning, professional-quality piece of art, ensuring the 3D illusion is as crisp and impactful as possible.
The Crucial First Step: Cleaning
Before any sealant or oil touches the wood, the surface must be impeccably clean. The engraved areas, with their newly created textures and depths, are delicate and can be easily damaged by aggressive cleaning methods. Your primary goal is to remove the loose soot without sanding down the subtle peaks and valleys that form the illusion. The best approach is to work from the least aggressive method to the most, stopping as soon as the piece is clean. Start by using compressed air to blow away the majority of the loose dust and particles. Follow this with a very soft brush, like a drafting brush or a large, soft-bristled paintbrush, to gently whisk away any remaining surface residue. For more stubborn resin buildup, especially on woods like pine or cherry, lightly dampen a lint-free microfiber cloth with denatured alcohol or high-percentage isopropyl alcohol. Gently wipe the surface, moving with the grain of the wood where possible. The alcohol acts as a solvent for the resin but evaporates quickly, minimizing the risk of raising the wood grain, which can be a significant problem when using water. Never use stiff brushes or abrasives, as they will scratch the untouched surfaces and erode the fine details of your engraving.
Sealing and Enhancing the Illusion
With the wood clean and dry, it’s time to apply a finish. This step not only protects the wood from moisture, dirt, and UV damage but also dramatically enhances the 3D effect. A good finish deepens the color of the burned areas, making the shadows appear darker and richer, while adding a slight sheen or depth to the untouched wood, making the highlights pop. This increase in contrast is the key to amplifying the optical illusion. The type of finish you choose will depend on the desired final look.
- Spray Clear Coats (Lacquer or Polyurethane): This is often the easiest and most effective option. An aerosol spray allows you to apply a thin, even coat without a brush disturbing the delicate engraved surface. A satin or matte finish is usually preferable to gloss, as a high-gloss surface can create glare that interferes with the 3D illusion. Apply several light coats rather than one heavy one to prevent pooling.
- Penetrating Oils (Danish Oil, Tung Oil): These oils soak into the wood fibers, providing a more natural, “in the wood” finish rather than a film on top. They excel at darkening the engraved portions, significantly boosting contrast. To apply, wipe on a liberal coat, let it soak in for 15-20 minutes, then wipe off all the excess with a clean cloth. The downside is that they offer less surface protection than a film finish.
- Wax Finishes (Paste Wax): Wax provides a beautiful, low-sheen luster and a smooth feel. It offers minimal protection and is best used over a sealed surface (like one finished with shellac or oil) or for decorative pieces that won’t be handled often. It’s applied by buffing a thin layer into the wood with a soft cloth.
Regardless of your choice, the application of a finish is the final flourish that brings your 3D illusion laser engraving to life, transforming it from a simple burn on wood into a captivating piece of dimensional art.
Conclusions
You now have the foundational knowledge to create your own impressive 3D illusion laser engraving projects. By carefully selecting your design, preparing your material, and dialing in your settings, you can achieve amazing results. Don’t be afraid to experiment with different woods and designs to push the boundaries of your creativity and master this unique art form.
Frequently Asked Questions
Q: What’s the difference between 3D illusion engraving and true 3D carving?
A: 3D illusion engraving creates the perception of depth on a flat surface by using a laser to burn different shades of color, simulating light and shadow. True 3D carving physically removes material to create different height levels on the surface.
Q: What type of file do I need for 3D illusion engraving?
A: You need a high-resolution (300 DPI or higher) raster file, such as a PNG, BMP, or TIFF. These files contain the necessary pixel-by-pixel grayscale information (a “depth map”) that tells the laser how to vary its power. Vector files like SVG or DXF will not work for this technique.
Q: What are the best woods to use for this technique?
A: The best woods are light in color with a fine, uniform grain to maximize contrast and avoid visual interference. Top choices include Basswood, Maple, and Cherry. Avoid woods with prominent grains like oak or inconsistent textures like pine.
Q: Why is a material test grid so important?
A: A test grid is essential because every piece of wood and every laser is different. It allows you to find the exact speed and power settings that produce the widest and smoothest range of shades on your specific material, which is critical for a convincing illusion.
Q: How should I clean my project after engraving?
A: Start with the gentlest method. Use compressed air to blow off loose dust, followed by a very soft brush. For stubborn resin, use a lint-free cloth lightly dampened with denatured or isopropyl alcohol. Avoid water, stiff brushes, and abrasives.
Block "subscribe-popup" not found