Tips and Tricks
A Guide to 3D Illusion Laser Engraving on Wood
Sep
Estimated reading time: 9 minutes
Key Takeaways
- 3D laser engraving is an optical illusion that uses grayscale shading to simulate depth on a flat surface, rather than creating a true three-dimensional object.
- The best materials are light-colored, uniform, closed-grain hardwoods like Maple, Basswood, or Alder, as they provide a high-contrast canvas without visual interference from natural grain patterns.
- Success depends on using high-quality, high-resolution (300+ DPI) grayscale design files that act as “depth maps” with smooth tonal gradients.
- Mastering machine settings—specifically the interplay between Power, Speed, and DPI/LPI—is critical for translating the digital design into a convincing physical illusion.
Table of Contents
- The Art of Illusion: How 3D Laser Engraving Works
- Choosing Your Canvas: Best Woods and Designs for 3D Effects
- Dialing in the Details: Mastering Your Laser Engraving Settings
- Conclusions
- Frequently Asked Questions
Dive into the fascinating world of 3D illusion laser engraving. This article reveals the secrets behind creating depth and dimension on wood. We’ll guide you through selecting the right materials and design files, and mastering your machine’s settings to produce breathtaking, three-dimensional artwork that truly stands out. Let’s turn flat surfaces into captivating optical illusions.
Interested in more 3D Illusion? Check out our 3D Illusion laser file designs: Click here!
The Art of Illusion: How 3D Laser Engraving Works
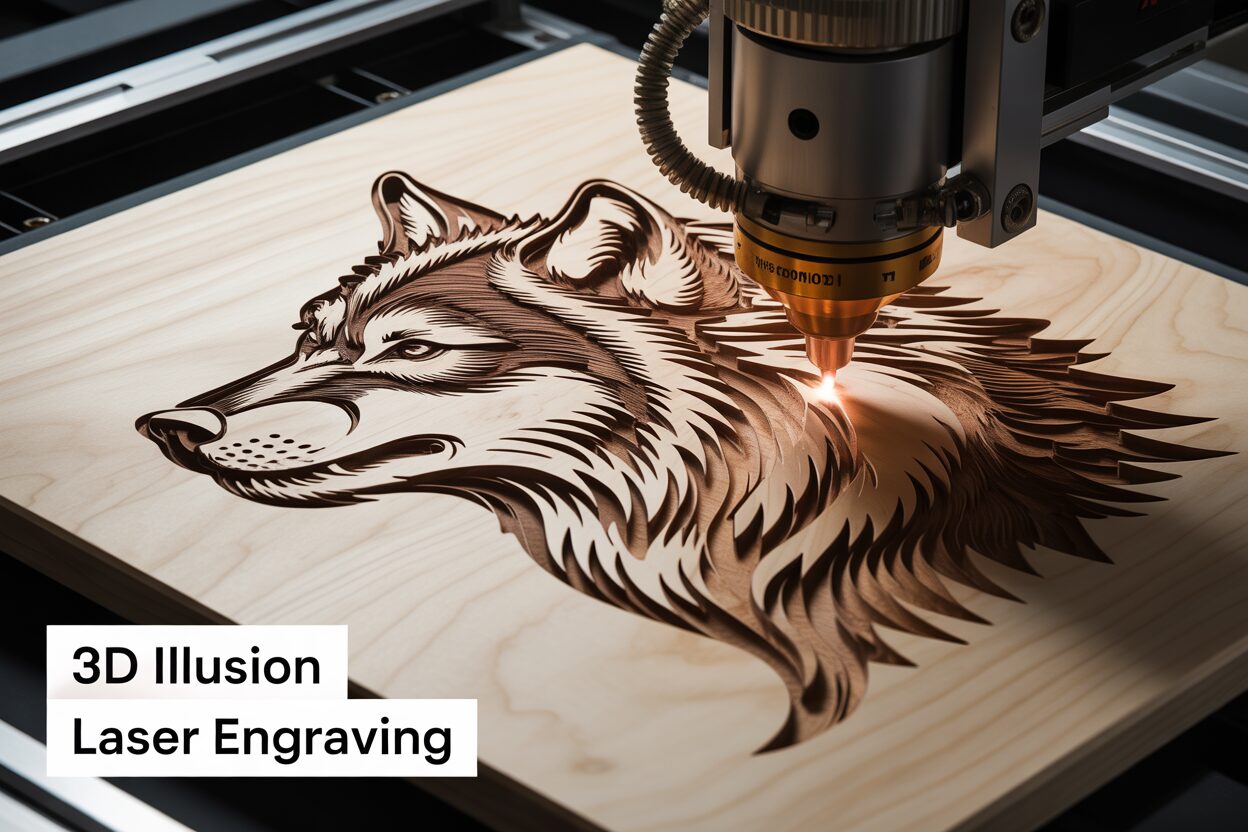
At first glance, the term 3D laser engraving might conjure images of a laser meticulously carving a miniature sculpture out of a block of wood. The reality, however, is both simpler and more fascinating. The process does not create a true, physically three-dimensional object; instead, it masterfully creates a powerful optical illusion of depth on a physically two-dimensional surface. The magic lies not in deep carving, but in tricking the human eye. Your laser engraver acts as an incredibly precise digital artist, using light and shadow to convince your brain that it’s seeing volume, texture, and dimension where there is only a subtle variation in surface depth and color. It’s a sophisticated interplay between technology, material science, and the very way we perceive the world.
The core principle behind this illusion is the manipulation of contrast. Think of a hyper-realistic pencil sketch. An artist doesn’t need to carve into the paper to make a sphere look round; they use meticulous shading. Dark, heavy graphite lines create the impression of shadows and receding surfaces, while the untouched white of the paper represents highlights, or the points closest to the viewer. Our brains automatically interpret this gradient of light to dark as form and depth. 3D laser engraving operates on this exact same principle. The laser beam becomes the artist’s pencil, and its power setting is the pressure applied.
The Laser’s Grayscale Language
To achieve this effect, the laser engraving designs are typically prepared as grayscale images. In this digital format, every pixel has a value ranging from pure black to pure white, with hundreds of shades of gray in between. The laser’s software interprets this grayscale information as a direct set of instructions for power output. Where the image is pure black, the software tells the laser to fire at a high power level (or move at a slow speed). This results in a deeper, darker burn that vaporizes more wood. This dark, recessed area is perceived by our eyes as a shadow or a surface that is farther away. Conversely, where the image is pure white, the laser is instructed to fire at a very low power or not at all, leaving the wood’s surface largely untouched and its natural light color intact. These light, raised areas act as highlights, appearing to pop out towards the viewer.
The true artistry happens in the gradients—the subtle transitions of gray between the black and white extremes. For every shade of gray in the design, the laser applies a corresponding, proportional level of power. A medium-gray pixel will result in a moderately deep, brownish burn. By precisely controlling the power for each tiny point of the engraving, the laser creates a seamless gradient of depth and color on the wood. It is this continuous tonal variation that our brains read as the smooth, curved surfaces, beveled edges, and intricate textures of a three-dimensional object. The final result is not just a flat image burned onto wood; it is a photorealistic relief that invites you to touch it to confirm what your eyes are seeing.
Choosing Your Canvas: Best Woods and Designs for 3D Effects
The success of a 3D illusion engraving hinges just as much on the materials and digital files you choose as it does on the laser itself. Selecting the right canvas and the right artwork is a foundational step that can make the difference between a flat, muddled burn and a breathtakingly realistic result. Not all woods or designs are created equal, and understanding their properties is key to mastering this technique.
The Ideal Wooden Canvas
When creating an optical illusion that relies on subtle gradients and contrast, the surface you engrave on must be as neutral and consistent as possible. This is why the best wood for laser engraving 3D effects is typically a closed-grain hardwood with a uniform, light color. The goal is to minimize any “visual noise” from the wood itself so that the engraved details can take center stage.
- Maple: Often considered the premier choice, Maple is hard, dense, and has an extremely fine, barely-there grain. Its pale, creamy color provides the perfect high-contrast background for the laser’s dark burns, allowing for a wide dynamic range from bright highlights to deep shadows.
- Basswood: A softer and more affordable option, Basswood is exceptionally uniform in both color and grain. It’s a favorite for its consistency, allowing the laser to create smooth, even burns without hitting unexpected hard or soft spots. Its softness means it engraves quickly, but it can also be more susceptible to scorching if settings aren’t dialed in.
- Alder: Like Maple, Alder has a fine, straight grain and a light, consistent color. It produces a rich, dark brown burn when engraved, creating excellent contrast. It contains minimal resin, which helps reduce sticky buildup during the engraving process.
Conversely, woods with prominent, open grain patterns, such as Oak or Ash, should generally be avoided for this type of work. The dark, sweeping lines of an Oak grain will physically and visually compete with the fine lines and shading of your engraving. The laser’s power will also be absorbed differently by the harder grain lines versus the softer wood between them, leading to an inconsistent, uneven depth and a disrupted illusion.
Selecting and Preparing Your Digital Design
The source file is the blueprint for your illusion. A low-quality image will always produce a low-quality engraving, no matter how perfect your wood or laser settings are. High-quality laser engraving designs for 3D effects are essentially detailed grayscale depth maps. Look for files with high resolution (300 DPI or higher) and, most importantly, smooth, well-defined gradients. Abrupt jumps from light to dark will create harsh, stepped edges rather than the soft, curved surfaces you’re aiming for. The design should have a full tonal range, from true blacks to bright whites, to maximize the perceived depth.
Beyond selecting a good file, file preparation is a critical wood engraving technique. Your laser software reads grayscale information, so if your image is in color, it must first be converted. During this conversion, you can adjust brightness and contrast to enhance the areas you want to appear deeper or shallower. For images that lack perfect gradients or to create a unique texture, dithering can be a powerful tool. Dithering is a process that uses patterns of tiny dots to simulate shades of gray. Algorithms like Floyd-Steinberg or Jarvis create finely scattered dot patterns that can fool the eye into seeing smooth tones from a distance, preventing banding and adding a distinct, almost stippled texture to the 3D effect. Experimenting with different dithering patterns in your software can unlock new artistic styles for your illusions.
Dialing in the Details: Mastering Your Laser Engraving Settings
With the right wood and a high-quality design file, you are ready to translate the digital grayscale map into a physical illusion. This is where you, the operator, become a crucial part of the process. Mastering the interplay of your machine’s settings is the final, critical step in creating a convincing 3D effect. Simply downloading a file and hitting “print” will rarely yield good results. Calibrating the laser engraving wood settings for your specific machine, laser wattage, and piece of wood is an art form in itself, requiring patience and a methodical approach. The primary variables you will control are power, speed, DPI/LPI, and focus.
The Fundamental Trio: Power, Speed, and Resolution
These three settings work in concert to determine the final look and feel of your engraving. Understanding their individual and combined effects is essential for achieving the subtle gradients that define 3D illusion work.
- Power: This is your primary tool for creating depth. As discussed, your laser’s software translates the grayscale values of your design into power commands. A setting of 100% power corresponds to the pure black areas of your image, creating the deepest, darkest burns that recede visually. Conversely, a low power setting, perhaps 1-10%, corresponds to the lightest grays, barely marking the wood’s surface to create highlights. The key to a good 3D effect is having a wide dynamic range between your minimum and maximum power settings to represent the full spectrum of grays.
- Speed: Speed is inversely related to power’s effect. It dictates how quickly the laser head moves across the material. A slower speed allows the laser beam to dwell on each spot for longer, resulting in a deeper, darker burn, much like holding a magnifying glass in the sun. A faster speed gives the beam less time to work, resulting in a lighter mark. Finding the sweet spot in the speed-power relationship is crucial. Too slow, and even your light gray areas might burn too dark; too fast, and your black areas may not have enough depth.
- DPI/LPI (Dots Per Inch/Lines Per Inch): This setting controls the resolution of your engraving. It determines how many lines the laser will engrave per inch. For laser etching wood with smooth, photorealistic 3D effects, a higher DPI/LPI is essential. A setting of 300 DPI or higher will cause the engraved lines to overlap slightly, blending them together to create seamless gradients. A lower resolution will leave visible gaps or “scan lines” between passes, which can severely disrupt the optical illusion. Be aware that doubling the DPI can nearly double the engraving time, so it’s a trade-off between detail and production speed.
Advanced Technique: Manipulating Focus
While standard engraving calls for a perfectly sharp focal point, 3D work allows for some creative manipulation. Intentionally setting your laser’s focus slightly out of focus (e.g., raising the Z-axis by 1-2mm) can produce a slightly wider laser beam. This can be advantageous for 3D illusions, as the softer, wider beam helps to further blend the scan lines, creating exceptionally smooth shading and a more natural, less “digital” appearance. This is an advanced technique best attempted after you have mastered the primary settings.
Because every laser and piece of wood is unique, a universal settings chart is impossible. The best practice is to create a test grid on a scrap piece of your project wood. Engrave a series of squares with varying power and speed settings to see firsthand how they interact. However, here is a conceptual starting point for a 40W CO2 laser:
- Wood Type: Maple
- Power: 10% (for white) to 70% (for black)
- Speed: 150 mm/s
- DPI/LPI: 340
- Focus: Standard or +1mm offset
Start with a test like this, observe the results, and adjust one variable at a time until you achieve a full, rich gradient from light tan to deep brown. Keep a detailed log of the settings that work for you—it will become your most valuable resource.
Conclusions
You now have the foundational knowledge to master 3D illusion laser engraving. By choosing the right wood, understanding design principles, and fine-tuning your settings, you can create incredible pieces. Experiment with different wood engraving techniques and materials to develop your unique style. We encourage you to apply these tips and elevate your creative projects to a new dimension.
Frequently Asked Questions
Q: Can I use any picture for 3D laser engraving?
A: Not directly. The best results come from high-resolution (300 DPI+) grayscale images specifically designed as depth maps with smooth gradients. A standard color photograph must be carefully converted to grayscale and optimized to adjust brightness and contrast to create the illusion of depth.
Q: Why is a wood like Oak not recommended for 3D engraving?
A: Oak has a prominent, open grain pattern with dark lines. These lines visually compete with the fine shading of the engraving, disrupting the 3D illusion. Additionally, the varying density between the grain and the softer wood causes the laser to engrave unevenly, further compromising the effect.
Q: What happens if my DPI/LPI setting is too low?
A: A low DPI/LPI setting will result in visible gaps or “scan lines” between each pass of the laser. This prevents the smooth blending of tones necessary for a convincing 3D optical illusion, making the final piece look pixelated or striped rather than photorealistic.
Block "subscribe-popup" not found