Tutorials
A Detailed Guide to Laser Engraving Photos on Wood
Nov
Estimated reading time: 8 minutes
Key Takeaways
- Wood Selection is Crucial: The best results come from light-colored woods with a tight, uniform grain, such as Alder, Basswood, and Maple. These woods provide high contrast and don’t obscure fine details.
- Digital Photo Preparation is Key: A high-resolution image (300 DPI) is essential. Before engraving, convert the photo to grayscale, significantly increase the contrast, and sharpen the details to ensure the image translates well onto wood.
- Master Your Settings Through Testing: The ideal power, speed, and DPI settings vary by wood and laser. Always perform a test engraving on a scrap piece of the same wood to find the perfect balance that yields rich blacks and clean whites without charring.
- Understand the Dithering Process: Lasers simulate grayscale shades by engraving patterns of tiny dots, a process called dithering. Experimenting with different dithering algorithms in your software is vital for achieving the desired texture and detail.
Table of Contents
- Choosing the Best Wood for Photo Engraving
- Preparing the Wood for Flawless Engraving
- Preparing Your Photos for Laser Engraving
- Understanding Dithering and Advanced Techniques
- Mastering Laser Engraving Settings for Photos
- The Art of the Test Engraving
- Troubleshooting Common Issues
- Conclusions
- Frequently Asked Questions
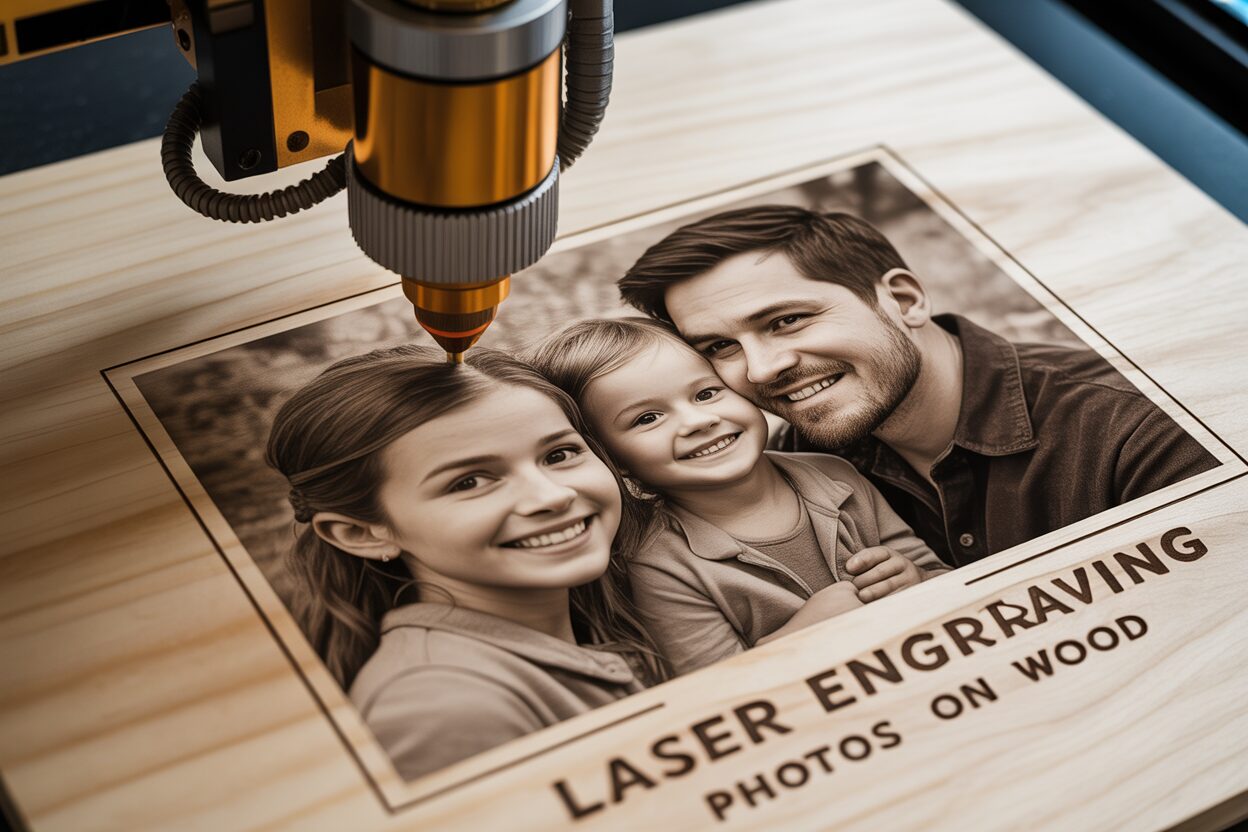
Discover the art of laser engraving photos on wood, a unique way to personalize gifts and create stunning decor. This tutorial provides essential tips and tricks for beginners and experts alike, ensuring high-quality results. We’ll explore everything from software and settings to wood selection and finishing touches, helping you master this popular and rewarding technique for creating beautiful, customized pieces.
Choosing the Best Wood for Photo Engraving
Choosing the right canvas is the first and most critical step in creating a beautiful engraved photo. The type of wood you select directly impacts the clarity, contrast, and overall quality of the final piece. When it comes to laser engraving photos on wood, not all species are created equal. The ideal choice depends on three primary characteristics: color, grain pattern, and hardness. A light-colored wood provides a high-contrast backdrop, making the dark, laser-etched details stand out vividly. A tight, uniform grain is essential because a heavy or inconsistent grain can interfere with the fine details of a photograph, creating distracting lines that disrupt the image. Finally, the wood’s hardness and resin content affect how it reacts to the laser, influencing the darkness of the burn and the crispness of the lines.
Finding the best wood for photo engraving involves balancing these factors. Fortunately, several types consistently deliver stunning results.
- Alder: Often considered the gold standard for photo engraving, Alder has a naturally light tan color with a reddish tint and a very fine, straight grain. Its uniform density allows the laser to produce a consistently dark and rich burn with minimal charring. This creates exceptional contrast and allows for the reproduction of subtle grayscale tones, making it perfect for detailed portraits and landscapes.
- Basswood: A favorite among hobbyists and professionals alike, Basswood is exceptionally soft, lightweight, and has an almost invisible grain. Its creamy white color provides a brilliant canvas for high-contrast engravings. Because it’s so soft, it requires less laser power, which can reduce the risk of excessive burning and allow for faster engraving speeds. It’s an excellent, budget-friendly choice for achieving crisp details.
- Maple: If you’re aiming for a premium, durable keepsake, Maple is a fantastic option. It is a very hard, dense wood with a light, creamy color and a subtle, fine grain. This density means it requires more laser power to engrave, but the result is an incredibly sharp and clean mark with no “bleeding” of the burn into the surrounding wood. This makes Maple one of the best choices for ultra-high-resolution photos where every tiny detail matters.
- Cherry: For a warmer, richer aesthetic, Cherry wood is an excellent choice. It has a beautiful reddish-brown hue that deepens with age and a fine, straight grain. While the contrast is slightly lower than on lighter woods like Maple or Alder, the engraving produces a deep, elegant tone that complements the wood’s natural beauty. It’s ideal for vintage-style photos or images where a softer, more classic look is desired.
While experimenting is part of the fun, some woods are notoriously difficult for photo engraving. Oak, for example, has a very prominent and coarse grain that often overpowers the details of an image. Softwoods like Pine have uneven densities (hard knots and soft areas) and a high resin content, which can lead to an inconsistent, splotchy burn. For the best results in laser engraving photos on wood, it’s wise to stick with the recommended hardwoods.
Preparing the Wood for Flawless Engraving
Once you have selected your wood, proper preparation is key to a flawless result. Even the best wood for photo engraving will yield poor results if the surface isn’t properly prepared. Start by ensuring the surface is perfectly smooth. Even if the wood feels smooth to the touch, sanding it will make a significant difference. Use a fine-grit sandpaper, such as 220-grit or higher, and sand with the direction of the grain. This eliminates any minor imperfections and allows the laser beam to maintain a consistent focal point across the entire surface, which is crucial for sharp details. After sanding, it’s essential to clean the wood thoroughly. Use a tack cloth or a lint-free cloth lightly dampened with denatured alcohol to wipe away all the sawdust and any natural oils from the surface. Any lingering dust can interfere with the laser, causing small imperfections in the final engraving. Ensure the wood is completely dry before placing it in your machine, as any moisture can cause the wood fibers to swell and result in a fuzzy, unclear engraving.
Preparing Your Photos for Laser Engraving
A pristine piece of wood is only half the equation; the digital preparation of your photograph is equally vital for a successful engraving. A laser doesn’t “see” a photo the way we do. It interprets a digital file as a map of instructions, telling it where to fire and with how much power. Optimizing this map is the key to transforming a flat image into a dynamic wooden keepsake. The first rule is to always start with the highest resolution image possible. A low-resolution photo will result in a blurry, pixelated engraving, as the laser has insufficient data to work with. Aim for a source image of at least 300 DPI (dots per inch) at the final intended engraving size. This ensures there is enough detail for the laser to render crisp lines and subtle transitions.
Most of the magic happens in post-processing, using image editing software like Adobe Photoshop, GIMP, or specialized laser photo engraving software like LightBurn or PhotoGrav. The process involves several key steps:
- Cropping and Sizing: First, crop your image to focus on the main subject and fit the dimensions of your wood piece. Remove any distracting backgrounds that might clutter the final engraving.
- Convert to Grayscale: Lasers don’t engrave in color; they burn shades of a single tone. Converting your image to grayscale (black and white) is a mandatory step. This allows you to see and adjust the tonal values that the laser will replicate.
- Adjust Contrast and Brightness: This is perhaps the most critical editing step. Photos that look perfectly balanced on a screen often appear flat or muddy when engraved. You need to exaggerate the tonal range. Increase the contrast significantly to make the dark areas darker and the light areas lighter. Use the Levels or Curves tool to eliminate mid-tone grays that don’t translate well on wood. You want distinct blacks, whites, and only a few mid-tones in between. Sharpening the image slightly using an “Unsharp Mask” filter can also help define edges and make details pop.
Understanding Dithering and Advanced Techniques
Once your image is edited, the final step before sending it to the laser is converting it into a format the machine can understand. Since a CO2 laser beam is essentially either on or off, it cannot create true grayscale shades by varying its power in a continuous way. Instead, it simulates shades using a process called dithering. Dithering converts the grayscale image into a pattern of tiny black dots. Denser clusters of dots create the illusion of dark areas, while sparse dots represent lighter shades. Most laser photo engraving software offers several dithering algorithms, such as Floyd-Steinberg, Jarvis, or Stucki, each producing a slightly different texture. Experimenting with these options is a core part of learning how to laser engrave a photo successfully, as some patterns work better for portraits while others excel at landscapes.
For those looking to add another layer of artistry, exploring 3d photo engraving is a great next step. This technique uses the grayscale values of an image to control the laser’s power output. The laser burns with higher power on the darker parts of the image and lower power on the lighter parts. This carves the image into the wood at varying depths, creating a tactile, bas-relief effect that you can feel as well as see. This adds incredible depth and a professional finish to your work, truly making the photo come alive on the wood.
Mastering Laser Engraving Settings for Photos
With your wood selected and your photo digitally optimized, you’ve reached the most hands-on stage: dialing in the machine itself. The quality of your final piece hinges on the delicate balance between three core parameters: power, speed, and DPI. These photo engraving settings are not universal; they vary based on your laser’s wattage, the specific type of wood, and the desired artistic effect. Think of them as the three legs of a stool—if one is off, the entire result will be unstable.
- Power: This setting determines the intensity of the laser beam. For laser engraving photos on wood, the goal is not to cut deep but to scorch the surface to create different shades. You’ll typically use a range of power, often setting a minimum and maximum value that corresponds to the black and white points in your image. A lower maximum power (e.g., 20-40% on a 60W laser) is often best for softer woods like Basswood to avoid excessive charring and capture subtle tones. Harder woods like Maple will require higher power to achieve a dark mark.
- Speed: This dictates how fast the laser head moves across the wood. Speed and power have an inverse relationship. A faster speed results in a lighter mark because the laser spends less time on any given spot. A slower speed produces a darker, deeper mark. For detailed photos, a moderate to high speed is often preferred to prevent the heat from “bleeding” into surrounding areas, which can blur fine details.
- DPI (Dots Per Inch): This setting, sometimes called LPI (Lines Per Inch), controls the resolution of the engraving. It determines how many lines the laser will engrave in one inch of space. A higher DPI (300-600) will pack the engraved lines closer together, creating a more detailed, photo-realistic image. However, a DPI that is too high for the wood can cause the lines to overlap, resulting in a dark, muddy appearance as the wood gets burned multiple times. Softer woods often benefit from a slightly lower DPI (around 250-350) to prevent this over-burning.
The Art of the Test Engraving
There is no magic formula for perfect photo engraving settings. The single most important practice you can adopt is performing a test engraving on a scrap piece of the exact same wood you’ll be using for your final project. Most laser photo engraving software includes a “material test” feature that allows you to create a grid of squares, each engraved with a different combination of power and speed. This grid will visually show you how the wood reacts to various settings, allowing you to choose the square that shows the best contrast and detail. For photos, you’re looking for a setting that produces a rich black without creating heavy char, and a clean, un-scorched surface for the white areas. This five-minute test will save you from potentially ruining a valuable piece of wood and a carefully prepared photo.
Troubleshooting Common Issues
Even with testing, you might run into problems. Here’s how to troubleshoot them:
- The Engraving is Too Dark or Charred: This is the most common issue. The cause is too much heat in one spot. To fix this, either increase the speed of the laser head or decrease the maximum power setting. You can also check your image file to ensure it doesn’t have excessively large black areas.
- The Engraving is Too Light or Lacks Contrast: The laser is not delivering enough energy. The solution is to decrease the speed or increase the maximum power. Also, revisit your photo preparation step; your image may lack sufficient contrast to begin with.
- Details are Blurry or Muddy: This can happen when the laser focus is incorrect or heat is bleeding between engraved lines. First, ensure your laser is perfectly focused on the wood surface. If the focus is correct, the issue is likely over-burning from lines being too close together. Try lowering the DPI setting to create more space between the engraved lines.
Conclusions
You now have the knowledge and skills to create beautiful laser-engraved photos on wood. With the right materials, software, and settings, you can turn any digital image into a lasting work of art. Experiment with different woods and techniques to develop your unique style. The possibilities are endless, so start creating your own personalized wooden treasures today and bring your favorite memories to life.
Frequently Asked Questions
Q: What is the single best wood for laser engraving photos?
A: While there are several great options, Alder is often considered the best choice for photo engraving. Its light color, minimal grain, and uniform density create exceptional contrast and allow for the reproduction of fine details and subtle grayscale tones with a rich, dark burn.
Q: Why does my engraved photo look muddy or blurry?
A: Blurriness can be caused by a few factors. First, check your laser focus—it must be precise. Second, your source image may be too low-resolution (aim for 300 DPI). Finally, you might be over-burning the wood due to a DPI setting that is too high, causing engraved lines to bleed into each other. Try lowering the DPI to create more space between the lines.
Q: How do I make my engraved photo darker?
A: To achieve a darker burn, you need to apply more energy to the wood. You can do this by either decreasing the laser’s speed (giving it more time on each spot) or increasing the laser’s maximum power setting. Also, ensure the dark areas of your digital photo are truly black by adjusting the contrast and levels before sending the file to the laser.
Q: What is dithering in laser engraving?
A: Dithering is a process used by laser software to simulate grayscale shades. Since a laser is typically either on or off, it can’t create a true gradient. Instead, it engraves a pattern of tiny dots. Areas with densely packed dots appear dark, while areas with sparse dots appear light. Different dithering algorithms (like Floyd-Steinberg or Jarvis) create different textures, so it’s worth experimenting to see which works best for your image.
Block "subscribe-popup" not found