Projects
A Deep Dive into 3D Illusion Laser Engraving
Dec
Estimated reading time: 6 minutes
Key Takeaways
- 3D illusion engraving uses a grayscale depth map where darker shades correspond to deeper laser cuts, creating varied physical depths on a flat surface.
- The three-dimensional effect is a visual illusion created by the interplay of real light and shadow on the engraved topography.
- Wood selection is critical; fine-grained, low-resin woods like Basswood, Alder, and Maple provide the best canvas for clear, detailed illusions.
- Mastering design software (e.g., Photoshop, GIMP) to create nuanced gradients and shading is essential for translating a 3D concept into a workable engraving file.
- This advanced technique can be a significant market differentiator for a laser engraving business, allowing for the creation of high-value, premium products.
Table of Contents
This article explores the fascinating world of 3D illusion laser engraving, a technique that adds depth and dimension to wood surfaces. We will delve into the nuances of creating these stunning visual effects, from the initial design to the final engraved product. Whether you’re a hobbyist or looking to start a laser engraving business, this guide will provide valuable insights into this captivating art form.
Interested in more 3D Illusion? Check out our 3D Illusion laser file designs: Click here!
The Magic Behind 3D Illusion Laser Engraving
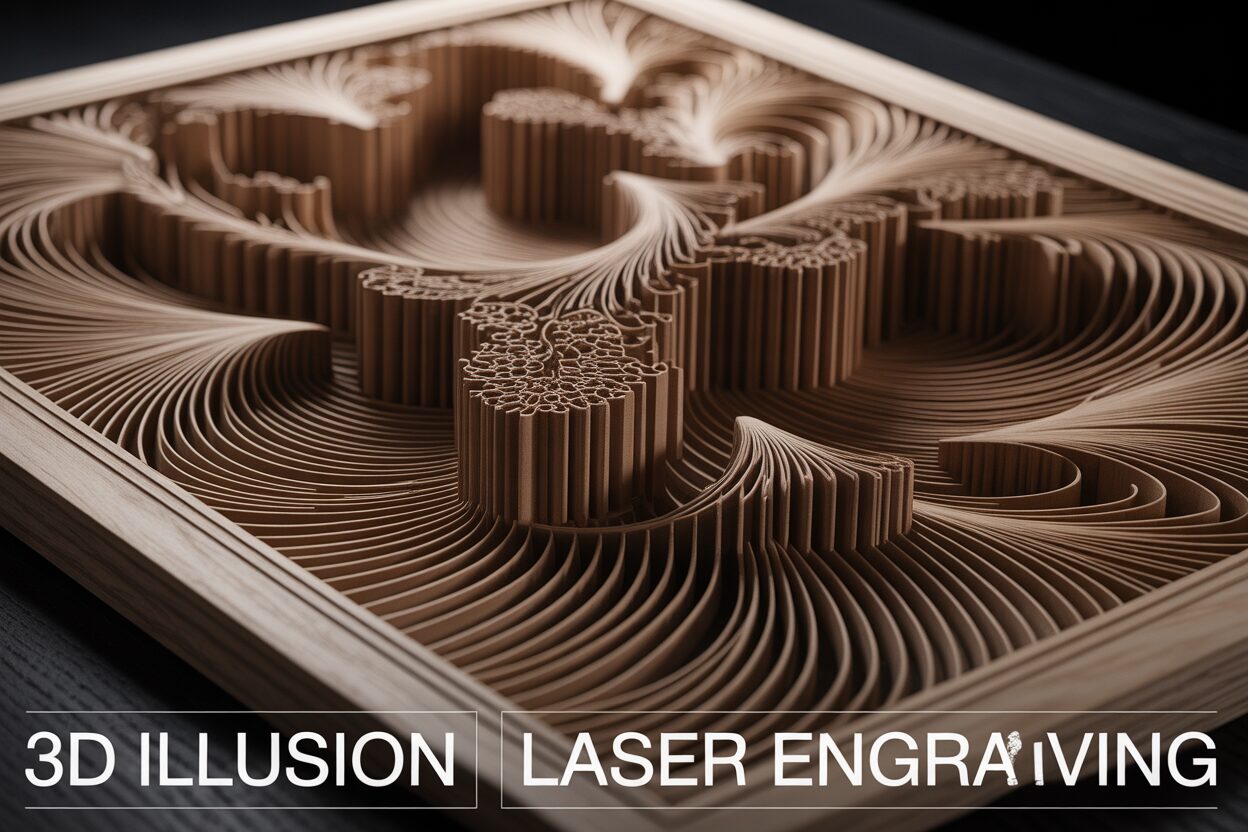
The stunning depth you see in a 3D illusion engraving isn’t the result of complex 3D carving but rather a brilliant deception played on the human eye. The magic lies in the precise manipulation of depth and shadow on a two-dimensional surface, a process governed entirely by the power of grayscale. Unlike standard line engraving, which simply traces outlines, this method uses a full spectrum of gray tones to inform the laser how deep to burn into the wood at every single point. It’s a technique that transforms a flat piece of wood into a canvas of topographical relief, where the image is sculpted rather than simply drawn.
The foundational principle is surprisingly straightforward: the darker the shade of gray in your source image, the deeper the laser will engrave. Think of your digital image as a depth map where each tone corresponds to a specific physical elevation on the wood.
- Pure black areas in the design tell the laser to operate at its maximum power setting, vaporizing the most material to create the deepest recesses.
- Pure white areas signal the laser to fire with zero power (or skip entirely), leaving the wood’s surface completely untouched and at its original height.
- Every shade of gray in between corresponds to a proportional laser power level. A 50% gray, for instance, will command the laser to fire at 50% of its set maximum power, creating a burn half as deep as the pure black areas.
This grayscale-to-depth mapping is one of the most sophisticated laser engraving techniques, allowing for incredibly nuanced results. The laser’s software meticulously reads the grayscale value of each pixel in your image—typically on a scale of 0 (black) to 255 (white)—and adjusts the laser’s intensity on the fly, effectively “painting with heat” to sculpt the wood.
Creating Depth Through Light and Shadow
While the laser creates varying physical depths, the true three-dimensional illusion comes to life only when light interacts with the finished piece. The engraved valleys and untouched peaks cast real, physical shadows, and it is our brain’s interpretation of this interplay between light and shade that constructs the perception of depth. The areas engraved from darker grays are deeper, thus casting longer and more defined shadows, which we perceive as being further away or more recessed. Conversely, the untouched white areas remain high, catching the light and appearing closer to the viewer. The success of the final piece is therefore heavily dependent on the quality of the 3D illusion design. The source image must be more than just a picture; it must be an expertly crafted map of highlights and shadows, pre-visualizing how the final carved surface will react to a light source. This careful planning within the design phase is what separates a flat-looking engraving from one that seems to pop off the surface, creating a truly mesmerizing piece of art. The laser is simply the tool that faithfully executes this carefully laid plan of light and shadow.
Choosing the Right Wood for 3D Engraving
The success of a 3D illusion engraving hinges on more than just a well-crafted design file; the canvas itself is of paramount importance. Not all woods are created equal when it comes to this intricate art form. The material’s inherent properties—its grain, density, color, and resin content—will dramatically influence the final outcome, either enhancing the illusion or obscuring it. Selecting the right wood is a critical step that ensures your engraving machine can translate the digital grayscale map into a physical object with maximum clarity and depth.
The ideal wood for 3D illusions has a fine, uniform grain pattern. Woods with a prominent or uneven grain, like oak or pine, create visual “noise” that competes with the subtle shadows of the engraving. The strong lines of the natural grain can disrupt the flow of the illusion, making it difficult for the eye to perceive the intended depth. Therefore, woods with a light color and a consistent, almost invisible grain are highly sought after. These materials provide a blank slate, allowing the engraved contrast to be the sole source of dimensional information. Equally important is the wood’s resin content. Woods high in sap or resin, such as pine, are problematic as they tend to burn unevenly, produce sticky residue that can coat your machine’s optics, and cause flare-ups that mar the surface. A low-resin hardwood is always the superior choice for clean, predictable results.
Top Wood Recommendations and Preparation
For achieving the best results in 3D wood engraving, certain species consistently outperform others due to their favorable characteristics. Here are some of the top choices for both beginners and professionals:
- Basswood: Often considered the perfect starting point, Basswood is soft, has a very light color, and features an extremely fine, straight grain. It engraves easily with lower power settings and produces a consistent, clean burn, making it ideal for detailed work.
- Alder: A fantastic all-around choice, Alder has a light tan color with a subtle grain. It engraves to a rich, dark brown, creating excellent contrast without requiring excessive laser power. It holds fine detail beautifully.
- Maple: Particularly Hard Maple, this wood is dense, light-colored, and incredibly durable. Its hardness allows for exceptionally crisp, sharp details that are difficult to achieve on softer woods. The resulting contrast is stunning, though it does require higher laser power or slower engraving speeds.
- Cherry: Known for its beautiful warm, reddish-brown hue that deepens over time, Cherry wood engraves with a deep, rich contrast. Its grain is fine and uniform, making it an excellent candidate for high-end, artistic 3D engravings.
Once you’ve selected your wood, proper preparation is key. The surface must be perfectly smooth and clean. Sand the wood with a fine-grit sandpaper (220-grit or higher) until it feels completely smooth to the touch. This ensures the laser maintains a consistent focal point across the entire piece, which is crucial for uniform depth. After sanding, thoroughly clean the surface with a tack cloth or a lint-free cloth lightly dampened with isopropyl alcohol to remove all dust and oils. This simple preparation prevents surface imperfections from being magnified during engraving and guarantees the cleanest possible result.
Mastering 3D Illusion Design
Creating a successful 3D illusion begins long before the laser fires; it is born in the digital canvas where the artist must learn to think not in terms of light and color, but in terms of elevation and depth. The entire process of crafting a compelling 3D illusion design relies on your ability to translate a three-dimensional concept into a two-dimensional grayscale depth map. For this task, raster-based image editing software is indispensable. Programs like Adobe Photoshop, GIMP, or Affinity Photo are ideal because they provide granular control over gradients, brushes, and tonal values, which are the fundamental tools for sculpting your illusion. The mindset shift is crucial: you are not drawing a picture, you are building a topographical map where every shade of gray represents a precise vertical instruction for the engraving machine.
The key to a convincing illusion lies in the masterful use of shading and gradients. Smooth, gradual transitions from light to dark are what create the appearance of curved, sloped, or rounded surfaces.
- A linear gradient, transitioning from white to black across a shape, will command the laser to engrave a smooth, inclined plane.
- A radial gradient, with white at the center and black at the edges, will produce a concave bowl or dome shape.
Manually painting highlights and shadows with soft-edged brushes allows for more organic and complex forms. Imagine you have a single light source shining on your virtual object. The surfaces closest to this light would be painted in the lightest grays (or pure white), while the areas in shadow and the deepest crevices would be painted in dark grays or pure black. Mastering this interplay of light and shadow is one of the most challenging but rewarding laser engraving techniques, as it is the artist’s skill, not the machine’s power, that breathes life into the wood.
Design for Commercial Success
For a laser engraving business, developing proficiency in 3D illusion engraving can be a powerful differentiator. While many competitors offer standard line art or simple photo engraving, the ability to produce items with tangible depth and texture sets your work apart and positions it as a premium product. You can offer unique products that are difficult to replicate, such as:
- Custom wooden portraits that have a bas-relief, sculptural quality.
- Business logos rendered with beveled edges and realistic depth.
- Intricate topographical maps of real-world locations or fantasy realms.
- Artistic pieces with abstract patterns that seem to ripple and wave.
These high-value, custom items command higher prices and appeal to a clientele seeking unique, handcrafted goods. By mastering the art of 3D illusion design, you transform your laser from a simple marking tool into a sophisticated sculpting instrument, opening up a new and profitable niche in the market.
Conclusions
In conclusion, 3D illusion laser engraving is an innovative technique that can elevate your woodworking projects to a new level. By mastering the right laser engraving techniques and using a reliable engraving machine, you can create breathtaking 3D illusion designs on wood. This skill is not only a creative outlet but also a viable way to produce unique products for your laser engraving business.
Frequently Asked Questions
Q: What is 3D illusion laser engraving?
A: It is an advanced technique that uses a grayscale image to control the laser’s power and depth. Darker areas in the image are engraved deeper into the material, creating a physical relief on a two-dimensional surface that mimics a 3D object.
Q: How does the 3D effect actually work?
A: The effect is a brilliant trick of the eye. The physically engraved depths cast real shadows when light hits the surface. Our brain interprets this interplay of light and shadow, creating the perception of depth and dimension, making the flat surface appear three-dimensional.
Q: What is the best type of wood for 3D illusion engraving?
A: The ideal wood has a light color, a fine and uniform grain, and low resin content. This provides a clean canvas for the illusion. Top choices include Basswood, Alder, Hard Maple, and Cherry.
Q: What software is needed to create a 3D illusion design?
A: You need raster-based image editing software that allows for precise control over grayscale values and gradients. Programs like Adobe Photoshop, GIMP, or Affinity Photo are perfect for creating the necessary depth maps for engraving.
Block "subscribe-popup" not found