Projects
A Comprehensive Guide to Laser Engraving Slate Coasters
Jun
Estimated reading time: 6 minutes
Key Takeaways
- Slate’s natural variations in color, texture, and thickness are part of its charm but require careful material selection and preparation for consistent engraving.
- Designing for slate emphasizes strong contrast and clear lines; vector graphics are ideal for sharp results, and test engravings are crucial for fine-tuning laser settings.
- Optimal laser parameters (power, speed, frequency) are key to crisp engravings, requiring iterative testing to balance depth and avoid chipping.
- Post-engraving cleanup is essential, and sealing the slate enhances durability, protects against stains, and improves the contrast of the engraved design.
- Laser engraved slate coasters offer vast creative potential for personalized gifts, home decor, or even a small business, with diverse design themes and strong market demand.
Table of Contents
- Understanding Slate as a Material for Laser Engraving
- Designing for Slate Coasters Artwork and Preparation
- Laser Engraving Techniques and Best Practices for Slate
- Project Ideas and Inspiration for Laser Engraved Slate Coasters
- Conclusions
Laser engraving slate coasters offers a unique way to personalize home decor or create custom gifts. This article dives into the essentials of laser engraving slate material, from choosing the right slate and preparing your designs to mastering engraving techniques. We’ll explore how to achieve professional results, troubleshoot common issues, and find inspiration for your slate coaster projects.
Understanding Slate as a Material for Laser Engraving
Slate, a fine-grained, foliated metamorphic rock, presents a unique and appealing medium for laser engraving, especially for creating items like coasters. Its natural beauty, durability, and the elegant contrast achieved through laser etching make it a popular choice. However, to achieve the best results when embarking on laser engraving slate coasters, it’s crucial to understand its inherent properties. Slate is a natural material, meaning each piece will exhibit variations in color, texture, and even thickness. Colors typically range from dark gray to black, though some varieties may have hints of green, purple, or red due to varying mineral content. Its surface can range from relatively smooth (honed) to more rugged and textured (riven or natural cleft). This natural variation is part of its charm, but it also means that consistency from one coaster blank to another can sometimes be a challenge. Slate is also relatively brittle and can chip or flake along its cleavage planes if not handled with care. In terms of its interaction with a CO2 laser, the laser beam ablates or fractures the surface, typically producing a light gray or whitish mark. This creates excellent contrast, particularly on darker slates, making designs pop. It’s important to note that slate can be somewhat porous, though less so than sandstone. This means unsealed engraved areas might be susceptible to staining over time if used as coasters for beverages that tend to leave marks.
Choosing and Preparing Your Slate
Not all slate is created equal when it comes to suitability for producing high-quality custom etched stone coasters. The ideal slate for laser engraving is generally one that is relatively flat, consistent in thickness, and has a smooth to moderately riven surface. Extremely rough or uneven surfaces can lead to inconsistent engraving depth and clarity, as the laser’s focal point may vary across the piece. While natural cleft slate offers a rustic appeal, honed slate, which has been ground to a smooth, flat surface, often provides more predictable and detailed engraving results, especially for intricate designs. Darker varieties, such as black or deep charcoal slate, are overwhelmingly preferred because they offer the most striking contrast with the lighter engraved mark. Lighter gray slates can be engraved, but the resulting design will be more subtle.
Sourcing quality slate blanks is a key first step. Many craft suppliers and online retailers specifically sell slate coaster blanks pre-cut to size and often pre-selected for engraving quality. These are usually a good starting point. Alternatively, slate tiles from hardware stores can be used, but their thickness, surface quality, and consistency can vary significantly. Always inspect slate for excessive flaking, cracks, or highly irregular surfaces before purchasing or using it. Once you have your slate, proper preparation is essential. The surface must be impeccably clean before it enters the laser engraver.
- Initial Cleaning: Wipe away any loose dust or debris. If the slate is particularly dirty, a gentle wash with mild soap and water can be effective, but ensure it is thoroughly dried afterward.
- Degreasing: The most crucial step is to remove any oils, fingerprints, or residues. A wipe-down with isopropyl alcohol (IPA) is highly recommended. Use a lint-free cloth and ensure the alcohol evaporates completely, leaving a pristine surface ready for the laser engraving slate coasters process. Any residue left on the surface can interfere with the laser, potentially causing uneven engraving or discoloration.
Finally, a brief note on safety: when laser engraving slate, fine particulate dust is produced. It’s imperative to use a laser system with adequate fume extraction and ventilation to manage this dust. Always wear appropriate laser safety glasses rated for your specific laser wavelength to protect your eyes. Handle freshly cut or engraved slate carefully, as edges can occasionally be sharp.
Designing for Slate Coasters Artwork and Preparation
Creating compelling artwork is fundamental to producing striking laser engraving slate coasters. Unlike printing on paper, engraving on slate involves removing or altering the surface material, which brings unique design considerations. The most significant factor is contrast. As discussed previously, laser engraving typically produces a lighter, often whitish-gray mark on dark slate. Therefore, designs that rely on strong positive and negative space, clear lines, and bold shapes tend to translate best. Intricate details can be achieved, but ultra-fine lines or very dense areas of small detail might not render as crisply as on smoother, more uniform materials. Think in terms of high contrast: black areas in your design will typically be where the laser engraves, resulting in the lighter mark on the slate. Grayscale images can also be engraved by dithering (converting shades of gray into patterns of dots or lines), but achieving smooth gradients requires careful calibration and testing. When working with photographs, they usually need to be converted to a high-contrast black and white image or a dithered pattern suitable for laser engraving. Avoid designs with large areas of solid engraving, as this can sometimes lead to a less uniform appearance or even overheating of the slate.
Optimizing Artwork and File Formats
To optimize your designs for etched stone coasters, simplicity often yields elegance. Vector graphics are highly recommended for most designs, especially logos, text, and geometric patterns. Vector files (such as .SVG, .AI, .DXF, .EPS) define images using mathematical equations, meaning they can be scaled to any size without loss of quality or pixelation. This is crucial for ensuring sharp edges and clear lines on your final product. Common software options for creating or editing vector designs include Adobe Illustrator, CorelDRAW, Inkscape (a free, open-source alternative), and Affinity Designer. For raster images (pixel-based, like .JPG, .PNG, .BMP, .TIFF), such as photographs or highly detailed illustrations, ensure they are high resolution (typically 300 DPI or higher at the intended engraving size). These will need to be processed, often through dithering algorithms within your laser software or a dedicated graphics program, to prepare them for a one-bit (engrave/don’t engrave) process.
When preparing text, choose fonts that are clear and legible. Very thin or script fonts with extremely delicate strokes might not engrave well, especially on more textured slate. Bold, sans-serif fonts often produce excellent results. For logos, ensure they are clean vector files, ideally in black and white. If the logo has multiple colors or gradients, it will need to be converted to a format suitable for single-color engraving. Intricate patterns, such as mandalas or Celtic knots, can look stunning on slate, but ensure the lines have sufficient thickness and spacing to prevent them from merging during engraving. Remember, the natural texture of the slate can sometimes interact with very fine details.
Test Engravings and Achieving Effects
Before committing to a full batch of laser engraving slate coasters, test engravings are absolutely essential. This cannot be stressed enough. Slate, being a natural material, can have variations even within the same batch. Test engravings allow you to fine-tune your laser’s power, speed, and frequency settings to achieve the desired depth, color, and clarity of the mark. Create a small test file with various elements: a snippet of text in the chosen font, a section of your logo, and a sample of any intricate patterns you plan to use. Engrave this on a spare piece of slate, or if slate is limited, on a similar-density, dark material as a preliminary check. While not identical, practicing on scrap wood, especially dark stained wood where the engraving also lightens the surface, can give you a rough idea of how your design might translate. This process is somewhat akin to understanding how to engrave wood coasters; each material requires its own experimentation phase.
For achieving different effects, minor adjustments to laser settings can make a difference. Higher power or slower speed will generally result in a deeper, potentially brighter engraving, but too much power can cause excessive chipping or a rougher finish. Lower power or faster speeds might produce a lighter, more subtle mark. Some laser software allows for different “fill” patterns (e.g., cross-hatch, raster lines) which can subtly alter the texture of the engraved area. Always document your settings for successful tests so you can replicate them consistently. Working iteratively—design, test, adjust—is key to mastering the art of engraving on slate and transforming your digital designs into beautifully tangible etched stone coasters.
Laser Engraving Techniques and Best Practices for Slate
Once your design is finalized and your slate coaster blank is meticulously cleaned, the actual process of laser engraving slate coasters begins. Secure the slate coaster firmly on the laser bed, ensuring it is perfectly flat and level. Unevenness can directly impact the focus of the laser beam, leading to inconsistent engraving depth. The core of successful slate engraving lies in dialing in the correct laser parameters: power, speed, and frequency (often expressed as PPI – Pulses Per Inch, or LPI – Lines Per Inch, depending on the laser software). Finding the optimal settings is often an iterative process. While manufacturers might provide baseline settings for slate, these are merely starting points. Much like how one might experiment with pressure and blade depth for engraving wood coaster with Cricut Maker (though the underlying technology is entirely different, the principle of material testing and iterative adjustment is analogous), laser engraving slate requires similar diligence to discover what combination yields the best results for your specific machine and the particular batch of slate you’re using. Always perform test engravings on scrap pieces or the back of a coaster before committing to your final pieces.
Optimizing Laser Parameters for Slate
Achieving the desired crisp, light-gray mark on dark slate involves a delicate balance of laser settings.
- Power: This determines the intensity of the laser beam. For slate, you generally want enough power to fracture or ablate the surface layer, creating the light mark, but not so much that it causes excessive chipping, deep gouges, or melts surrounding minerals excessively. Too little power will result in a faint, barely visible engrave. Start with a moderate power setting (e.g., 15-30% on a 40-60W CO2 laser, but this varies wildly between machines) and adjust based on test results.
- Speed: This dictates how quickly the laser head moves across the material. Faster speeds mean less laser exposure time for any given point, resulting in a lighter engrave. Slower speeds allow more energy to be imparted, leading to a deeper, potentially brighter mark, but can also increase the risk of overheating or chipping if power is also high.
- Frequency/PPI/LPI: Frequency (PPI) controls how many laser pulses are delivered per inch of travel. LPI determines the density of engraved lines when filling shapes. Higher PPI/LPI settings generally result in a smoother, more solid engraved appearance but can take longer and generate more heat. For slate, a moderate LPI (e.g., 250-500 LPI) is often sufficient. Too high an LPI with excessive power can pulverize the surface rather than creating a clean etch.
Laser focus is paramount. An out-of-focus laser beam will produce a blurry, indistinct engraving. Always ensure your laser is correctly focused for the thickness of your slate coaster. Air assist, which directs a stream of air at the engraving point, is also highly beneficial. It helps to clear away dust and debris generated during engraving, resulting in a cleaner mark and preventing residue from re-depositing and interfering with the laser.
Addressing Common Engraving Challenges
Several issues can arise when engraving slate. Uneven engraving is a common complaint, often resulting from varying slate density, an unlevel coaster surface, or inconsistent material thickness affecting the laser’s focal point. Ensure your slate is as flat as possible and your laser bed is level. If material thickness varies significantly, you may need to adjust focus for individual pieces. Chipped edges or excessive flaking can occur if the slate is particularly brittle or if the power setting is too high, especially near the edges of the design. Reducing power slightly or increasing speed can mitigate this. Some users find that applying masking tape over the slate before engraving can help reduce chipping, though it adds an extra step for removal. If you encounter excessive dust despite air assist, you may need to pause and clean the lens and the material more frequently during very long engraving jobs.
Post-Engraving Cleanup and Enhancement
Once engraving is complete, your custom etched stone coasters will require some cleanup. The surface will likely be covered in fine slate dust.
- Gently brush off loose dust with a soft brush.
- Wipe the surface with a slightly damp (not wet) lint-free cloth. Some find that a magic eraser, used gently, can help remove any stubborn residue.
- Allow the coaster to dry completely.
To enhance the appearance and durability, sealing the coasters is highly recommended. Sealing not only protects the slate from spills and stains (crucial for coaster functionality) but can also deepen the color of the unengraved slate, making the light-colored engraving stand out even more dramatically. Options include:
- Food-Safe Mineral Oil: Simply wipe on, let soak, and wipe off excess. It darkens the slate and enhances contrast beautifully. Reapplication may be needed over time.
- Stone Sealers: Available in spray or wipe-on forms, these provide more robust protection. Look for sealers designed for natural stone; matte finishes are generally preferred to retain the natural look of slate.
- Acrylic Sprays: Clear matte or satin acrylic sprays can also offer good protection. Apply thin, even coats.
Always test your chosen sealant on a scrap piece first to ensure you like the final look.
A brief note on how this differs from other materials: creating acrylic coasters laser cut (or engraved) involves entirely different laser interactions. Acrylic vaporizes cleanly when hit with a CO2 laser, often producing a frosted white mark on clear or colored acrylic when engraved at lower power, or smooth, flame-polished edges when cut at higher power. It doesn’t chip or fracture like slate, so settings and approaches (e.g., often higher speed for engraving, specific settings for cutting through) are distinct, showcasing how material properties dictate laser techniques.
Project Ideas and Inspiration for Laser Engraved Slate Coasters
The true joy of laser engraving slate coasters lies in the boundless creative possibilities they offer. Beyond simple text, the rich, dark surface of slate becomes a canvas for an array of styles and themes, transforming a functional item into a piece of art. The ability to precisely etch intricate designs allows for a high degree of personalization, making these coasters incredibly versatile for personal use, gifting, or even commercial ventures. Don’t be afraid to experiment; the journey of discovering what looks best on slate is part of the creative process. The subtle variations in the stone itself mean each coaster will have its own unique character, even when engraved with the same design. From minimalist elegance to expressive illustrations, the potential is vast.
Diverse Design Themes for Your Coasters
To spark your imagination, consider these popular and effective design avenues for your custom etched stone coasters:
- Personalized Monograms and Initials: A classic choice that exudes sophistication. Experiment with elegant script fonts, bold modern lettering, or intertwined initials. Consider adding a subtle laurel wreath or geometric border around the monogram for added flair. These make fantastic wedding or housewarming gifts.
- Inspirational Quotes and Sayings: Short, meaningful quotes, witty remarks, or even lines from favorite poems can turn a coaster into a daily dose of inspiration or humor. Choose fonts that match the mood of the quote – a whimsical font for a funny saying, or a classic serif for a profound statement.
- Intricate Patterns and Mandalas: The fine detail achievable with laser engraving lends itself beautifully to complex geometric patterns, Celtic knots, or mesmerizing mandalas. These designs can be incredibly eye-catching and showcase the precision of the engraving process.
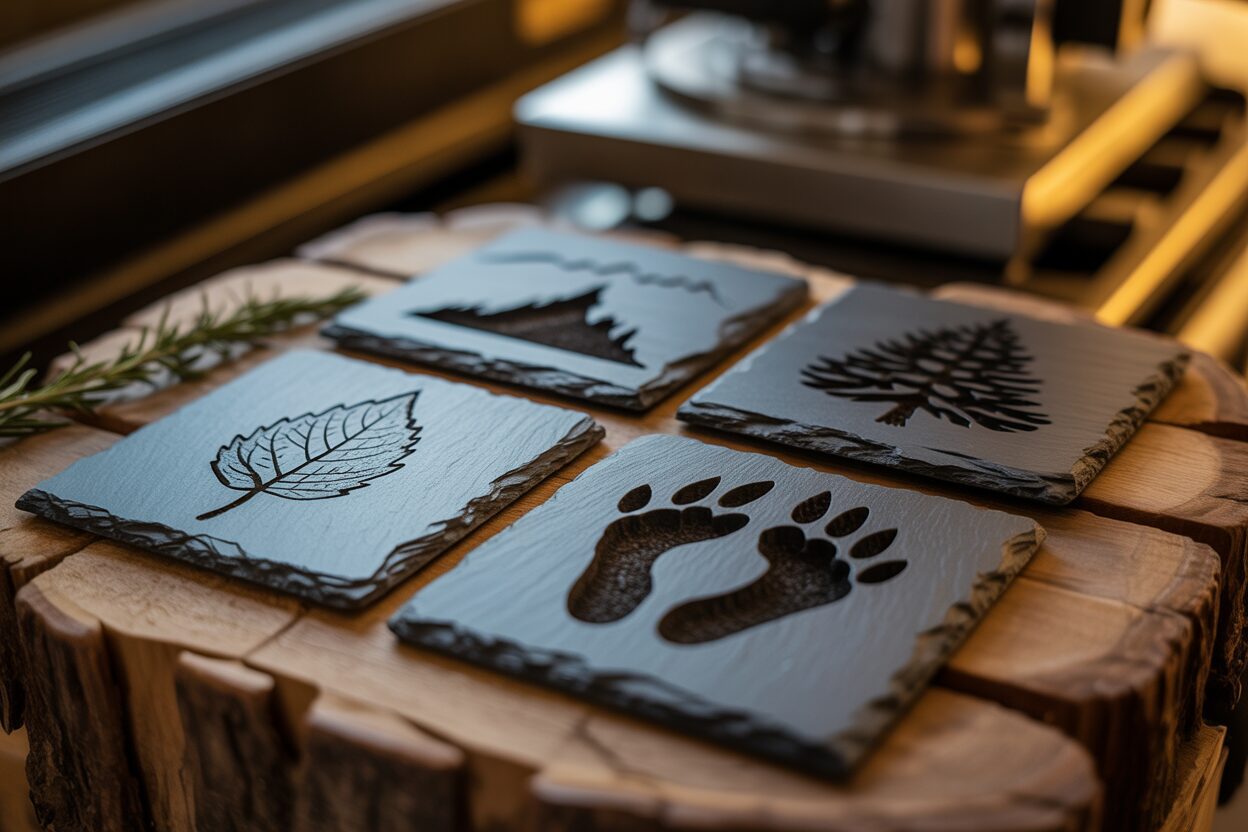
- Nature-Inspired Illustrations: Silhouettes of trees, mountains, animals (like deer, wolves, or birds), delicate leaf patterns, or constellations can create a rustic yet elegant feel, perfectly complementing the natural stone material.
- Geographic Coordinates or City Skylines: Commemorate a special place – a hometown, a wedding venue, or a favorite travel destination – by engraving its geographic coordinates or a stylized skyline. These are particularly popular as personalized gifts.
- Hobby and Interest Themes: For a more targeted gift, consider designs related to hobbies – musical notes for a musician, coffee beans for a coffee lover, a compass for an adventurer, or paw prints for a pet owner.
- Abstract Art and Textures: Don’t shy away from more abstract designs. Interesting line work, subtle textures, or minimalist geometric shapes can create very modern and stylish etched stone coasters.
Encourage experimentation. Combine elements, play with negative space, and see how different levels of detail translate onto the slate. The more you test and iterate, the more unique your creations will become.
From Hobby to Business: Marketing Your Coasters
If you find joy and success in creating laser engraving slate coasters, you might consider turning your hobby into a small business. The market for personalized and handcrafted items is strong, and slate coasters offer a unique, high-perceived value product. Firstly, high-quality photography is crucial. Showcase your coasters in appealing lifestyle settings – on a coffee table, with a steaming mug, or as part of a gift set. Capture the detail of the engraving and the natural beauty of the slate. Platforms like Etsy, Not On The High Street, Amazon Handmade, or even your own website or social media channels (Instagram, Facebook Marketplace) are excellent starting points.
Consider your target audience. Are you aiming for the wedding market? Then focus on designs for favors, bridal party gifts, or save-the-dates. Personalized gifts are always in demand; offer customization options such as names, dates, or custom messages. Corporate clients can also be a lucrative market. Offer branded promotional items, such as coasters engraved with company logos for client gifts or event giveaways. Networking at local craft fairs and markets can also be a great way to gain visibility and direct customer feedback. When pricing, factor in the cost of materials (slate blanks, packaging), your time (design, engraving, finishing), and any platform fees. Bundling coasters into sets of four or six, perhaps with an optional wooden holder, can increase the perceived value and average order size. Emphasize the handcrafted nature and the uniqueness of each piece due to the natural stone. By offering thoughtful designs and quality craftsmanship, your custom etched stone coasters can find a cherished place in many homes and businesses.
Conclusions
Laser engraving on slate coasters is a rewarding craft that combines technology with natural materials. By following the guidance in this article on slate selection, design preparation, and engraving best practices, you can produce beautiful and durable custom etched stone coasters. Experiment with different designs and techniques to unlock your creative potential and create truly unique pieces.
Frequently Asked Questions
Q: What types of slate are best for laser engraving slate coasters?
A: The ideal slate is generally one that is relatively flat, consistent in thickness, and has a smooth to moderately riven surface. Honed slate often provides more predictable and detailed results, and darker varieties like black or deep charcoal slate offer the most striking contrast.
Q: How do I prepare slate coasters for laser engraving?
A: Ensure the slate surface is impeccably clean. Start with an initial cleaning to remove loose dust, then degrease thoroughly with isopropyl alcohol (IPA) using a lint-free cloth. Allow it to dry completely to prevent interference with the laser.
Q: What are the key laser settings to optimize for slate engraving?
A: You need to balance power, speed, and frequency (PPI/LPI). Power determines intensity (fracture/ablate surface), speed dictates exposure time (lighter/deeper engrave), and frequency/LPI controls mark density. Test engravings are crucial for finding the optimal settings for your machine and slate batch.
Q: How can I prevent chipping or uneven engraving on slate?
A: Ensure your slate is flat and level on the laser bed. If material thickness varies, adjust focus for individual pieces. Reduce power slightly or increase speed if chipping or excessive flaking occurs. Applying masking tape before engraving can also help reduce chipping.
Q: Is it necessary to seal laser engraved slate coasters?
A: Yes, sealing is highly recommended to enhance appearance and durability. It protects against spills and stains, crucial for coasters, and can deepen the unengraved slate’s color, making the light engraving stand out more dramatically. Options include food-safe mineral oil or stone sealers.
Block "subscribe-popup" not found