Tips and Tricks
A Complete Guide to Finishing Laser Cut Wood
Dec
Estimated reading time: 7 minutes
Key Takeaways
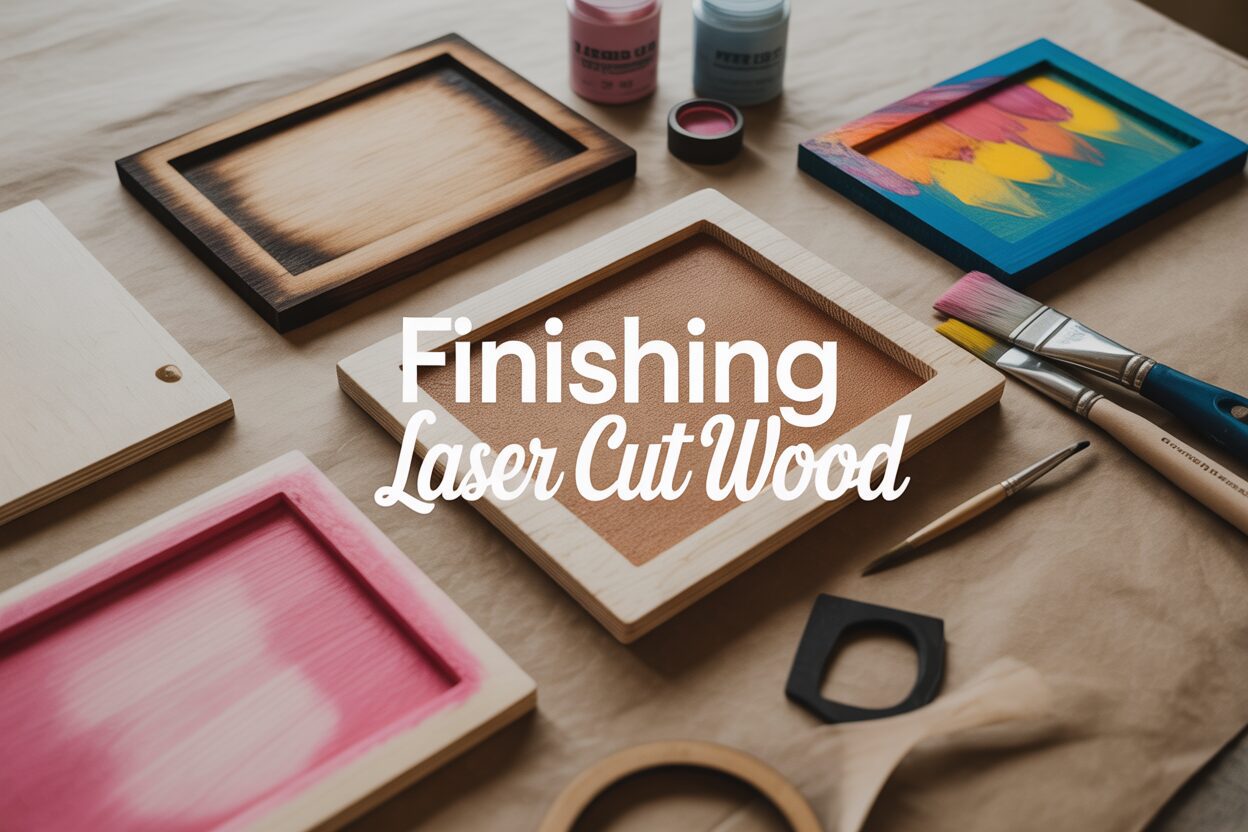
- Preparation is Paramount: Thoroughly cleaning laser residue with isopropyl alcohol and proper sanding (starting with 220-grit and finishing with 320/400-grit) are non-negotiable first steps for achieving a smooth, professional finish.
- Prime Before You Paint: Always apply a wood primer to seal the porous surface of laser-cut wood. This prevents blotchy results, ensures vibrant color, and helps paint adhere better for long-term durability.
- Master Intricate Details with Masking: For clean, crisp painted engravings, apply masking tape to the wood *before* the laser cutting process. This allows you to paint over the mask and then peel it away, leaving color only in the recessed areas.
- Seal for Longevity: The final step of applying a protective sealant (like polyurethane, lacquer, or shellac) is essential. It shields your project from moisture, UV damage, scratches, and dust, significantly extending its life and maintaining its appearance.
Table of Contents
- Initial Preparation: Sanding and Cleaning
- Bringing Your Project to Life With Paint
- The Final Step: Sealing and Protecting Your Work
- Conclusions
- Frequently Asked Questions
After the laser works its magic, the journey of a wooden creation isn’t over. The finishing process is what elevates a simple cutout into a professional-quality product. This guide explores the essential post-processing steps, from proper sanding and cleaning to vibrant painting techniques and protective sealing, ensuring your project looks its best and lasts for years to come.
Initial Preparation: Sanding and Cleaning
Your laser cutter has just completed its final pass, leaving you with a precisely cut wooden piece. While the machine has done the heavy lifting, your work has just begun. This initial preparation phase is arguably the most critical stage in the entire finishing process, as it lays the groundwork for everything that follows. A poorly prepared surface will never yield a professional result, no matter how carefully you apply paint or sealant. The first order of business is to thoroughly clean the wood to remove the byproducts of the laser cutting process.
Tackling Laser Residue and Soot
The intense heat of the laser vaporizes the wood, but it also leaves behind a fine layer of soot and resinous residue, often called ‘laser char’. This residue is most prominent on the cut edges, giving them their characteristic dark, sometimes sticky, appearance. Smoke can also settle on the top surface of the wood, creating a faint halo or haze around the cut lines. It is crucial to remove this residue because it will prevent paints, stains, and glues from adhering properly, leading to a splotchy finish or weak joints.
- For light surface dust and soot, a soft-bristled brush or a quick blast from a can of compressed air is often sufficient to clear away loose particles.
- For more stubborn residue, especially the sticky resin on the edges of woods like MDF or birch plywood, a cloth lightly dampened with isopropyl alcohol (IPA) works wonders. Lightly wipe the surfaces and edges. The alcohol acts as a solvent, breaking down the residue without oversaturating and warping the wood, and it evaporates quickly. Always use a clean section of the cloth for each wipe to avoid spreading the soot.
The Art of Sanding Laser Cut Wood
With the surface clean, the next step is sanding. Sanding accomplishes two goals: it removes any remaining laser haze from the wood’s surface and it smooths the grain, preparing it to accept a finish evenly. The choice of sandpaper grit is paramount for achieving the desired outcome without damaging your piece. Start with a medium-fine grit and progress to a finer one.
- Initial Sanding (220-grit): This is your workhorse grit. A 220-grit sandpaper is fine enough to avoid creating deep scratches but has enough bite to smooth the surface and remove any slight discoloration from the laser’s heat. When sanding the face of your piece, always move the sandpaper with the grain of the wood. Using a small sanding block will help apply even pressure and prevent you from accidentally rounding over the crisp edges.
- Fine Sanding (320 or 400-grit): After the initial pass with 220-grit, move to a finer 320 or 400-grit paper. This step further refines the surface, removing the microscopic scratches left by the previous grit. The result is a silky-smooth finish that feels wonderful to the touch and provides the perfect canvas for paint or clear coats.
Sanding intricate and delicate parts requires a gentle touch. To avoid snapping fragile details, lay the piece on a soft, non-slip surface like a silicone mat. Instead of moving the piece, move a small piece of folded sandpaper over it with your fingertips. For hard-to-reach internal cutouts, use sanding twigs, needle files, or wrap a small piece of sandpaper around a dowel. Remember that the goal is to smooth the flat surfaces; the dark, laser-sealed edges rarely require heavy sanding unless you specifically want to lighten them. A very light pass is usually all that’s needed to knock down any roughness. After your final sanding pass, wipe the piece down one last time with a tack cloth or a clean microfiber cloth to remove all sanding dust before proceeding to the next stage.
Bringing Your Project to Life With Paint
With your wood piece cleaned and sanded to a perfect smoothness, it’s time to add color and character. This stage can be incredibly rewarding, but it demands patience and the right techniques to achieve a professional finish. Before a single drop of paint touches the wood, the first step is priming. Bare wood, especially porous varieties like birch plywood or MDF, acts like a sponge. Applying paint directly will result in uneven absorption, a blotchy appearance, and wasted paint. A thin coat of wood primer seals these pores, creating a uniform, non-absorbent surface. This not only ensures your final color appears true and vibrant but also provides an excellent base for the paint to grip, preventing chipping and improving durability. For laser-cut items with fine details, a spray-on primer is often the best choice as it provides a thin, even coat without obscuring delicate engravings.
Choosing Your Coloring Medium
The medium you choose will define the final look of your project. Each has distinct properties suited for different applications on laser-cut wood.
- Acrylic Paints: Highly versatile and available in a vast spectrum of colors, acrylics are a popular choice. They are water-based, easy to clean, and dry quickly. They can be applied with brushes for a handcrafted look or thinned slightly with water and applied with a foam brush or mini roller to minimize brush strokes. However, their quick drying time means you must work efficiently to avoid a streaky finish.
- Wood Stains: If you want to enhance the natural beauty of the wood grain rather than cover it, a wood stain is the ideal option. Stains penetrate the wood fibers, adding color while allowing the grain to show through. A pre-stain wood conditioner is highly recommended, especially on softwoods and plywood, to prevent blotching. Be aware that the dark, sealed edges of laser-cut pieces will not absorb stain in the same way as the wood face.
- Spray Paints: For complex shapes or achieving a flawless, uniform finish, spray paint is unmatched. It provides excellent coverage quickly and without brush marks. The key to success is applying several very light, misting coats rather than one heavy one, which can pool and obscure fine details. Always work in a well-ventilated area and maintain a consistent distance from your piece.
Mastering Detail with Masking and In-Fills
One of the greatest advantages of laser cutting is the ability to create intricate engravings. Painting these details without making a mess requires a specific approach. Masking is your most powerful tool. By applying a low-tack transfer tape or masking film to your wood sheet before you laser cut and engrave, you create a protective barrier. The laser will cut through both the tape and the wood. This allows you to:
- Spray paint the entire piece, mask and all.
- Let the paint fully cure.
- Carefully peel away the masking tape using a weeding tool or tweezers, revealing the clean, unpainted wood surface beneath while leaving perfectly painted engraved areas.
For painting inside engravings after the fact, a common technique is to apply a thin coat of paint over the engraved area, ensuring it fills the recessed lines. While the paint is still wet or slightly tacky, use a cloth lightly dampened with isopropyl alcohol or a plastic razor blade held at a low angle to wipe or scrape the excess paint from the un-engraved surface. This leaves crisp, color-filled details that make your design pop. Always use light coats to prevent paint from bleeding into the wood grain along the edges of the engraving.
The Final Step: Sealing and Protecting Your Work
You have cleaned, sanded, and painted your laser-cut creation, and it looks fantastic. However, the process is not yet complete. The final, non-negotiable step is to apply a protective sealant. This clear top coat acts as a durable shield, safeguarding your hard work from the elements. It protects the wood from moisture which can cause warping and swelling, shields the colors from UV rays that can cause fading over time, and guards the surface against scratches, scuffs, and fingerprints from handling. Sealing is especially critical for sealing wood engravings, as it prevents dust and grime from settling into the fine details, making the piece easier to clean and maintain. Without this protective layer, your project remains vulnerable and its lifespan will be significantly shortened.
Choosing the Right Sealant and Sheen
The type of sealant you choose will impact both the durability and the final appearance of your project. Each has its own characteristics:
- Polyurethane: This is a highly durable and popular choice. Water-based polyurethane dries quickly, has low odor, and remains crystal clear, making it ideal for pieces with white or light-colored paint that you don’t want to yellow. Oil-based polyurethane offers superior durability and water resistance but takes longer to dry, has strong fumes, and imparts a slight amber hue that can warm up wood tones.
- Lacquer: Typically applied by spraying, lacquer provides a very hard, durable, and often high-gloss finish. It dries extremely fast, which allows for multiple coats to be applied in a short period. However, it requires a well-ventilated space due to its powerful fumes.
- Shellac: A natural, traditional finish made from the lac beetle. It’s easy to apply, dries fast, and gives the wood a warm, attractive glow. While beautiful, it is not as resistant to water, alcohol, or heat as polyurethane or lacquer, making it best suited for decorative items that won’t see heavy use.
In addition to the type of sealant, you must choose a sheen. This refers to the level of glossiness in the finish. A matte finish has no shine and is great for a natural or rustic look. A satin finish has a low-lustre, subtle sheen that is very forgiving and a popular all-around choice. A gloss finish is highly reflective, making colors appear more vibrant and deep, but it will also highlight any imperfections on the surface.
Application for a Perfect Finish
The key to a professional-looking sealed coat is thin, even application. For intricate laser cut wood projects, an aerosol spray sealant is often the best method. It allows you to apply a fine mist that coats all surfaces evenly without pooling in corners or obscuring engraved details.
- Work in a dust-free, well-ventilated area. Shake the can thoroughly as per the manufacturer’s instructions.
- Hold the can about 8-12 inches from the piece and apply a light, sweeping coat. It’s better to apply three thin coats than one thick, heavy coat, which can lead to drips and bubbles.
- Allow the coat to dry completely. For an ultra-smooth finish, you can lightly sand between coats (but not the final coat) with 400-grit sandpaper, then wipe away all dust with a tack cloth before applying the next coat.
If brushing, use a high-quality brush and apply a thin layer, moving in the direction of the wood grain. Avoid over-brushing, as this introduces air bubbles. This final sealing step ensures that your beautifully crafted piece is not just a project, but a lasting product.
Conclusions
Properly finishing your laser-cut wood is a critical step that enhances both beauty and durability. By mastering sanding, painting, and sealing, you can transform your creative ideas into stunning, professional pieces. Don’t skip these final touches; they are what truly bring your intricate laser cut wood projects to life and ensure they are cherished for a long time.
Frequently Asked Questions
Q: Why is sanding necessary for laser-cut wood?
A: Sanding is essential for two reasons. First, it removes the fine layer of soot and haze left by the laser. Second, it smooths the wood grain, which creates an even surface that allows paint, stain, and sealant to be absorbed uniformly, preventing a blotchy and unprofessional appearance.
Q: Do I have to seal my laser-cut wood project?
A: Absolutely. Sealing is a critical final step that should not be skipped. A good sealant protects the wood from moisture that causes warping, shields colors from UV-ray fading, and guards against scratches and fingerprints from handling, ensuring your project lasts for years.
Q: What’s the best way to paint small, engraved details?
A: The most effective method is to apply masking tape to the wood surface before laser cutting and engraving. This allows you to paint over the entire piece (mask and all) and then simply peel the tape away, leaving perfectly clean lines and paint only inside the engraved areas.
Q: What is the difference between water-based and oil-based polyurethane?
A: Water-based polyurethane is clear, has a low odor, and dries quickly, making it ideal for light-colored or painted pieces where you don’t want any yellowing. Oil-based polyurethane is generally more durable and water-resistant but imparts a slight amber tint to the wood, takes longer to dry, and has stronger fumes.
Block "subscribe-popup" not found