-
×
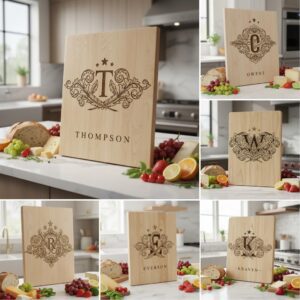 Vintage Crest Bundle, Charcuterie Board Designs, Elegant Monogram Family Name Art
1 × Original price was: $5.00.$3.50Current price is: $3.50.
Vintage Crest Bundle, Charcuterie Board Designs, Elegant Monogram Family Name Art
1 × Original price was: $5.00.$3.50Current price is: $3.50.(30% off)
-
×
 Funny Kitchen Humor Bundle, Charcuterie Board Engraving Designs, 20 Styles
1 × Original price was: $5.00.$3.50Current price is: $3.50.
Funny Kitchen Humor Bundle, Charcuterie Board Engraving Designs, 20 Styles
1 × Original price was: $5.00.$3.50Current price is: $3.50.(30% off)
-
×
Funny Charcuterie Board Engraving File, 21 Cracked Egg Designs, Kitchen Humor
1 × Original price was: $5.00.$3.75Current price is: $3.75.
(25% off)
 Funny Kitchen Humor Bundle, Charcuterie Board Engraving Designs, 20 Styles
  Funny Charcuterie Board Engraving File, 21 Cracked Egg Designs, Kitchen Humor
 Tutorials
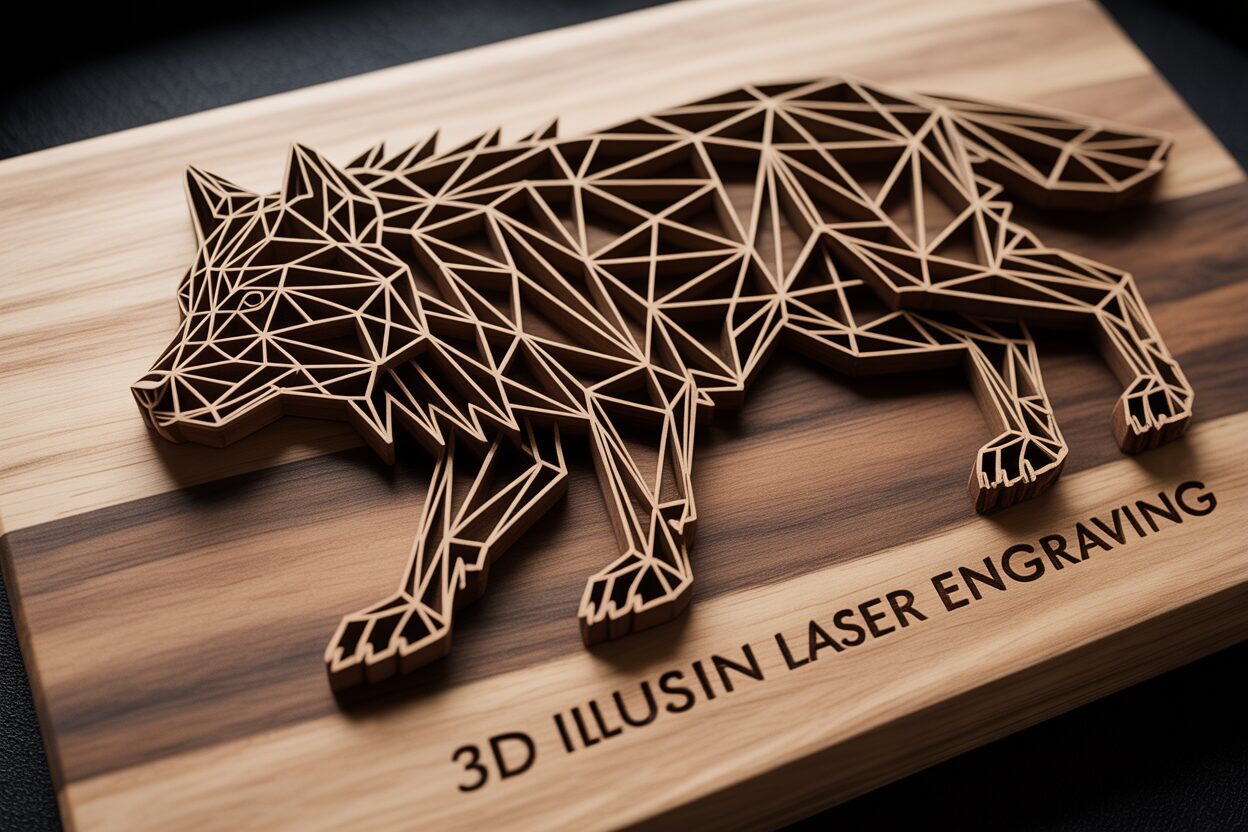
A Beginner’s Guide to 3D Illusion Laser Engraving
01
Jan
Jan
Estimated reading time: 10 minutes
Key Takeaways
- The Illusion of Depth: 3D illusion laser engraving uses grayscale images to control laser power, creating varying depths and shadows on a flat surface that trick the eye into perceiving a three-dimensional object.
- File Quality is Crucial: The success of the project hinges on using a high-resolution (300+ DPI) raster file (like PNG or BMP) with smooth, full-range grayscale gradients.
- Preparation and Setup are Key: A flawless result requires a perfectly sanded and cleaned wood surface, a securely fastened workpiece, and a precisely focused laser beam.
- Test Before You Engrave: Always run a test grid on a scrap piece of the same material to dial in the ideal power, speed, and DPI settings for your specific machine, wood, and design.
- Finishing Amplifies the Effect: Proper post-engraving cleaning followed by an application of a penetrating oil finish (like Danish or Tung oil) is essential for maximizing contrast and making the 3D illusion pop.
Table of Contents
- The Magic Behind 3D Illusion Laser Engraving
- Why It’s a Maker’s Favorite
- Choosing the Perfect Design File
- Raster vs. Vector and Where to Find Files
- Step-by-Step Guide to Engraving Your 3D Illusion
- Dialing in Your Software Settings
- Finishing Techniques and Creative Applications
- Choosing a Finish to Enhance the Illusion
- Conclusions
- Frequently Asked Questions
Dive into the fascinating world of 3D illusion laser engraving. This technique creates mesmerizing designs that appear three-dimensional, adding incredible depth to your projects. In this guide, we’ll walk you through the entire process, empowering you to turn simple wood pieces into extraordinary works of art and explore one of the most exciting laser engraver projects available.
The Magic Behind 3D Illusion Laser Engraving
At first glance, a 3D illusion engraving appears to be a complex, sculpted piece of art, with shapes and figures that seem to rise right off a flat wooden surface. But the magic isn’t in complex carving; it’s in a masterful deception of the eye. 3D illusion laser engraving is a technique that uses carefully controlled laser power to create varying depths and textures on a 2D material. These precise variations in depth interact with light to cast micro-shadows, which our brains instinctively interpret as three-dimensional form. Unlike true 3D carving, which physically removes large amounts of material to create a contoured object, this method relies on a much subtler, yet equally impactful, visual trick. The final piece remains almost entirely flat, but when viewed from the correct angle, the illusion of depth can be breathtakingly realistic.
The secret lies within the design file itself and how the laser interprets it. These designs are typically prepared as grayscale images. In this format, every shade from pure white to solid black represents a different instruction for the laser. When you send the file to your engraver, it translates these shades into power levels.
- Black Areas: The laser applies its highest power, burning deeper into the material. These deep valleys create the darkest, most pronounced shadows.
- Gray Areas: Intermediate shades of gray correspond to varying levels of laser power, resulting in shallower engravings. These create the subtle gradients and gentle slopes that define the object’s form.
- White Areas: The laser uses minimal to no power, leaving the material’s surface untouched. These high points catch the most light, acting as the highlights of your 3D object.
This interplay of light-catching peaks and shadow-casting valleys is what convinces your brain it’s seeing a fully rendered 3D object. The effect is often enhanced by specific line patterns within the design that curve and flow to further define contours and trick your eye into perceiving a rounded surface where none exists.
Why It’s a Maker’s Favorite
This technique has exploded in popularity within the maker community for several compelling reasons. First and foremost is the incredible “wow” factor. It allows creators to produce visually stunning pieces that look far more intricate and time-consuming to make than they actually are. This makes it one of the most rewarding laser engraver projects for beginners and experts alike, transforming simple items like coasters, plaques, and phone stands into high-value, artisanal products. Furthermore, it pushes the boundaries of what a hobbyist laser can achieve, moving beyond simple outlines and fills into the realm of photorealistic texture and depth. For anyone looking to create unique gifts or start a small business, mastering this skill offers a significant creative advantage. While the technique can be adapted for materials like slate or coated metals, wood is overwhelmingly the preferred medium. The natural warmth and grain of wood provide the perfect canvas. Woods like Basswood, Cherry, and Alder are ideal because of their light, uniform color and fine grain, which allows for crisp details and excellent contrast. The laser’s charring effect naturally darkens the engraved areas, perfectly enhancing the illusion of shadow and making wood the perfect partner for this captivating art form.
Choosing the Perfect Design File
The success of your project is determined long before the laser ever fires up; it begins with the selection of a high-quality design file. Not all images are created equal, and for this technique, the file is more than just a picture—it’s a precise topographical map for your laser. The best 3d illusion laser files are high-resolution raster images, typically in formats like PNG, BMP, or high-quality JPG. High resolution is non-negotiable because the laser interprets each pixel’s shade. A low-resolution file will result in visible pixelation or “stair-stepping” on your final piece, shattering the smooth, continuous illusion of depth you’re trying to create. Look for files with at least 300 DPI (dots per inch) for the best results.
A suitable design must have two key characteristics: smooth gradients and a full tonal range. The magic of the illusion comes from the gradual transition between light and dark areas. An ideal file will have soft, seamless shifts from black to grey to white, which the laser translates into the gentle slopes and curves of a three-dimensional object. Designs with harsh, abrupt changes in shade will look disjointed and flat. Equally important is the use of the full grayscale spectrum. A design that uses only mid-range grays will lack contrast and appear washed out. You need deep, pure blacks to create the darkest shadows and pure whites for the brightest highlights to truly make the image pop. Many of the most effective designs also incorporate fine line patterns that flow along the object’s contours, further enhancing the brain’s perception of shape and volume.
Raster vs. Vector and Where to Find Files
In the world of digital design, you’ll encounter two main file types: raster and vector. Vector files use mathematical equations to draw lines and curves, making them infinitely scalable without losing quality. They are perfect for cutting outlines and engraving simple logos. However, for 3D illusion engraving, you need a raster file. Raster images are made up of a grid of pixels, and it’s the specific grayscale value of each individual pixel that tells the laser how much power to use at that exact point. This pixel-by-pixel instruction is what allows for the detailed shading needed for the illusion. In short, this technique is fundamentally a raster engraving process.
Finding high-quality 3d laser engraving files is easier than ever. Digital marketplaces like Etsy are filled with independent creators selling designs specifically for this purpose. Larger design resource websites also have extensive libraries. For those starting out, it’s often best to use files from a trusted source to ensure they have been properly designed and tested for laser engraving. To ensure you start with a proven design, exploring curated collections is a great idea. For instance, browsing our own categories for ready-to-use files will give you access to designs that have been specifically created and optimized for this stunning effect. Additionally, many online communities and forums for laser enthusiasts are great places to find shared files and get recommendations from other makers. Just be sure to verify the quality and resolution before you start your project.
Step-by-Step Guide to Engraving Your 3D Illusion
With your chosen design file and a piece of wood ready, it’s time to bring your illusion to life. Following a methodical process is key to achieving a clean, detailed, and convincing 3D effect. This guide will walk you through the essential steps, from preparing your material to running the final job.
- Prepare the Wood Surface: A flawless surface is the foundation of a great engraving. Start by sanding your wood with a fine-grit sandpaper, something around 220-grit works well. The goal is to create a perfectly smooth, uniform surface, removing any machine marks, minor scratches, or imperfections from the wood. Any divot or inconsistency in the surface can disrupt the way light hits the final engraving, weakening the illusion. After sanding, it’s crucial to clean the surface thoroughly. Use a tack cloth, a microfiber towel, or compressed air to remove every speck of dust. Lingering sawdust can interfere with the laser beam, causing small imperfections and flare-ups that mar the final result.
- Set Up Your Laser Engraver: Precision is paramount. First, place your prepared wood into the laser bed and secure it firmly. Even a minuscule shift during the engraving process can cause ghosting or misaligned lines, ruining the project. Use honeycomb pins, hold-down clamps, or heavy weights at the edges to ensure it doesn’t move. Next, focus your laser. This is arguably the most critical machine setup step. An improperly focused laser will produce soft, blurry lines instead of the crisp, sharp details needed for the micro-shadows that create the 3D effect. Use your machine’s focusing tool and set the distance perfectly according to the manufacturer’s instructions for your specific material thickness.
Dialing in Your Software Settings
This is where you translate the digital design into physical instructions for the laser. After importing your 3d illusion laser files into your software (like LightBurn or RDWorks), you’ll need to configure the engraving parameters. These settings will vary significantly between different laser wattages, wood types, and even specific design files. This is why a test run is not just recommended—it’s essential. Before committing to your final piece, take a scrap of the same wood you just prepared and run a power/speed test grid on a small section of your design. This will show you exactly how different settings affect the depth and darkness, allowing you to find the perfect combination for maximum contrast and depth.
- Power: Unlike a simple engraving, you’ll set a power range. Set a low minimum power (e.g., 0-10%) which will correspond to the white areas of your design, and a high maximum power (e.g., 70-90%) for the black areas. This allows the software to dynamically adjust the power based on the grayscale shades.
- Speed: Slower speeds generally produce a darker burn and deeper engraving, which enhances contrast. A good starting point for a diode laser might be around 1000-2000 mm/min, while a CO2 laser can run much faster. Your test grid will reveal the ideal speed.
- DPI (Dots Per Inch): This setting determines the resolution of your engraving. A higher DPI means more lines per inch and finer detail, but also a significantly longer engraving time. For most wood projects, a DPI between 300 and 600 provides an excellent balance of detail and efficiency.
- Run and Monitor the Job: Once your settings are dialed in from your test run, it’s time to engrave the final piece. Frame the job to ensure the placement is correct, double-check your focus, and start the machine. 3D illusion engravings can take a considerable amount of time, often hours for larger pieces. Never leave your laser engraver running unattended. Stay nearby to monitor the process for any potential issues, such as flare-ups. Be patient, and watch as the intricate play of light and shadow slowly emerges from the flat surface of the wood, revealing the magic you’ve orchestrated.
Finishing Techniques and Creative Applications
Once the hum of your laser fades and the smoke clears, your project isn’t quite finished. The surface will be covered in a fine layer of soot and resinous residue, which can obscure the fine details and mute the contrast that is so vital to the 3D effect. The first step in post-processing is a thorough but gentle cleaning. Using a soft-bristled brush, like a clean toothbrush or a paintbrush, lightly whisk away the loose debris from the engraved area. Be careful not to scrub too hard, as you could damage the delicate peaks of the engraving. For more stubborn residue, dampen a lint-free cloth or a shop towel with isopropyl alcohol or denatured alcohol. Gently wipe the surface, moving with the grain of the wood. The alcohol will evaporate quickly and is very effective at dissolving the sticky resin without raising the wood grain. The goal is to make the un-engraved, lighter areas of the wood pristine, which maximizes the visual contrast against the dark, charred valleys.
Choosing a Finish to Enhance the Illusion
Applying a finish not only protects your woodwork but can dramatically enhance the perceived depth of the engraving. The right finish will make the darks appear darker and the lights richer, causing the 3d illusion laser engraving to truly pop. Your choice of finish will have a significant impact on the final look:
- Penetrating Oils: Finishes like Danish oil, Tung oil, or even simple mineral oil are often the best choice. They soak into the wood fibers, enriching the natural color and grain. Most importantly, they give the entire piece a “wet look,” which makes the charred, dark areas of the engraving appear significantly deeper and blacker. This boost in contrast is the single most effective way to amplify the 3D illusion. Apply a light coat with a cloth, let it penetrate for the recommended time, and then wipe away any excess.
- Clear Coats (Lacquer, Polyurethane, Shellac): These form a protective film on the surface. While they offer superior protection against moisture and wear, be mindful of the sheen. A high-gloss finish can create reflections and glare that compete with the subtle play of light and shadow, potentially weakening the illusion. If you opt for a clear coat, a satin or matte finish is highly recommended as it protects the piece without introducing distracting reflections.
- Stains: Applying a wood stain after engraving is generally not recommended. The porous, charred areas will soak up the stain much more than the sealed surface of the raw wood, often resulting in a muddy, low-contrast appearance that kills the illusion.
With your masterpiece cleaned and finished, it’s time to think beyond a simple engraved square. This technique is a powerful tool to be integrated into larger and more complex laser engraver projects. Imagine creating a custom keepsake box where the lid features a stunning 3D illusion of a family crest or an intricate geometric pattern. You can combine this skill with your machine’s cutting capabilities to produce truly unique items. For example, design a multi-layered sign where the back layer is a solid shape cut from wood, and the front layer has a cutout window showcasing a detailed 3D engraving. These kinds of wood cutting ideas elevate your work from a simple engraving to a multi-dimensional art piece. Think about creating custom coasters, intricate wall art panels, or personalized book covers. By merging 3D engraving with traditional vector cutting and scoring, you unlock a whole new level of creativity and can produce professional-quality items that are guaranteed to captivate anyone who sees them.
Conclusions
You now have the knowledge to create your own stunning 3D illusion laser engraving projects. By selecting the right design, calibrating your laser, and applying careful finishing touches, you can produce incredible pieces. Don’t be afraid to experiment with different wood cutting ideas and designs. Embrace this technique to elevate your craft and amaze your audience with unique, eye-catching creations.
Frequently Asked Questions
Q: What is the best type of wood for 3D illusion engraving?
A: Light-colored, uniform woods with a fine grain like Basswood, Cherry, and Alder are ideal. They provide excellent natural contrast when charred and can hold crisp, fine details, which are essential for the illusion to work effectively.Interested in more 3D Illusion? Check out our 3D Illusion laser file designs: Click here!
Q: Can I use a vector file for 3D illusion engraving?
A: No, this technique fundamentally requires a raster file (like PNG, BMP, or high-quality JPG). The laser needs the grayscale pixel data from a raster image to dynamically vary its power and create the different depths needed for the illusion.
Q: Why is my 3D engraving coming out blurry or soft?
A: The most common cause of a blurry engraving is an improperly focused laser. Double-check your focus distance for your specific material thickness. Other causes can include using a low-resolution source file or running the job at too high a speed for the desired level of detail.
Q: How do I clean my project after engraving?
A: First, use a soft-bristled brush (like a toothbrush) to gently remove all loose soot and debris. For any remaining resin or residue, lightly wipe the surface with a lint-free cloth dampened with isopropyl or denatured alcohol.
Q: Do I need a special or expensive laser engraver to do this?
A: Not necessarily. Most modern diode and CO2 laser engravers that can interpret grayscale engraving are capable of this technique. The keys to success are a high-quality design file and correctly configured software settings, not necessarily the cost of the machine.
Block "subscribe-popup" not found