Tutorials
A Beginner’s Guide to 3D Illusion Laser Engraving
Dec
Estimated reading time: 7 minutes
Key Takeaways
- Grayscale is Key: 3D illusion engraving works by translating a grayscale depth map into varying laser power levels. Black represents the deepest cuts, white represents untouched surfaces, and shades of gray create a physical relief that tricks the eye.
- Material Matters: The best results are achieved on light-colored hardwoods with a tight, uniform grain. Woods like basswood, cherry, and maple provide a clean canvas that doesn’t interfere with the laser-etched shadows.
- Settings are Crucial: You must use the “Grayscale” image mode in your laser software, not a dithering pattern. Always perform a material test to find the optimal balance of power, speed, and DPI for each specific piece of wood.
- Finishing is Essential: Proper cleaning to remove soot, followed by the application of a penetrating oil or a matte/satin finish, is a critical final step. This dramatically enhances the contrast and makes the 3D effect “pop.”
Table of Contents
- What Is 3D Illusion Laser Engraving
From Grayscale to Depth: The Magic of Mapping
3D Illusion vs. 3D Photo Engraving: What’s the Difference? - Choosing the Right Designs and Materials
Finding the Perfect Digital Blueprint - Perfecting Your Laser Engraving Settings
Preparing Your Artwork and Laser Software
Starting Point Settings for Common Woods - The Engraving Process and Finishing Touches
From Soot to Shine: The Cleaning and Finishing Process
Sealing the Deal: Applying a Finish - Conclusions
- Frequently Asked Questions
Dive into the captivating world of 3D illusion laser engraving. This technique adds incredible depth and dimension to your projects, turning simple pieces of wood into stunning works of art. In this guide, we’ll walk you through the entire process, from selecting the perfect 3d illusion laser files to mastering the art of laser engraving on wood for a mind-bending 3D effect.
Interested in more 3D Illusion? Check out our 3D Illusion laser file designs: Click here!
What Is 3D Illusion Laser Engraving
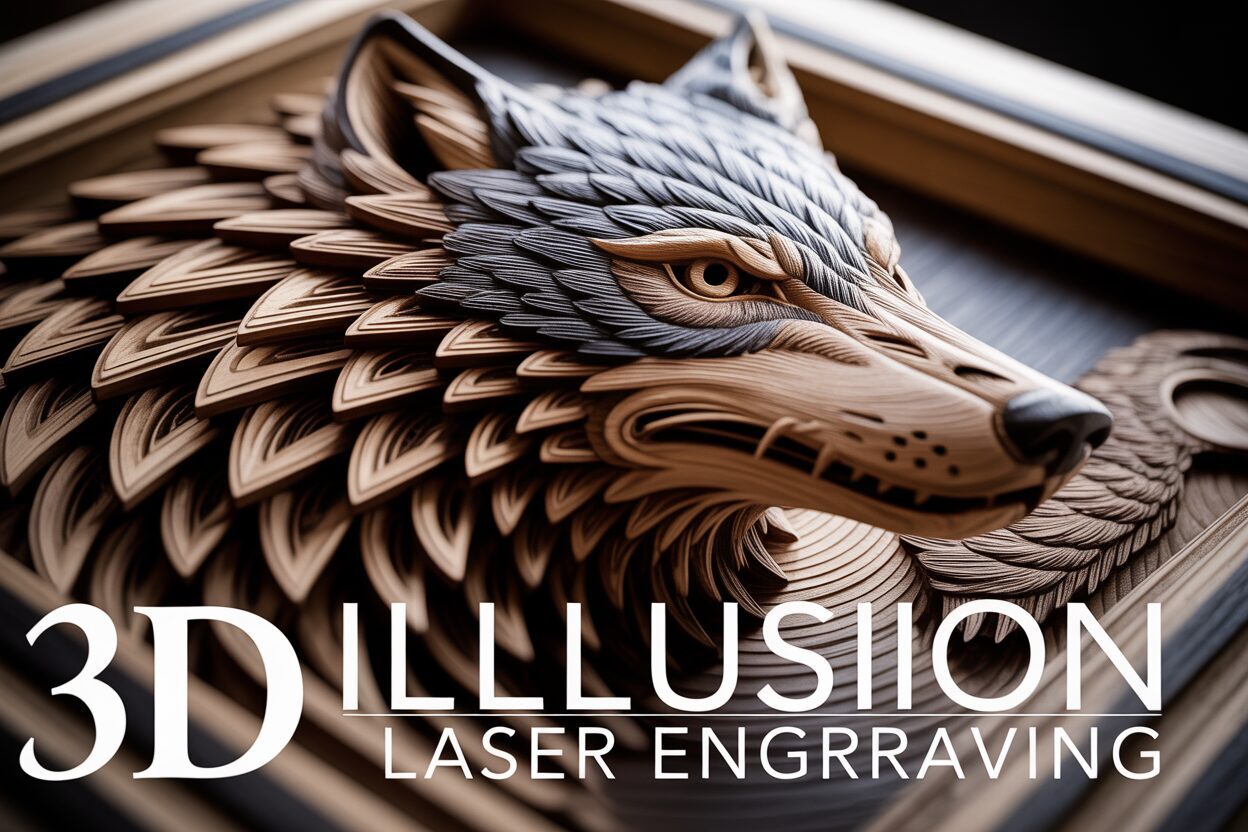
At its heart, 3D illusion laser engraving is a fascinating technique that tricks the eye into seeing depth and dimension on a perfectly flat piece of material, like wood. Unlike traditional engraving, which typically creates sharp, uniform lines or fills, this method uses a more nuanced approach. It’s not about creating a physically three-dimensional object; instead, it’s about carving a detailed relief map into the surface. When light hits these varied depths, it creates highlights and shadows that our brains interpret as a 3D image. Imagine running your fingers over a finished piece; you would feel a textured, contoured surface, and it’s this physical texture that produces the stunning visual illusion. The goal is to make an object look like it’s either emerging from the wood or receding into it, creating a truly captivating piece of art from a simple 2D design.
From Grayscale to Depth: The Magic of Mapping
The secret behind this illusion lies in how the laser interprets a special kind of image file: a grayscale depth map. Think of a standard black and white photo, but instead of representing light and dark, each shade represents a different height or depth. In this system, pure black typically instructs the laser to engrave at its highest power setting, creating the deepest point in the design. Conversely, pure white tells the laser to use minimal or zero power, leaving that part of the wood untouched and at its original height. Every shade of gray in between corresponds to a specific power level, resulting in a different engraving depth. Your laser software reads this grayscale “map” and translates it into a dynamic set of instructions, constantly modulating the laser’s intensity as it moves across the wood. The result is a smooth gradient of peaks and valleys carved into the material, which masterfully mimics the way light falls on a real 3D object. This is the core principle that transforms a flat image into a tactile and visual experience, especially powerful when laser engraving on wood where the charring from deeper burns enhances the shadowing effect.
3D Illusion vs. 3D Photo Engraving: What’s the Difference?
As you explore this technique, you’ll encounter the term 3d photo engraving, which is often used interchangeably with 3D illusion engraving. While the underlying technology is identical—both use grayscale depth maps to control laser power—their artistic application and typical source files can differ slightly. 3D photo engraving is primarily focused on recreating photographs with added depth and realism. The goal is to make a portrait or landscape feel more lifelike by engraving the image’s natural light and shadow information as physical depth. On the other hand, 3D illusion engraving often refers to designs specifically created to maximize the optical illusion. These are not typically photos but rather computer-generated models or patterns—think of a dragon’s head that seems to burst through the wood or intricate geometric shapes that appear to have impossible depth. The core process is the same, but the intent is different: one aims to add realistic depth to an existing image, while the other aims to create a striking, purpose-built illusion from scratch. Understanding both terms will help you find the right design files for your projects.
Choosing the Right Designs and Materials
Selecting the perfect piece of wood for your project is as crucial as choosing the right design. For 3D illusion laser engraving, your goal is a material that acts as a clean, consistent canvas. The best woods for this technique are hardwoods with a tight, uniform grain and a light, even color. A prominent, unpredictable grain pattern, like that found in oak or pine, can interfere with the optical illusion, as the dark lines of the grain compete with the shadows created by the laser. Instead, opt for woods that provide a predictable and smooth surface.
- Basswood: Often considered the top choice for beginners, basswood is soft, has an extremely fine grain, and is very light in color. It engraves easily and consistently, requiring less laser power and allowing the subtle grayscale details to shine through without much resistance.
- Cherry: A fantastic option that offers a premium look. Cherry has a fine, straight grain and a rich, warm color. When engraved, it darkens beautifully, creating a stunning natural contrast that enhances the 3D effect. It’s harder than basswood, resulting in crisper details.
- Maple: Known for its hardness and light color, maple is excellent for achieving incredibly sharp, high-definition engravings. Its dense structure holds fine details exceptionally well. You may need to use higher power or slower speeds, but the results are often worth the extra effort.
Regardless of the wood you choose, always ensure it is sanded smooth and is perfectly flat. Any warping or unevenness in the material will affect the laser’s focus and disrupt the precision needed for a convincing illusion.
Finding the Perfect Digital Blueprint
Once you have your material, you need a high-quality design file. The success of your 3D illusion laser engraving project hinges on the quality of its source file, which, as we’ve learned, is a grayscale depth map. A good design will have a full range of tones, from pure black for the deepest cuts to pure white for the untouched surfaces, with many shades of gray in between to create smooth transitions. High contrast and intricate detail are hallmarks of an effective design. Avoid files that are muddy, low-resolution, or lack a true black or white point, as they will produce flat, unimpressive results. When searching for 3d illusion laser files online on platforms like Etsy or specialized design websites, look for high-resolution formats like PNG, BMP, or TIFF. These formats handle grayscale information better than compressed JPGs, which can introduce artifacts that ruin the smooth gradients. To get your creativity flowing, consider some popular wood engraving ideas that work exceptionally well with this technique: detailed topographical maps, portraits of animals with rich textures like a lion’s mane, complex geometric patterns, or fantasy creatures that seem to be breaking through the surface of the wood. These types of designs have the inherent depth and detail that truly bring the 3D illusion to life.
Perfecting Your Laser Engraving Settings
Getting your design and material right is half the battle; the other half is fought in your software by perfecting your 3d laser engraving settings. Unlike standard engraving, 3D illusion laser engraving relies on a dynamic use of your laser’s power, modulated in real-time based on the grayscale information in your design. This means a “one size fits all” approach won’t work. The three primary settings you will manipulate are Power, Speed, and DPI (Dots Per Inch) or LPI (Lines Per Inch). Power determines how deep the laser burns; Speed controls how long the laser dwells on any given point; and DPI dictates the resolution or how many lines are engraved in each inch. For a successful 3D illusion, you must find the perfect balance. Too much power or too little speed will result in a charred, muddy mess with lost details. Too little power or too much speed will produce a faint, shallow engraving that lacks the depth needed for the illusion to take hold. Every piece of wood is different, so testing your settings on a small scrap piece of the same material is not just recommended—it’s essential.
Preparing Your Artwork and Laser Software
Before you even send the file to your laser, you must configure it correctly in your control software, such as LightBurn. When you import your grayscale depth map, you need to set the layer to the proper mode. This is the single most important software setting. Do not use dithering modes like Jarvis, Stucki, or Halftone. These modes are designed to simulate shades of gray on materials that can only be marked in one color (on/off). For 3D illusion laser engraving, you must use the Grayscale image mode. This mode instructs the software to directly translate the shades of gray into laser power levels. You will typically set a “Max Power” (corresponding to pure black) and a “Min Power” (corresponding to pure white). A good starting point is to set Max Power to a level that achieves a nice depth without excessive charring (e.g., 85%) and Min Power to the lowest possible setting that still makes a faint mark on the wood (e.g., 10-20%). This ensures that even the lightest gray areas receive some energy, helping to create a smoother, more detailed final product.
Starting Point Settings for Common Woods
The following are suggested starting points for a common 10W-20W diode laser. For CO2 lasers, your speeds will be significantly higher and power percentages lower. Always perform a material test grid first to find the optimal range for your specific machine and material when laser engraving on wood.
- Basswood: Being a soft wood, basswood requires less power and can be engraved at a decent speed.
- Speed: 2000-3000 mm/min
- Max Power: 70-85%
- Min Power: 10%
- DPI/LPI: 254-318
- Cherry: Cherry is denser than basswood and requires a bit more power or a slower speed to achieve similar depth.
- Speed: 1500-2500 mm/min
- Max Power: 80-95%
- Min Power: 15%
- DPI/LPI: 300-400
- Maple: As a very hard wood, maple needs the most energy. You’ll need to run it slower to allow the laser time to carve into the dense grain.
- Speed: 1000-1800 mm/min
- Max Power: 90-100%
- Min Power: 20%
- DPI/LPI: 300-400
The Engraving Process and Finishing Touches
With your settings dialed in, it’s time for the most rewarding step: watching your creation come to life. As you start the 3D illusion laser engraving job, it’s crucial to have your ventilation system running at full capacity and to use a strong air assist. Air assist is not just a recommendation; it’s a necessity for this technique. It blows a concentrated stream of air directly at the engraving point, which serves two vital purposes: it prevents the wood from flaring up and it clears away smoke and debris, resulting in a cleaner, less sooty burn. A clean burn means sharper details and better contrast, which are the cornerstones of a convincing illusion. Stay near your machine while it’s running, especially for long jobs. Listen for any unusual sounds and watch for excessive charring, which might indicate your power settings are too high for a particular section of the wood. This is a slow process, often taking several hours for a detailed piece, but your patience will be rewarded.
From Soot to Shine: The Cleaning and Finishing Process
Once the laser has finished its work, you’ll be left with a piece that is visually impressive but covered in a layer of fine, dark soot. Your first instinct might be to wipe it off, but you must be gentle to avoid smearing the residue into the grain of the lighter, unburned areas. Start by using a very soft brush, like a clean toothbrush or a paintbrush, to gently whisk away the loose particles. Follow this with a blast of compressed air to clear out the deeper crevices. For any remaining residue, lightly dampen a microfiber cloth or a shop towel with 90%+ isopropyl alcohol and gently dab or wipe the surface. The alcohol will evaporate quickly without raising the wood grain. This cleaning step is critical, as it prepares the surface for a finish, which is what will truly make your design pop. A proper finish not only protects the wood but also dramatically enhances the depth and contrast of the engraving, turning a good project into a great one.
Sealing the Deal: Applying a Finish
Applying a finish is the final touch that brings out the richness of the wood and the full potential of the illusion. For a 3d photo engraving, this step can make the difference between a flat-looking image and one that feels truly lifelike. Penetrating oils like Tung oil, Danish oil, or even simple mineral oil are excellent choices. They soak into the wood fibers, darkening the entire piece and saturating the colors, which makes the contrast between the light-colored peaks and the dark, charred valleys incredibly stark. Apply a thin coat, let it soak in for a few minutes, and then wipe away all the excess. For a more protective coating, a spray-on satin or matte lacquer is ideal. The spray application ensures an even coat without the risk of brush strokes filling in your fine details. Avoid high-gloss finishes, as the reflections can create glare that competes with the subtle shadows of the illusion. As the finish cures, you will see the details become sharper and the 3D effect grow even more pronounced. For those looking for more advanced wood engraving ideas, consider filling the deepest engraved sections with colored epoxy resin before the final sanding and sealing, or try combining a 3D engraved centerpiece with a traditionally vector-cut decorative border.
Conclusions
You now have the knowledge to create your own breathtaking 3D illusion laser engraving projects. By choosing the right materials, using high-quality 3d illusion laser files, and fine-tuning your 3d laser engraving settings, you can produce stunning pieces that will amaze. Don’t be afraid to experiment with different wood engraving ideas and techniques to develop your unique style.
Frequently Asked Questions
Q: What’s the best wood for a beginner in 3D laser engraving?
A: Basswood is highly recommended for beginners. It’s soft, has a very fine grain, and engraves consistently with lower laser power, making it easier to achieve good results while you learn to dial in your settings.
Q: Can I use a regular JPG photo for 3D illusion engraving?
A: While you can, it’s not ideal. The best results come from high-resolution grayscale depth maps specifically designed for this purpose, usually in formats like PNG, BMP, or TIFF. Standard JPGs can have compression artifacts that disrupt the smooth gradients needed for a convincing illusion.
Q: Why is air assist so important for this technique?
A: Air assist is crucial because it prevents flare-ups and clears smoke and debris from the engraving point. This results in a much cleaner, less sooty burn, which is essential for preserving the fine details and high contrast that make the 3D illusion work.
Q: My engraving looks dark and muddy. What did I do wrong?
A: A dark, muddy result usually indicates that your laser settings are too aggressive. This could be due to the power being set too high, the speed being too slow, or a combination of both. It’s essential to perform a material test grid on a scrap piece of the same wood to find the optimal balance for your specific machine.
Block "subscribe-popup" not found