Tutorials
A Beginner’s Guide to 3D Illusion Laser Engraving
Sep
Estimated reading time: 8 minutes
Key Takeaways
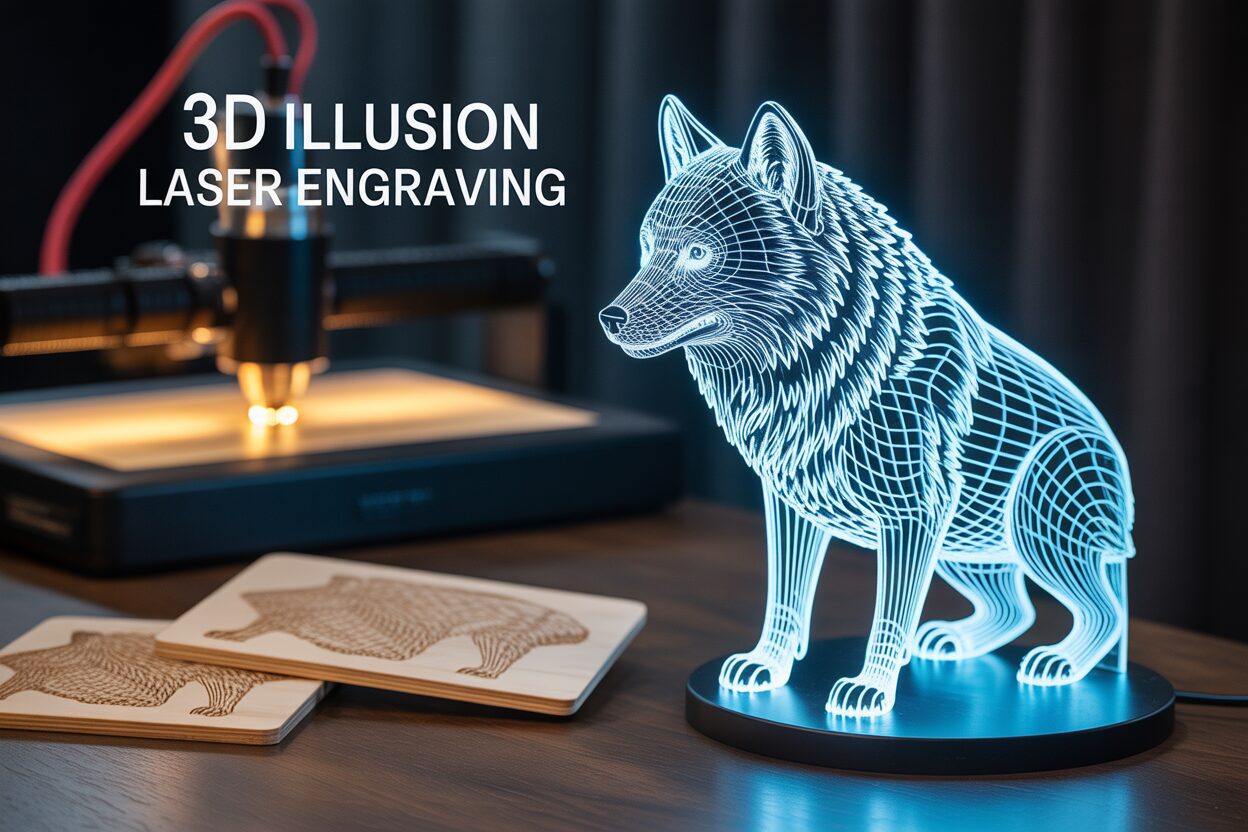
- Illusion Through Lines: 3D illusion engraving creates the perception of depth on a flat surface by etching meticulously designed patterns of lines. The spacing and thickness of these lines trick the brain into seeing shadows and highlights.
- Material is Crucial: The choice of material is fundamental. Cast acrylic is essential for creating illuminated lamps as it catches and glows with light, while light-colored woods like birch, basswood, or maple are perfect for high-contrast, non-illuminated designs.
- Quality Files are Paramount: Success begins with a high-quality 3D illusion laser file. These specialized files contain the precise line art needed to create the effect, not just a standard grayscale image.
- Test, Don’t Guess: Always perform a power/speed test grid on a scrap piece of your exact material before running the final project. This step is critical for dialing in the perfect settings for crisp, clear lines and avoiding wasted material.
Table of Contents
- Understanding the Magic Behind 3D Illusion Laser Engraving
- Selecting the Perfect Design and Materials
- Setting Up Your Laser for Optimal 3D Effects
- Bringing Your 3D Illusion Lamp to Life
- Conclusions
- Frequently Asked Questions
Dive into the fascinating world of 3D illusion laser engraving, a technique that transforms flat materials into breathtaking three-dimensional masterpieces. This guide will walk you through the entire process, from finding the perfect 3d illusion laser files to creating your very own illuminated 3d illusion lamp. Let’s turn ordinary wood and acrylic into extraordinary art.
Interested in more 3D Illusion? Check out our 3D Illusion laser file designs: Click here!
Understanding the Magic Behind 3D Illusion Laser Engraving
At its heart, 3D illusion laser engraving is a captivating form of artistic deception. Unlike true 3D carving or milling where material is physically removed to create different levels of depth, this technique operates entirely on a two-dimensional plane. The laser doesn’t sculpt a physical object; instead, it etches a highly detailed pattern of lines onto a flat surface. The magic lies in how this specific pattern manipulates our perception. Our brains are hardwired to interpret visual cues like light, shadow, and perspective to understand the world in three dimensions. 3D illusion engraving masterfully exploits these tendencies. By engraving a meticulously designed set of lines, the laser creates an image that tricks our eyes into seeing depth, curves, and contours that simply aren’t there. It’s a modern take on an old artistic principle, using a beam of light as the brush and a flat piece of material as the canvas to create a stunning optical illusion.
The illusion of depth is primarily achieved through the clever manipulation of lines within the digital design file. Think of it as a sophisticated form of shading, but executed with pure line work. The core principles at play are line spacing and thickness. Where lines in the design are spaced very closely together, the laser creates a denser pattern on the material. This dense area appears darker and is interpreted by our brain as a shadow, a surface curving away from us, or a feature that is further in the background. Conversely, where the lines are spaced far apart, the engraved area is lighter and appears to be closer or more directly illuminated. Line thickness adds another layer to this illusion. Thicker, bolder lines can be used to define prominent edges that seem to leap out at the viewer, while finer, more delicate lines can represent softer transitions or distant details. The combination of these variables allows a designer to simulate a full grayscale image using only engraved lines, creating a powerful sense of form and volume.
The Critical Role of a Well-Designed File
This is why the quality of the 3d illusion laser files is paramount to your success. These are not simple drawings; they are complex vector or raster images where every single line’s position, thickness, and proximity to its neighbors has been calculated to contribute to the overall effect. A skilled designer essentially takes a 3D model and translates its surface lighting and shadows into this unique line-based language. When you engrave a project like a 3d illusion lamp, the laser is precisely following this intricate map of lines. The final result is not just a picture on a surface, but a carefully constructed visual trap for the eye, turning a flat piece of material into an object that appears to have tangible depth and dimension.
The choice of material is equally crucial as it determines how the engraved lines interact with light. Two materials stand out for this technique: acrylic and wood. Clear cast acrylic is the premier choice for projects like illusion lamps. When the laser hits the acrylic, it creates a frosted, light-catching mark. On its own, this is subtle. But when an LED base illuminates the edge of the acrylic sheet, the engraved lines catch that light and glow brightly, while the untouched areas remain transparent. This stark contrast between the glowing design and the clear background creates a breathtaking, hologram-like effect. Wood, on the other hand, offers a more rustic and organic aesthetic. The laser burns the wood’s surface, creating dark, high-contrast lines against the lighter, natural grain. Light-colored woods such as birch, basswood, or maple are ideal because they maximize the visual difference between the burn and the raw material, making the illusion pop. Each material provides a different canvas, but both rely on the same principle: creating strong visual contrast to sell the illusion of depth.
Selecting the Perfect Design and Materials
The foundation of a successful 3D illusion project is the digital file itself, as it contains the precise map of lines your laser will follow. When sourcing files, you’ll encounter two main types: raster and vector. Raster files (like JPG, PNG, or BMP) are made of a grid of pixels. Vector files (like SVG, AI, or DXF) are made of mathematical paths. For many laser applications, vectors are preferred for their clean cuts and scalability. However, for 3D illusion engraving, the lines between file types blur. The engraving process itself is a raster operation—the laser head moves back and forth, firing at specific points, much like an inkjet printer. Therefore, the most important factor is not the file extension but the content of the file. High-quality 3d laser engraving files are specifically designed with varying line spacing and thickness to produce the illusion. Whether it starts as a vector or is delivered as a high-resolution raster, the file must contain this deliberate line art, not just a standard grayscale image. When choosing a design, look for one with strong contrast and clear depth cues. Designs with a single, well-defined subject tend to work better than cluttered scenes. Inspect the file by zooming in; you should see distinct, clean lines, not blurry pixels or muddy grayscale patches.
Sourcing Designs and Choosing Your Wood
Finding the perfect file is easier than ever. Online marketplaces like Etsy are a treasure trove of designs created by artists who specialize in this niche. Search for terms like “3D illusion laser file,” “hologram lamp SVG,” or “laser line art.” Many digital design websites also offer bundles of files perfect for getting started. When you have your file, the next choice is your canvas. For laser engraving wood projects, the goal is to achieve maximum contrast between the engraved lines and the natural wood. This makes light-colored woods with a tight, uniform grain the superior choice.
- Baltic Birch Plywood: An excellent and affordable all-rounder. It’s stable, light in color, and its smooth surface takes engravings very well.
- Basswood: A favorite among hobbyists. It’s a soft, very light-colored wood with an almost invisible grain, which ensures that the engraved lines of your illusion are the star of the show without any distraction.
- Cherry: While slightly darker, cherry wood engraves to a beautiful, rich, dark brown, creating a stunning and warm contrast that gives the final piece a premium look.
- Maple: A dense, light-colored hardwood that produces incredibly sharp and clean engraved lines. Its durability makes it great for high-quality keepsakes.
Avoid woods with prominent, uneven grains like oak or pine, as the natural dark lines in the wood can interfere with the engraved lines, weakening the 3D illusion.
When it comes to creating a vibrant 3d illusion lamp, not all acrylic is created equal. The material you must use is cast acrylic. This is non-negotiable for achieving the best results. When the laser engraves cast acrylic, it creates a crisp, white, frosted mark. This frosted surface is brilliant at catching and refracting the light from the LED base, causing your design to glow intensely. The alternative, extruded acrylic, is cheaper but should be avoided for this application. Extruded acrylic tends to melt rather than vaporize when hit by the laser, resulting in a clear, less visible engrave with gummy edges that does not catch the light well. The ideal thickness for an acrylic lamp panel is typically between 3mm and 4mm (approximately 1/8 inch). This thickness is sturdy enough to stand securely in a lamp base yet thin enough to allow the light to travel up through the entire design effectively. Always remember to leave the protective paper or plastic film on both sides of the acrylic sheet during the engraving process. This protects the surface from scratches and prevents smoke residue from staining the clear areas, ensuring a perfectly clean result.
Setting Up Your Laser for Optimal 3D Effects
Once you have the perfect design file and material, your success hinges on correctly configuring your laser. A 3d illusion laser engraving is not about brute force; it’s a delicate dance between three critical parameters: Power, Speed, and DPI (Dots Per Inch) or LPI (Lines Per Inch). Power dictates the intensity of the laser beam—too high, and you’ll get excessive charring on wood or melting on acrylic; too low, and the lines will be faint and lack contrast. Speed is how fast the laser head moves across the material—slower speeds allow for a deeper, darker burn, while faster speeds result in a lighter mark. Finally, DPI/LPI determines the resolution of your engrave by setting how many lines are engraved per inch. A higher DPI packs the lines closer together, creating a more detailed image. The secret to a stunning illusion is finding the precise balance where these settings produce sharp, clear lines that maximize contrast without damaging the surrounding material.
The single most important step in this process is performing a material test, often called a power/speed test grid. Never engrave your final workpiece without first dialing in your settings on a scrap piece of the exact same material. Most laser software, like LightBurn, has built-in tools to create these test grids automatically. This grid creates a series of squares, each engraved with a different combination of power and speed. When you run this test on wood, you are looking for the square that has a dark, crisp line with minimal charring or “bleed” into the wood grain. You want a clean mark, not a deep, burnt trench. For acrylic, the goal is different. You are looking for the square that produces the brightest, most opaque, frosted white mark. You want to avoid settings that cause the acrylic to melt and become clear again, as this will not catch the light from the lamp base effectively. This test removes all guesswork and is the key to repeatable, professional-quality results.
Example Settings and the Final Cut
While your material test is the ultimate authority, here are some general starting points for popular 3d illusion laser files. These will vary based on your specific machine’s actual power output and the exact material you are using.
- For a 10W Diode Laser on Birch Plywood: Try a speed of around 3000 mm/min, power at 60%, and an LPI of 254-300.
- For a 10W Diode Laser on 3mm Cast Acrylic: Start with a faster speed of around 4000 mm/min, lower power at 40-50%, and an LPI of 254-300.
- For a 50W CO2 Laser on Birch Plywood: You can move much faster. Begin with a speed of 300 mm/s, power at 18-22%, and an LPI of 300-400.
- For a 50W CO2 Laser on 3mm Cast Acrylic: Speed can be very high. Try 400 mm/s, power at 15-18%, and an LPI of 300-400.
After your engraving pass is complete, your project might still be part of a larger sheet. To free it, you’ll need a separate cutting pass. This is especially common for a 3d wood design laser cut project or an acrylic lamp insert that needs a specific shape. In your software, you will set up a new layer for the outline of your design with completely different settings. The goal of a cut is to go all the way through the material, so you will use a very slow speed and high power (e.g., 100% power, 10 mm/s), often requiring two or more passes depending on the material’s thickness.
Bringing Your 3D Illusion Lamp to Life
With your laser settings dialed in from your material test, it’s time to bring your project to life. The process begins in your laser control software, such as LightBurn. Start by importing your chosen 3d laser engraving files. A well-designed file for a 3d illusion lamp will typically have at least two distinct layers: one for the detailed engraving and another for the outer cutting line. Assign the engraving layer the optimal power, speed, and LPI settings you discovered during your material test. For the cutting layer, apply the slow-speed, high-power settings required to cut cleanly through your material. It is critically important to ensure the tab at the bottom of the cutting outline is the correct width and thickness to fit snugly into the slot of your LED lamp base. Measure your base’s slot with calipers and adjust the cutline in your software if necessary before proceeding.
Next, prepare your material in the laser bed. If using acrylic, leave the protective paper or plastic film on both sides. This is a crucial step that prevents smoke stains on the clear surface and protects it from scratches. Place the sheet on your machine’s bed, ensuring it is perfectly flat. Use hold-down pins or honeycomb magnets if needed to prevent any warping. Set your laser’s focus precisely to the top surface of the material (including the protective film). In your software, use the “Frame” function to trace the job’s outer boundary. This allows you to visually confirm that the design is positioned correctly on your material, avoiding waste. Once you are satisfied with the placement, close the lid of your laser engraver, turn on your air assist and ventilation, and send the job to the machine. Always run the engraving pass first, followed by the cutting pass. This ensures the piece remains stable and in perfect focus for the intricate details before it is cut free.
Cleaning and Assembly for the Perfect Glow
Once the machine has finished, carefully remove the cut piece. The magic is hidden under the protective film. Gently peel the film from both sides of the acrylic. You’ll likely see some fine dust or residue from the engraving process. To clean it for maximum clarity, avoid abrasive paper towels. The best method is to use a soft, clean microfiber cloth. If there is stubborn residue, you can lightly dampen the cloth with isopropyl alcohol and gently wipe the surface. Hold the acrylic by its edges to avoid getting fingerprints on the main viewing area, as these smudges will catch the light and mar the illusion. For a wood project, you can clean any light soot from the surface by gently dabbing it with masking tape or using a soft-bristled brush.
The final step is the most rewarding: assembling your 3d illusion lamp. Take your clean, gleaming acrylic panel and carefully insert the tab at the bottom into the slot of the LED lamp base. It should be a snug fit. If it’s slightly loose, a small drop of clear superglue on the sides of the tab (not on the bottom, where the LEDs shine) or a tiny piece of clear tape can secure it. Plug in the base, turn it on, and dim the lights in your room. Watch as the engraved lines catch the light and your flat piece of acrylic transforms into a glowing three-dimensional object. Experiment with the different color settings on the remote; you’ll find that certain colors, like white, blue, or red, can make the details pop more than others, allowing you to customize the mood and highlight the incredible depth you’ve created.
Conclusions
You now have the foundational knowledge to create your own stunning 3D illusion laser engraving projects. By choosing the right 3d laser engraving files and mastering your machine’s settings, the possibilities are endless. Don’t be afraid to experiment with different materials and designs to develop your unique style. Start creating and bring your illuminated visions to life!
Frequently Asked Questions
Q: What is the difference between 3D illusion engraving and real 3D carving?
A: 3D illusion engraving works on a flat, 2D surface. It uses carefully spaced lines to trick your eyes into seeing depth. Real 3D carving or milling physically removes material to create different levels and a true three-dimensional shape.
Q: What is the absolute best material for a 3D illusion lamp?
A: Cast acrylic is the non-negotiable choice. When engraved, it creates a frosted white mark that brilliantly catches and scatters light from an LED base, making the design glow. Extruded acrylic should be avoided as it melts and does not light up effectively.
Q: Can I use a regular photo or image for 3D illusion engraving?
A: No, a standard image or grayscale photo will not work. You need a specialized 3d illusion laser file where the depth, lighting, and shadows have been translated into a specific pattern of lines with varying thickness and spacing. This line art is what creates the illusion.
Q: Do I really need to do a material test every time?
A: Yes. This is the single most important step for getting professional results. Materials can vary slightly, even from the same supplier. A quick test grid on a scrap piece guarantees you have the perfect power and speed settings for a crisp, high-contrast engrave without wasting your main workpiece.
Block "subscribe-popup" not found